Star News


DIY organizer for chargers. How easy is it to organize the storage of wires at home? What do we need
Everyone has a lot of wires, cords, chargers from gadgets (phones, players, cameras, navigators, etc.). And often this category of things in comparison with such as clothes, shoes, accessories, is in complete disarray. Our new author, a professional organizer of the space, Nadezhda Avvakumova, has already started talking about the practically “forbidden” - cleaning in wires and various other male devices. In this article, we will continue the topic and analyze several ways to store and organize wires, cords, chargers.
boxes
Boxes, whether they are cardboard or plastic, are a great place to store anything. And if you think through their interior space wisely, it will turn out to be a good idea to organize all the wires, cords and chargers in the house. Here are a couple of ideas on how to do this:
If we divide a simple box into compartments with cardboard, sign each cell and put the wires there, then it will not be difficult for you and your household to find the right one. You can even allocate a separate box for some gadgets, as Eteri did, giving the name to one of them - “Computer Accessories”. The main thing after use is to send the cord back to your cell. No time to do handmade? Ours with many small cells will also do a great job of storing wires.
Budget and eco-friendly option - make in tubes from toilet paper or in cardboard sleeves each wire has its own "house". And to make them look pretty, decorate with decorative tape or paste over with paper. It will be possible to give a second life and cups. Any plastic will do. Simple, convenient and affordable.

box can be used and as storage for phone chargers. Make small holes in the side walls. On one side there will be plugs that you can plug into a tee or socket, and on the other - a plug. Such a box can become an element of decor.

But an important note - this is not entirely safe. An alternative could be special boxes. So, all the gadgets that require an additional network connection will not create havoc. First of all, this applies to long cables, endlessly winding and hanging from the desktop and creating an untidy look.

Organizers
Organizers do not take up much space and allow you to keep some quivering little things, such as headphones and a charging cable, safe and sound.
For needlewomen - a couple of ideas on how to sew pockets and cases for wires and chargers.

There are many options on the market. In the pockets you can store everything you want, up to the TV remote control.

An indispensable accessory - . They can be used both when traveling and for storing wires at home.

Budget option - fold infrequently used cords in a cosmetic bag how does it Elena. Since rarely anyone uses different wires in the house, they are stored with shop wire. Another cosmetics organizer adapted for wire storage Julia. It's beautiful - and you can see that it's lying, but the only drawback, perhaps, is that "no one puts anything back."

Hooks
For those who are too lazy to put the wires into organizers, take them out, and then put them back in place, there is a way out - try hanging them on , holders. If desired, you can even install them away from the eyes, for example, on the cabinet door.

How to fasten wires for easy storage
If you have a dedicated box for wires, then no matter how carefully you try to fold them, they will definitely get tangled together. The following ways of organizing will help solve this problem, and there will always be order and extra space in the drawer:
Binders (stationery clips). Easy to attach, easy to remove. It is possible to use for fastening wires both at the workplace and in the box, as in Anastasia.

Who prefers store options, then on sale are now available and holders for compact storage and placement of large cables and wires.

rubber bands(for hair, for creating children's bracelets, for money) are very convenient and affordable. Evgenia uses them to store cords, chargers, and Anna additionally winds them up with a net and stores them in a container.

Special Velcro help to clean up the tangled wires in the workplace.

Plastic ties. Available in disposable and reusable. Useful for collecting wires and cables spreading throughout the house, as in the example in the photo of my colleague Helena.

Budget option - wrap the wires with self-adhesive colored bookmarks so you can easily find what you need.

Ideas for hiding wires in your home
How to make sure that the wires at the computer desk do not create chaos? Very simple! Use one of the ways to fasten them above!


And in order for the chargers to be in the same place, organize their storage in one of the drawers of the chest of drawers.

Hiding wires can also be the highlight of your decor!


What tricks and ideas do you have for storing wires, cords and chargers? We are very interested to know! Share your photos in our groups
Quickly and from improvised materials.
Let's not argue about the benefits of order and trust the wisdom and experience of people from different eras and generations:
You need to put things in order when there is still no turmoil. - Lao Tzu
Order saves time. – Johann Goethe
Order frees thought. – S.P. Korolev
Putting everything in order is impossible, let's start with ourselves. Most of the day, many of us spend at the desktop with a bunch of necessary and unnecessary junk. We are literally entangled with wires, chargers, adapters and other electronics. Why not streamline it all?
To solve the problem, I propose to make a simple organizer. Any of the available means can make it. You may have to buy something, but penny spending is not comparable to the benefits that our product will bring.
What do we need
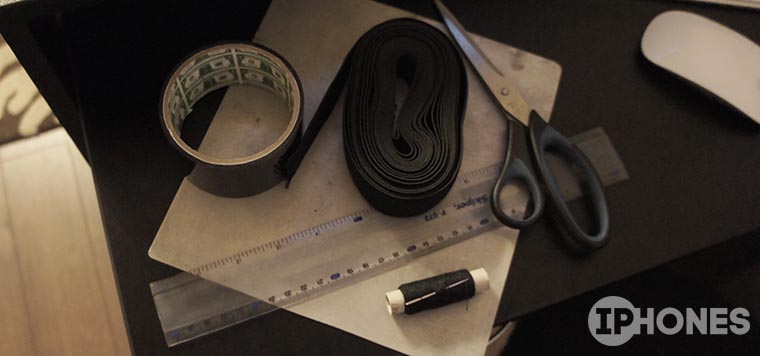
- base for the organizer (any flat object of suitable size);
- elastic band for clothes (we will calculate the length below);
- thread, needle, scissors, adhesive tape (optional);
- up to one hour.
The basis
1. First you need to decide on the size of the future organizer. I recommend making it so that it fits in a drawer or on a certain shelf without any problems.
We are looking for a place for the future organizer, measuring the length and width of the space.
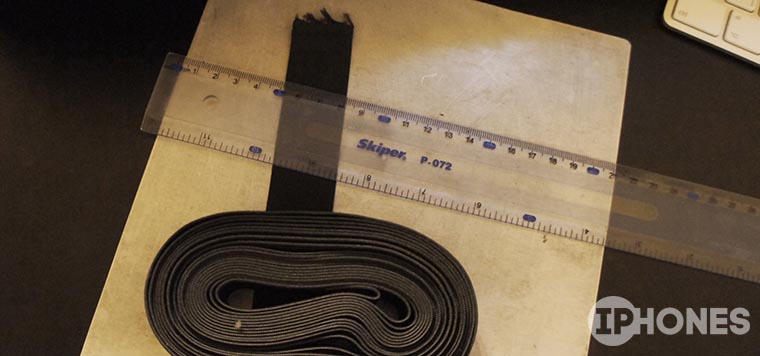
2. Now we need a base that will fit into the allotted place without any problems. As a frame, you can use a plank, a very dense piece of cardboard, chipboard / kragis / plywood. A metal plate, plexiglass will do, you can take a box from a dvd disc or an old vinyl record (by cutting a square out of it) as a basis.
There is only one condition for the base - it must ensure the rigidity of the structure and not bend. For example, I found a suitable piece of galvanized steel in the pantry.
3. To make the finished product look beautiful, I glued it with black tape (in the color of the rubber bands used). Those who do not aim for the aesthetic appearance of the organizer can skip this step.
Rubber
4.
Most likely, the required amount of gum will not be at home, for it you will have to take a walk to the fabric store. There you can choose a ribbon of any color and width.
- we divide the length of the base by the width of the tape - we get the number of vertical stripes (we take into account only whole stripes);
- multiply the number of stripes by the width of the base and multiply the resulting length by two (the stripes will encircle the frame on both sides);
- now we similarly divide the width of the base by the width of the tape - we get the number of horizontal stripes (we take into account only whole stripes);
- multiply the number of stripes by the length of the base and multiply the resulting length by two (the stripes will encircle the frame on both sides);
- add the two numbers that were obtained in the second and fourth steps and get the required length of the tape.
5.
Now the gum needs to be cut into strips (vertical and horizontal). We have already counted the number of stripes, the length of the vertical ones is equal to twice the width of the base, and the length of the horizontal ones is equal to twice the length of the base. In other words, each strip should encircle the frame without overlap. 
6.
The most painstaking process is the stitching of rings from strips. Pre-scorch the edges of the ribbon on the fire and you can start making rings. 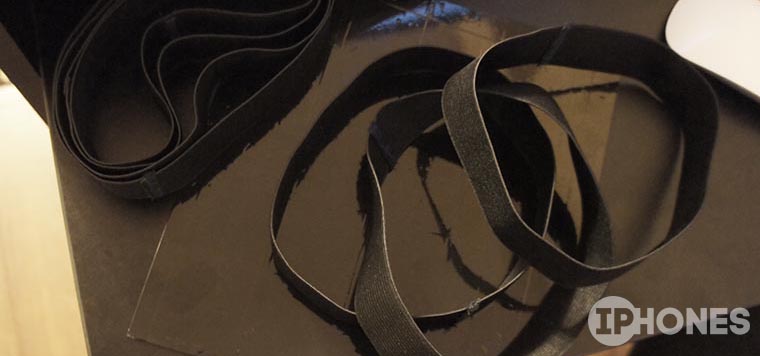
We make a small overlap of 3-4 mm. and sew the ribbon into a ring. You can ask your wife for help, especially if she knows how to work on a sewing machine.
Weaving

7.
When all the gum rings are ready, we begin to put them on the base. First we put on all the vertical stripes.
8.
Now, one by one, we begin to put on horizontal ones. They need not just be put on top, but threaded through one vertical one. 
Each next strip is threaded in a checkerboard pattern. 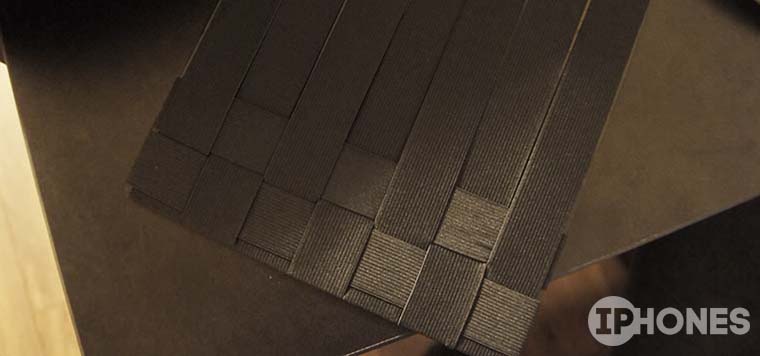
9.
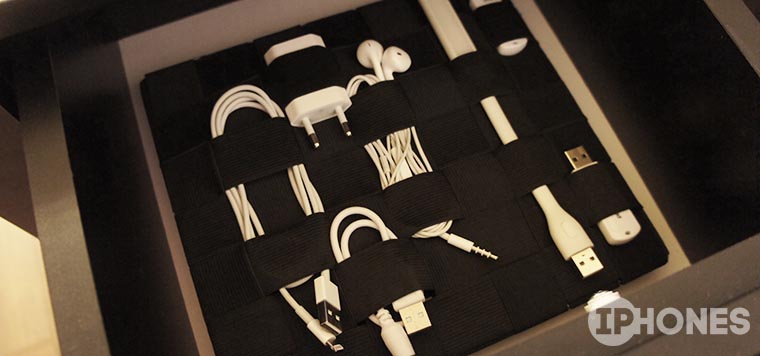
The result is a beautiful checkered organizer. 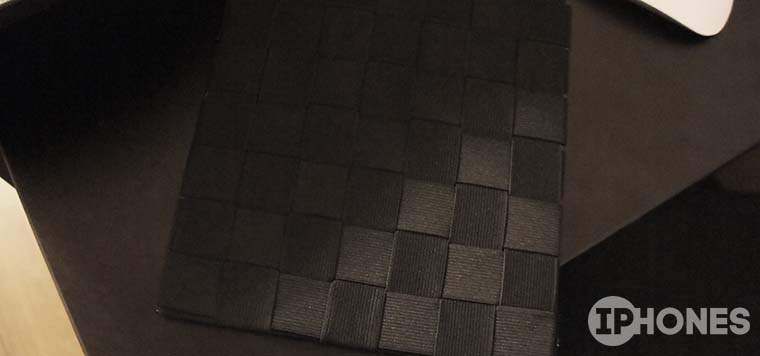
We fill
Such a product can be filled with any small things stored in the table. Place wires, adapters, batteries, memory cards and flash drives, chargers and headphones in the organizer. 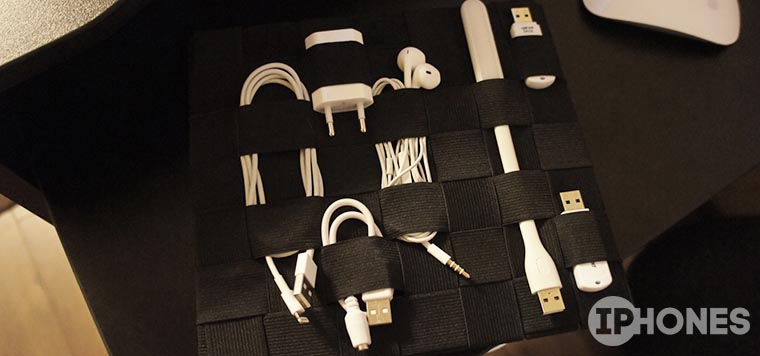
All elastic bands are held in place quite confidently, but you can additionally flash them around the perimeter. This process is quite painstaking, I would not recommend starting it right away. 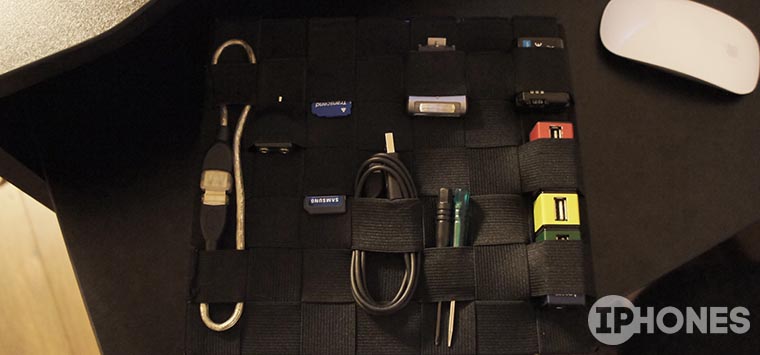
While the elastic bands are not sewn, you can try to change the shape of the organizer so that not only small items can be placed in it, but also large ones. 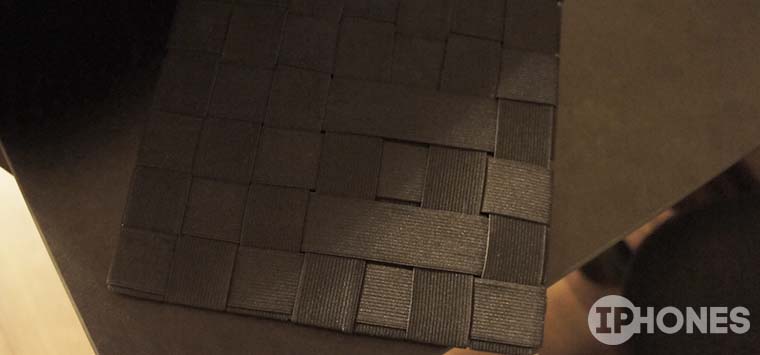
To do this, in a certain place, when weaving an elastic band, we skip the required number of intersecting rings. We provide the size of such loops according to the dimensions of the device that we will wear in the organizer. 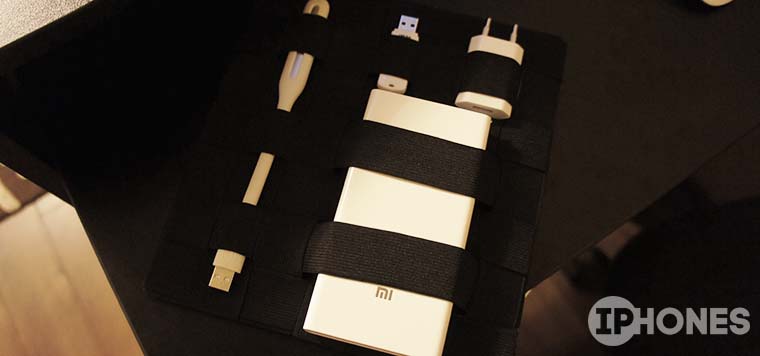
A few days later, when the final weaving pattern is approved, you can sew the elastic bands around the perimeter or glue them with Moment glue. If the organizer will not be used in the most active way, you can not sew or glue the elastic bands.
Bonus

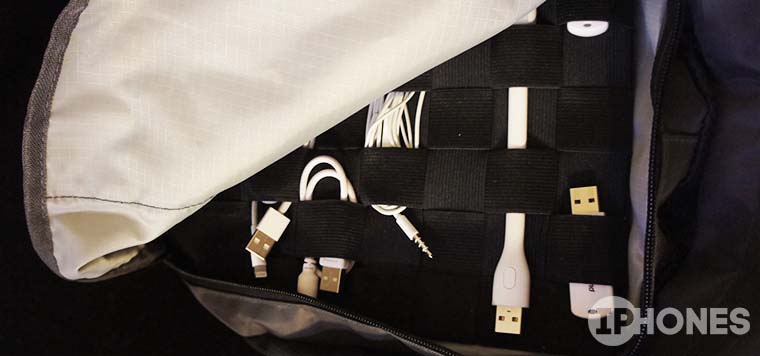
Our organizer can be stored not only in a desk drawer, it will perfectly cope with its functions on the road or travel. Preliminary consider the size of the product so that later it can be placed in a bag or backpack.
HOW TO HIDE THE WIRES
The problem of wires, cords and cables getting under your feet will probably be relevant until absolutely all devices become wireless. Then blessed times will come and all these snake balls of tightly tangled wires will be forgotten like a nightmare. I hope that it will be very soon, but in the meantime, let's try to somehow disguise these recalcitrant writhing, dust-collecting and spoiling the interior cords using a variety of methods.
The most thorough way to hide cables and wires is to hide them in the wall, under the floor or hide them under a false ceiling. True, this is done even before the repair stage. Also a very popular way are special skirting boards with built-in cable channels. These skirting boards are attached with clips, so in order to remove or place the wire under the skirting board, you just need to remove it and then fix it back without any tools.
Well, if the repair has already been done, then in this case there are only different ways of disguise. You can mask the wires using commercially available white or wood-colored plastic boxes. The body of the box is attached to the wall, wires are laid inside it and closed with a lid-plate.
However, from an aesthetic point of view, this is not the best solution. Such boxes do not look very nice and are more suitable for offices.
If you don't want to ruin your interior with plastic, try using bamboo or other hollow reeds. Cut the bamboo trunk in half, attach one half to the wall, lay a wire in it, and close the trunk with the other half, putting it on glue. The result is very decorative bamboo poles on the wall, especially suitable for Japanese-style rooms.
Here is another original way to hide the wires for those who have flat baseboards installed. With the help of such a pretty fence, you can quite successfully hide all the wires running along the wall.
If the wires go straight along the wall, then you can not hide them, but decorate them with original plastic leaves and a bird. You can make such things yourself from unnecessary plastic bottles of beautiful colors, for example, from ketchup, shampoo or detergent.
Most of the wires usually accumulate in the area of \u200b\u200bthe computer desk. The computer itself and its peripherals create a whole jungle of wires and cables. One way to somehow organize this jungle is to put all the wires going in the same direction all together with the help of different devices.
These can be ordinary flexible wires that are used to twist new cords and wires when packing new equipment, disposable ties or special Velcro strips, like mine.
These Velcro tapes are very easy to make yourself, because Velcro is sold in any needlework or sewing department. There are also special corrugated or spiral cable organizers. All cables going in one direction are put into this tube and the result is one thick pipe.
A popular budgetary way to combine all the wires is to put on a golf jacket or a stocking from pantyhose.
But what if all the wires go in different directions? Then they can be put on the back edges and legs of the table, secured with special loops or with tape (if you don't want the tape to leave marks, use masking tape).
Or you can use special gutters that are hung from the countertop, and wires and extension cords are placed in it.
You can hide all the wires, small devices and extension pilots under the top of the computer table. True, for this you will have to drill holes in it. In stores like Ikea, a special wire organizer basket is sold, which is attached under the countertop.
And in order to know which wire belongs to which device, labels with device names should be attached to them.
And here is a way to hide the wires behind the table, requiring almost no effort. All you need is a single Styrofoam Ceiling Tile that can be used to simply block out the tangle of wires out of sight!
Behind the TV there are also a lot of wires. For them, you can adapt a plastic or cardboard box with holes.
For computer wires, you can arrange a box in the form of a large button from the keyboard.
Today, let's take a look at and put in order the numerous coils of cords, wires and cables that appear in the house literally from nowhere and begin to gradually accumulate, entangling our house with their "tentacles". Taking advantage of the fact that we cannot just take them and throw them away, since nevertheless they are sometimes useful and are useful in some situations, these unbearable balls, skeins and bundles accumulate in boxes, drawers of tables, on the balcony, on mezzanines and in pantries. . Let's finally try to sort out all these intricacies, put them in order and organize them so that later, at the right time, you can easily find them.
What is usually the habitat of extra cords and wires? As a rule, they are lying around the house, and when the need arises for them, you won’t find them with fire during the day! But, let's say we decided to put all these cords together - then what will we get? In this case, it will be some kind of cardboard box, box or old bag, where all the wires are collected indiscriminately, lying there at random, at best wound into a ball, at worst - tangled with each other in one heap. How to order and organize them in such a way that, firstly, you know which wire is from what and, secondly, you know where to find it at the right time?
We will not dismiss a cardboard box (or maybe more than one) as a way to store wires in order. In the end, this is the most accessible and common container for storing anything. But, if you want aesthetics and beauty, then of course, you can pick up some pretty basket (wicker or plastic), a fabric box or a transparent plastic container and put all the wires into it. The most important thing is how to put them there!
Here is what the box with wires looks like before and after putting things in order:
To begin with, put all the wires in the house into several piles (especially if you have quite a lot of them) according to their purpose. For example, wires for a computer - in one pile, audio / video cables - in another, extra cords and chargers from mobile devices - in a third, etc. The main thing is that they do not lie around your apartment. Note that now we are talking only about extra wires and cords, which we will keep just in case. I already wrote about the masking of existing wires in the article, and I will write about the storage of chargers, headsets and headphones of those mobile devices that you use right now in the next article.
So, we put all the wires in piles, and now they should be untangled, disconnected and signed. And the best way to do this is considered to be the use of such simple items as cardboard rollers (rollers) from toilet paper or paper towels, empty clean juice boxes and transparent bags with slider locks. So, as I warned in the article “Not everything that seems unnecessary is garbage”, from now on, do not rush to throw away the things listed above, but try to save them and use them to store wires.
Again, for lovers of prettiness, I can advise you to decorate toilet paper rolls with a beautiful wrapping film or self-adhesive film using this instruction:
Step 1. We will need a cardboard roller, a rectangle of wrapping paper, the width of which should be 2-3 cm longer than the length of the roller, and the length should be such that the roller can be wrapped, tape and scissors.
Step 2 We turn the tube out of paper, connecting the edges with tape.
Step 3 We insert the roller into the tube, and cut the excess ends and wrap it inside the roller and fix it with adhesive tape (or, if it is self-adhesive, it sticks inside itself).
Result: it turned out a beautiful tube for storing a coil of wire. If you want, you can make an inscription on the tube about what kind of wire it is and what device it is from.
But not every wire can fit into such tubes. For example, chargers with large adapters will not fit into them. This is where boxes of juices, milk or breakfast cereals come in handy. Of course, they will need to be prepared first: cut off the tops, beautifully process the edges (with the same self-adhesive), wash and dry (if they had a liquid product). It is also a good idea to put each cable bundle in a separate transparent bag with a lock - then everything will be visible, clearly and at the same time neat.
Another good idea is to use foam insulation instead of cardboard rollers, which are usually sold in repair or housekeeping departments. The wires tied into a coil are perfectly placed in them and are also stored separately and do not tangle with each other.
As a result, after applying all these methods, you will get one or more boxes or baskets with ordered and neatly laid wires. It remains only to find a suitable place for them and from now on you will not need to run around the house in search of the right cord or cable!
Hello everyone! Often, when trying to organize our home, we forget about the details, which are very important and not conspicuous. First of all, we start thinking about storing clothes, kitchen utensils, books or cosmetics. But the wires from chargers, adapters, headphones continue to be in disarray. Therefore, the purpose of this article is to give you an idea that will help you choose the best way for you to organize your cords.
How to organize wire storage: the best ideas
It's very simple, let me tell you. You can create some of their organizers with your own hands, or you can not work, but just go to the store and purchase at very low prices. By the way, I saw a lot of similar things on Aliexpress, this is just a godsend for hostesses.
If you are constantly losing headphones from your phone, or charging from your camera, then immediately start reading the post. And then create a place that will become a permanent refuge for them.

Toilet paper rolls. An unexpected decision, right? A cheap and very easy way to collect wires, twist and put inside. By the way, you can store them not only in a basket, but also in a drawer, like an organizer. If you don't want to wait until you run out of toilet paper, you can buy cardboard and make your own. And to make them look decent, decorate with decorative tape or paste over with paper.

Boxes. The second and very easy way to eliminate clutter is to make boxes out of storage. The photo above shows the best option, when the inside of the box itself is divided by partitions, beautifully designed and signed by each cell. Now you will never get tangled up in wires, chargers and headphones. And never throw away shoeboxes!

If your hands are not hooks, you know how to sew and have a desire to create something, then this option is for you. A simple fabric organizer for storing wires with elastic bands can not only be twisted, but also hung on a hook, for example, under a table.

Well, for those who are not familiar with sewing, a ready-made organizer bag is suitable. This is a great way to collect and organize chargers, cords and other tech accessories neatly. In addition, it is very convenient to take it with you.

In one of the articles I wrote about how to use . So, I really liked the idea of folding the cords there. Agree a very convenient option.


There must be order both on the table and under it. It is not only beautiful, but also safe. Randomly scattered and disorganized wires create a fire hazard. Therefore, take this matter seriously.
The best, in my opinion, way to assemble the wires together is to use Velcro or clerical clips. And adapters and power supplies in special containers that can be bought or made from a shoe box.


A special solution was invented for headphones - cut a rectangle out of thick paper, make two longitudinal cuts on top, at the end of which cut out circles. Insert the speakers themselves into them, and wind the rest of the wire around the workpiece. Now you will not need to constantly unravel the knots.


Sockets on the walls often also accumulate various kinds of wires and chargers. Organizing them is easy enough. There are special devices that are attached with the charger or wires next to it and are used safely without creating a sense of clutter.
This is how I suggest you organize the storage of wires in your home. Share your ways! See you soon!
A simple and elegant way to organize a place to charge your smartphone - railing and hanging shelf-basket. It will not be difficult to repeat such a decision in your own home, while the costs will be minimal, and the result will definitely please.
2 In a drawer
A slightly more labor-intensive option, which, however, allows you to completely hide all charges and wires from your eyes, is a station for gadgets in a drawer (desk, chest of drawers or kitchen set).

If you have a lot of different electrical appliances that require recharging, choose a box with more space. A very elegant, and most importantly, practical solution to the problem of wires, isn't it?

3 On the shelf
Fans of placing the phone on charge at night - and certainly next to the bed! - another neat solution will please: a bedside mini-shelf with a connector for connecting gadgets. Such a shelf clings to the side of the bed - and makes it possible (say, a remote control from a TV or air conditioner).

However, you can also choose a very compact option, like this mini-shelf, which is mounted directly on the wall next to the outlet.

Smartphone shelf. Price: 98 rubles. Photo: AliExpress
4 On the docking station - organizer
Modern manufacturers are well aware that without a smartphone, a modern person is nowhere, and therefore they offer many stylish solutions for organizing a stylish and convenient station for recharging gadgets.
There are various docking stations with an organizer function that allow, in addition to the phone, to neatly arrange watches, rings, business card holders and other important little things.

5 for pots
Another tricky move that allows you to hide smartphone chargers in the interior is docking stations in the form of planters with succulents.

Design: suitetreatments.com
Look what a stylish decorative thing, and most importantly, no one will guess that it hides a lot of wires.

Design: suitetreatments.com
6 In a stylish case
Another idea that helps is a stylish case that hides all kinds of charges and disguises them as a decorative accessory.

Design: IKEA
7 In a special box
However, there are also stylistic neutral boxes for wires that help to neatly organize a place for recharging gadgets.

Design: IKEA
Take a look at this option with AliExpress. You can hide a whole extension cord in it and use it to recharge various devices.

Boxing for wires. Price: 838 rubles. Photo: AliExpress
8 Wireless technologies
A modern solution - a neat and stylish docking station for wireless charging of a smartphone or tablet. Of course, this solution is unlikely to be suitable for those who have a whole arsenal of gadgets that require recharging. But it will help out those who want or space on the bedside table - and solve the issue with the wires from the phone charger.
9 On the shelves
The most ordinary shelves can also help out in organizing a place for phone chargers.
The advantages of this solution:
- shelves can be placed almost anywhere (selecting the actual length and width);
- finding models that match in color and style to your interior is not difficult;
- the cost of such a solution is very democratic.

