Star news


How to change the wiring in an apartment with your own hands. How to replace old electrical wiring in a house
Replacing wiring in an apartment is a fairly common event. The need for this process is most often determined by the fact that old cables include an aluminum core that is not adapted to modern power. Such systems are not always able to withstand the loads placed on them by a large number of electrical appliances. Before replacing the electrical wiring, you need to familiarize yourself with the sequence of work and recommendations for each item.
In what cases is it necessary to replace electrical wiring in an apartment?
Most often, this operation is performed if the electrical system does not meet modern requirements. Today, the load on the network has increased several times, since almost every family uses powerful electrical appliances (washing machine, boiler, etc.).

Until recently, cables in electrical systems included aluminum cores. Although this metal is a good conductor, it has many disadvantages. For example, it has poor resistance to corrosion. And also during operation, changes occur in the structure of aluminum itself. Wearing metal increases the likelihood of a fire resulting from a short circuit.
The service life of aluminum wiring does not exceed 15 years, while copper cables can be used for up to 30 years. From a safety point of view, copper wires are the most acceptable. The most common problems with old electrical networks made of aluminum:
- neutrals are solidly grounded (instead of protective);
- outdated cable routing method;
- lack of circuit breakers;
- minimum number of sockets.

You should think about replacing the electrical system in an apartment when the old system has been in operation for more than 20 years, as well as when signs of network wear are detected. Among these criteria, we can highlight those that are easiest to detect. For example, sparking sockets are a warning that you should not turn a blind eye to.
Note! The problem can be solved in two ways. The first of them is a partial replacement of electrical wiring. However, this option is recommended only if it is necessary to eliminate a break in the network. In other situations, experts advise carrying out a complete replacement of the system.
Other signs indicating a system malfunction are all sorts of breakdowns of sockets and switches. Often, when electrical appliances fail, you can smell the smell of burnt insulating material. In this case, it is also necessary to replace the wiring.
How much does it cost to change the wiring in an apartment? The cost of replacing an electrical system primarily depends on the size of the living space. The following factors are also very important: the number of rooms, layout, number of electrical appliances that will be used after the renovation. The minimum cost of replacing electrical wiring for one-room apartments is 15,000 rubles. For two-room dwellings the price is slightly higher - 20,000 rubles.

How to conduct wiring in an apartment: two popular ways
Today, electricians use two methods of installing electrical wiring indoors: external and internal. All subsequent work depends on the choice of the desired option, so you need to familiarize yourself with the advantages and disadvantages of each of these methods.
The internal method of laying electrical wiring is also called hidden. It involves the arrangement of cables and other elements of the electrical network in special channels (grooves). To organize them, a hammer drill is used. The main advantage of this installation option is that the usable area of the apartment is saved. And also the installed system does not affect the appearance of the room.
Another advantage of hidden wiring in a house or apartment is that there is no need to organize cable protection from mechanical damage. The location of the wires inside the walls allows you to increase the degree of tolerance for load and overload of the system.
However, this method of laying cables also has its disadvantages. First of all, it is worth noting that the hidden method involves a large amount of work. The complexity of this option leads to the fact that when laying it yourself, the open method is often chosen. Problems with cables installed in walls are more difficult to diagnose. Repairing individual elements of the electrical network in this case is a rather complex undertaking.

The open method of do-it-yourself wiring involves pulling cables through baseboards or installing special external boxes (channels). There are other options for laying the electrical network outside the walls, but for private construction their use is not advisable.
The main advantage of the external method is the relatively simple implementation of installation tasks. And also (unlike a hidden network), an open system is easier to diagnose, which makes it easy to identify the problem and fix it as quickly as possible. Thus, electrical repairs in an apartment are simplified if they are carried out outside the walls and other surfaces.
Helpful information! Among other things, open wiring allows you to make changes to it as needed. For example, if desired, it will not be difficult to extend an additional line for new equipment.
This method also has some disadvantages. Cable channels laid on the surface can serve as an obstacle when installing furniture. Another disadvantage of this option for laying wires is the restrictions on their number during baseboard installation. Boxes take up useful space in the apartment and do not always look appropriate in the interior of the premises.

When installing wiring openly, experts recommend paying special attention to protecting cables from mechanical damage. It is also important to follow fire safety rules and ensure that each wire is provided with reliable insulation.
How to draw up a wiring diagram in an apartment
Before you start replacing the wiring in the room, you need to select the most suitable electrical circuit. This document is compiled taking into account the location of all network elements. It indicates sockets, switches, lighting fixtures located in each room. The diagram must necessarily contain paths (lines) corresponding to the places where the cables are laid.
When drawing up an apartment wiring diagram, you will need to calculate the following parameters:
- required power (for each room separately);
- power reserve (for each room);
- power of household electrical appliances.

The diagram is the most important document when installing new electrical equipment in a home. When compiling it, every little detail is important. Therefore, experts advise to be careful when creating this drawing.
The diagram should include information on the number of sockets and switches, as well as their location. The places where important electrical appliances will be installed must be marked on the drawing. Installation points are selected depending on the individual characteristics of the apartment or private house.
The location of the lamps and their number are also indicated when drawing up the electrical wiring diagram of a house or apartment. It is important to remember that shortcomings made when creating this document lead to a lack of necessary elements of the electrical network or, conversely, to an excess of them. And the worst outcome in this case is a faulty system.

The location of all individual elements of the electrical network, as well as the placement of household appliances, should be selected as competently as possible. Sockets, switches and devices that produce light should not interfere with other components of the interior (for example, furniture).
The choice of wiring type is made depending on the individual characteristics of the room. This is influenced by the following factors: number of rooms, layout, number and power of household electrical appliances. For the most powerful equipment, as a rule, installation of a separate line is provided.
Features of drawing up an electrical wiring diagram
It is recommended to pay special attention to drawing up a bathroom layout. In this situation, electrical appliances are located in close proximity to a water source, so you need to be careful and follow safety rules. In this case, the placement of sockets is carried out taking into account that the distance to the water source is at least 100 cm.

For each wiring group, a separate power cable is laid, coming directly from the electrical panel
Note! It is important to remember that for the convenience of drawing up a diagram, it is recommended to divide all the electrical equipment in the home into separate groups (for example, wiring leading to lighting devices or household appliances). This will allow you to draw up a diagram as competently and concisely as possible and avoid confusion when installing electrics in the house with your own hands.
For each group, a separate power cable is laid, coming directly from the electrical panel. This installation option allows you to properly distribute the load throughout the apartment. In addition to the lighting and electrical groups, it is traditional to lay separate branches for the bathroom and kitchen area.
Each individual group usually has different power ratings. Therefore, to connect the bathtub and toilet, a cable with a cross-section that differs from the size of the wire intended for household appliances can be used. Dividing wiring into groups has the following advantages: cost savings (due to the selection of the optimal cable size for each line) and the independence of one branch from another. Such autonomy allows, if one group fails, to use others without any harm to the system as a whole.

Do-it-yourself replacement of wiring in an apartment: necessary tools
Before starting work on dismantling the old wiring, you need to calculate the materials that will be required to organize the system and purchase them. It is also necessary to prepare tools to perform all types of work. Let's take a closer look at what tools you will need to replace electricity in your home.
Related article:

Drawing up a wiring diagram. Installation of electrical appliances and cables. Programs for drawing up diagrams.
First of all, you need to prepare a hammer drill. This device is needed to dismantle old wiring and organize new channels (if necessary). To work, you will need to purchase several attachments for scoring concrete walls with a cross-section of 16-20 mm, a crown drill of 90-100 mm and a chisel of 25-30 mm.

To connect wires, you need to prepare soldering equipment. The power of the device in this case should be at least 40 W. For installation of electrical For wiring in the home, you will need tools: an angle grinder with a stone wheel, pliers, side cutters, a set of screwdrivers, a building level, a cord, a flashlight and a knife. For finishing you need to buy a spatula. In addition, you should acquire instruments for checking electrical circuit readings, such as a multitester and a phase indicator.
Replacing wiring in an apartment: calculation of materials
Calculation of wires is quite simple. The most common way to determine the exact amount of cable required to connect an electrical network element is to measure the distance to it from the panel. To do this you need to use a regular tape measure. It is important to remember that during manual measurements, all surface irregularities, protrusions and depressions are taken into account.
After calculating the wiring in an apartment or private house, it is advisable to add another 10-15% of the cable to the resulting figure. The stock is needed to meet installation needs, since during operation there is always a certain amount of spoiled material.

Note! The cable must be laid at right angles only. Thus, the wires are mounted horizontally or vertically. Diagonal lines are not recommended as they are much more difficult to organize. Knowing how to do the wiring in the house with your own hands, it is much easier to draw up a plan for future work.
There is another option for calculating the materials needed to organize an electrical network in a home. It is simpler, but at the same time less accurate, because generalized values are used when calculating. To carry out such a calculation, you need to find out the area of the apartment and multiply this figure by 2. The resulting number is approximate, but this calculation is used quite often. In this case, two-thirds of the wires will be used to lay outlet lines, and one-third will be used to connect lighting fixtures.
After calculating the amount of cable, other elements of the electrical system should be calculated. To install the network, you will need to buy at least 3 sections of terminal blocks, and they must include 10 contacts each. Experts do not recommend buying parts with a polyethylene body. This is due to the fact that this material does not have high technical characteristics and the required degree of protection.

In order to answer the question of how to conduct wiring in a house, it is recommended to watch training videos that can easily be found on the Internet. It is important to determine what and how the cables will be secured in the system. The option for fixing the wires depends on the personal preferences of the master. Experts note that it is more convenient and reliable in this case to use clamping plates. In turn, screw fastenings are less functional.
When choosing socket boxes, you need to pay attention to whether these elements are equipped with external protrusions to enhance adhesion to alabaster. VVG and PUNP cables are best suited for wiring. You will also need to buy an inlet shield, corrugated tubes and insulating material.
Replacing wiring in the house with your own hands: dismantling the old line
Before you begin laying new wiring, you will need to dismantle the old system. This work is carried out taking into account safety rules, so rubber gloves should be purchased as a precaution. The first thing you need to do to dismantle the electrical network is to turn off the power to your house or apartment.

Then all wires are checked using a phase indicator. If the device does not register voltage, you can proceed directly to dismantling the line. Most often, it is in old-style buildings that the wiring is replaced. In Khrushchev buildings, old wiring diagrams cannot cope with modern voltage levels. This not only risks interruptions in the operation of the power grid, but also poses a direct threat to the lives of residents, since a fire may occur in a faulty system.
Helpful information! Each element of the system is first checked with a phase indicator - and only after that it is allowed to begin removing it.
First, sockets and switches are dismantled. You don’t have to remove the old cables at all, leaving them in the walls, but in this case you need to disconnect them from the network. If you still decide to remove old wiring from the walls, then you will need to buy a tester. This device is used to detect old cables. Then the places where they are laid are tapped, followed by the removal of the wires.
How to change the wiring in an apartment: features of hidden installation
As mentioned above, the installation of a hidden system is carried out inside the walls. If necessary, the cables can be placed in the floor or covered with plasterboard boxes. Today, a very popular option is to hide the cables behind a suspended ceiling.

The most difficult way is to organize channels in the walls. The amount of “dirty” work in this case increases several times. Laying wiring in an apartment along the floor has some advantages. For example, this option allows you not to go around the walls. However, installing electrical cables in the floor requires dismantling the old covering and completely replacing it with a new one. Before installing the wiring yourself, experts recommend that you read the step-by-step instructions for carrying out the work.
First of all, you will need to make channels in the walls into which the electrical wiring will be laid. To do this, it is customary to use a special tool - a wall chaser. If you don't have one, a regular hammer drill will do. As a result of such work, a lot of dust rises in the room, so it is necessary to take protective measures by wearing glasses and a respirator.
When choosing the optimal depth for channels, you should remember one important rule: the thickness of the plaster applied on top of them should not exceed 10 mm. As for the width of the grooves, there are no restrictions in this case. If it is possible to install electrical wiring in the house with your own hands in the ceilings, then you should give preference to this method. This will simplify the process of installing a new network.

At the second stage, it is necessary to prepare holes for sockets. In this case, a hammer drill is used. To work, you will need to equip it with a crown-shaped attachment. It is used to create niches for distribution boxes. Next, the cables are laid in pre-prepared grooves. During this process, you must strictly follow the diagram drawn up before starting the installation of the electrical network.
Then you need to connect the wires in the junction boxes. For this purpose, connecting clamps (PPEs) are used, which also perform an insulating function. Then switches and sockets are installed. After installing electrical appliances, wires are connected to their contacts. At this stage, the wiring in the apartment is completed. Control of the work performed is carried out using a special tester.
The final stage includes two points: activating the electricity supply from the panel and sealing the channels with cables. If the wiring was laid in plasterboard structures, then it must be protected using corrugated tubes, which are attached to the surfaces using clips.

Installation of electrical wiring in the house: public method
The open method of wiring electrical wiring into a home involves the use of special plastic boxes. This method is less complicated, so it is often used when installing electricity yourself. In order to answer the question of how to make wiring in a house using an open method, you should familiarize yourself in more detail with the algorithm of actions.
First you need to fix the skirting boards. If the voids of these elements are used as a wiring box, then they must be indicated in the diagram before starting actual work. At the second stage, it is necessary to lay boxes from the baseboards to electrical appliances (sockets, switches). Next, the cables are pulled through them.
Replacing wiring in a panel house or Khrushchev house is done in the same way. It should be remembered that the boxes must have sufficient physical properties to withstand mechanical stress.
Note! Low-quality channels are not always able to protect wires from damage, which can lead to an emergency situation in the room.

Then you need to install the external junction boxes and connect the cables inside them. Connecting wires, as in the case of closed lines, is performed using PPE. Next, you need to mount sockets and switches and connect cables to them. At the final stage, all network elements are checked using a tester.
Thus, there are several signs by which you can easily determine whether your electrical wiring needs to be replaced. Self-installation of this system will save money. However, it is not recommended if you do not have special knowledge and skills in this area.
We all know very well that nothing is eternal and everything must be replaced sooner or later. Electrical wiring, unfortunately, is no exception. And if it is necessary to change the pipes in the house after a fairly long period, then the electrics need to be changed no later than after 15-20 years. The thing is that wiring has a service life - aluminum connections age and become fragile, as a result the metal spreads in the contacts and becomes unreliable. What should be the replacement of electrical wiring and how to carry it out?
Replacing electrical wiring in the house: key points
Whatever one may say, it is impossible to escape from the need to change all the electrical wiring in the house at least once every 20 years. Failure to make the replacement on time will simply mean that the replacement will have to be made at a less opportune time. It is best to change the wiring during repairs, and even if it serves reliably for now, do not put off the work until later. Replacing the wiring when the repair has already been completed will negate all efforts and the wall cladding, as it turns out, was done in vain. You will have to destroy the walls and cover everything with dust again, so it is better not to put off this difficult task for later and replace the wiring during the next renovation of the room.

In a private house, especially a wooden one, it is better to replace the wiring every time you update the walls. It is better to carry out the work before plastering and plan in advance. Determine where household appliances and the most energy-consuming appliances are stored. On the plan, consider the location for each cable before making repairs, taking into account the locations of electrical consumers.
A washing machine, a boiler, a microwave oven, a kettle - each device is demanding of electricity in its own way and needs a separate outlet. Provide electricity to all corners of the house, sockets will not interfere in the bathroom, and even on the balcony there should be at least two of them.
In rooms such as the living room, you should not leave a single wall without an outlet. When rearranging furniture, it may simply turn out that the wiring does not allow connecting all the necessary electrical appliances to the network.
Do-it-yourself electrical wiring in a private house
If you decide to renovate your apartment and want to completely replace the existing wiring, then you should think through every detail.
Special wiring for suspended ceilings. So, for example, if as part of the renovation it is planned to install a suspended ceiling, then it is necessary to think in advance about the entire layout of lighting fixtures and their control system. The fact is that suspended ceiling– this is an opportunity to make modern spot lighting, but we must not forget that it also requires special wiring.
Do not replace wiring in “pieces”. If you need to change the electrical wiring in an old apartment in a panel house, but you decide to do repairs in only one room, then you should not be tempted to save money by replacing the wiring in only one room. Extra connections on the wiring are very undesirable and it is in such places of previously unplanned connections that breakdowns often occur. Even if you decide to partially replace the wiring, all connections should be placed in separate protected boxes. Under no circumstances should the joints be simply hidden under wallpaper and a layer of plaster, otherwise, if something happens, you will have to completely rip out the wall.

Don't skimp on wiring. Aluminum wiring is cheaper, however, it leads to a number of completely unnecessary problems. Firstly, it lasts less than copper. Secondly, aluminum connections fail in a variety of situations simply due to bending. Sometimes you have to change part of the wiring simply when replacing the socket. If you don’t want unnecessary problems, then don’t skimp on wiring.
How to do electrical wiring in a house with your own hands
Today, many schemes are available on the Internet that suggest replacing electrical systems in apartments entirely with your own hands. Not only that, you can easily find detailed how-to videos that walk you through every step of any introductory activity. If you are not at all friendly with electricians, then it is better not to take risks. However, if you have some experience working with wiring, then you can take on replacing it in the house, if not completely independently, then at least in collaboration with a more experienced specialist.
In general, the first step in replacing electrical wiring is to create a detailed plan for the new wiring. Perhaps during the renovation process you want to change the current distribution of electricity in the house.
- Preparing the apartment for work. At this stage, furniture is removed from the housing, and the premises are disconnected from electricity.
- Marking. In order not to get confused while performing the work, it is better to initially apply markings on the walls, which indicate the locations of all electrical installations and connecting lines.
- Wall chipping. Now the time has come for action. Recesses are made in the walls for wiring and all electrical installation elements.
- Laying cables. When all the recesses and places for electrical installation elements are prepared, it is time to directly lay the wiring, first to the distribution boxes, and from there to sockets, switches, etc.
- Connection. When everything is ready, all that remains is to connect the electrics and test it in operating mode.
DIY house wiring for beginners
If you have little experience with electrical wiring, the task of completely replacing your home can seem extremely daunting. However, this is by no means true; one should not judge the work without actually doing it. If you create a clear step by step plan work and strictly adhere to it, then you will probably succeed. True, even with an optimal work plan, experience and motivation, one more thing will be required to successfully complete the task - a high-quality, reliable tool. What do you need?

To completely replace the electrical wiring in the house with your own hands, you need to prepare, first of all, a hammer drill for many holes in the walls. You may also need a grinder, which can be used to cut out channels for electrical wiring. Among the electrical elements, do not forget about the input panel, cables, breaker cord, terminal blocks and socket boxes.
The most crucial moment in the task will be the competent connection of all elements; the most difficult task will be gating. In order to make smooth channels for wiring, it is recommended to use not a grinder, but a wall chaser for concrete.
Professional tools are expensive, but they can be rented. Without it, gating will take a long time and will require both a lot of effort and a lot of nerves.
Do-it-yourself electrical wiring in a private house (video)
The electrical wiring in the house should be changed at least once every 15-20 years, as it wears out and works less and less reliably every year. Timely replacement of wiring is a guarantee of peace of mind, because emergency repairs will require damage to the walls, even if we are talking about new repairs. You can replace the electrical wiring yourself, but to do this you should have at least a little experience working with electrical equipment and a clear, step-by-step work plan. To begin, draw a diagram of the new electrical wiring, then disconnect the house from the light and use the markings to cut out recesses for the new wiring. If you want to save money at all costs, you can partially replace the electrical wiring, for example in one room. However, in this case, all connection points should be placed in separate boxes, access to which should be simplified. In no case should the junctions of old and new electrics be hidden deep under a layer of plaster and wallpaper, since it is in such places that breakdowns most often occur that need to be corrected.
More and more household appliances are appearing in modern apartments: dishwashers, coffee machines, toasters, heaters and other joys of civilization. Often in houses built before 2000, the electrical wiring is not adapted to such intensive work, because it often happens that many electrical appliances work simultaneously.
In some cases, after purchasing a new apartment or at the time of modernizing an existing home, it becomes necessary to replace the old electrical wiring with a more powerful one if it cannot cope with the load from modern household appliances. This article is about where to start and how to carry out this work.
First you need to analyze the old wires and decide on the following:
- Check the presence of a grounding loop in your area. If it is not there, you should contact your local management company so that they can carry out the appropriate work to install a grounding system. Read about how to make grounding at your dacha in a separate article on our website.
- Is it possible to leave some of the old cables in some rooms? For the bedroom and living room, a complete replacement of the electrical wiring may not be necessary, but if you plan to install warm floors or an additional lighting and heating system, you cannot do without dismantling the old wires.
- Can you do the electrical installation yourself or will you still have to call a specialist? Replacing electrical wiring in a house is not difficult, but it requires certain knowledge.
Electrical wiring plan or diagram
The next step is to create the proposed cable routing along the walls. It’s better to make a drawing on paper or a stencil on the walls so you don’t forget. You should also think about the ground loop at this stage. Example below.
Scheme
After the final measurements, you can move on to the next step.
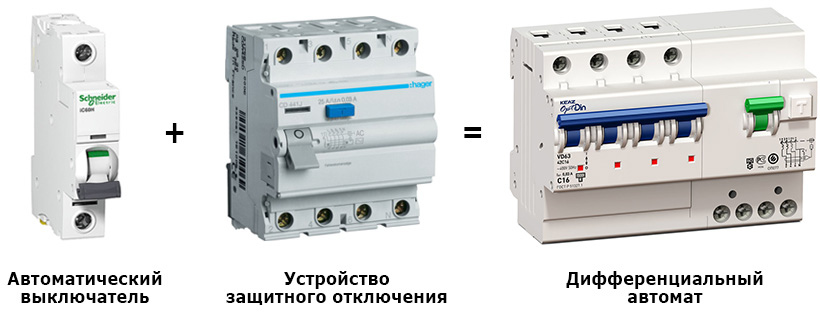
How to choose a machine?
Circuit breaker - designed to protect residential and industrial premises from short circuits, which can cause rapid electric shock to a person. The principle of operation is as follows: in normal circumstances, when the functionality of the devices and cables is in ideal condition, the switch passes current through itself. But, when one device suddenly fails or the incoming current exceeds the rated value, the circuit breaker immediately trips and the network opens.
 Net
Net Usually in apartments, in front of the meter, an introductory machine is installed. One switch for each room and a separate circuit breaker for the electric stove and lighting lines.
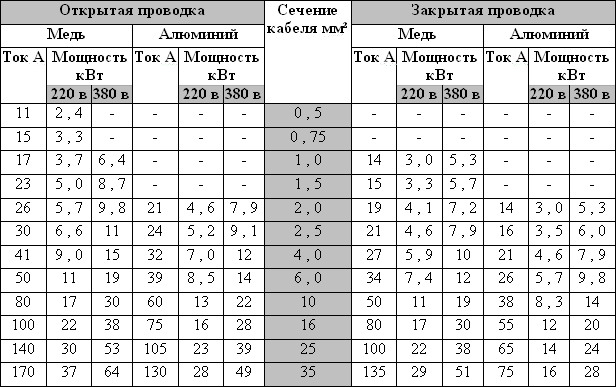
To correctly select circuit breakers for outlet lines, it is necessary to start from the cable cross-section.
If you plan to install one consumer on the protected line, you should select the amperage based on the power of the device.
Table for selecting machines (maximum values are lowered by 1 - 2 points for your safety).
How to choose a wire?
On the electrical products market you can find a huge variety of cable products with a core cross-section of 0.30 mm2 and above. Therefore, wiring in the house requires a special approach.
An incorrect calculation of the rated power of all electrical appliances will result in the purchase of an unsuitable wire, the wires of which will begin to overheat, which can lead to melting of the sheath, short circuit and fire.
The following section is considered the most common:
- For lighting fixtures use 1.5 mm square.
- For sockets (with and without grounding) use 2.5 mm square.
- For other, more powerful devices, 4 - 10 mm square is used.
P1+P2+P3 – power of electrical appliances, kW. Correction factor – 0.8. Individual values can be applied to individual groups of devices.
Removing old wiring
Most of our houses belong to the secondary housing stock, so in most cases the electrical wiring is designed for small loads, usually 1.5 kW per apartment. Today, when apartments are overcrowded with a variety of appliances, 10 kW is considered the minimum acceptable. Therefore, after purchasing a new property, you should immediately look at the current electrical wiring plan in the house.
After studying the diagram, it is advisable to familiarize yourself with the (PEU) rules for electrical installations.
Let's look at some of them:
- All aluminum cables must be replaced with copper ones.
- Solid grounding must be replaced with protective grounding.
- New rules require modern branching of wires into groups.
- A new wiring plan, with a complete replacement of all parts, must be approved by a qualified energy supervision employee.
 Wires in the junction box
 After studying the relevant literature, we proceed to the next step:
- We take a pre-prepared plan for the new wiring.
- We abandon the temporary structure and connect directly to the panel to de-energize the apartment.
- Manually remove old cables. To search for hidden and non-functional cables, you can use a special device - a hidden wiring detector.
- We are digging and preparing a place for the new system.
- We install sockets, wiring, switches.
Installation of a temporary structure
After disconnecting the apartment from electricity, you will need to connect power tools and at least one lamp for lighting. Otherwise, all work will have to be carried out during daylight hours, but what about rooms that do not receive daylight (toilet, corridor)? Therefore, we proceed in the following way:
- We take a board and attach a block to it for one or two sockets.
- We buy or cut a flexible cable (KG or PVS) with a cross-section of at least 4 mm2.
- We turn out the plugs or turn off the supply machine.
- We connect to the meter cable using a regular twist.
In some cases, you will need permission to connect a temporary structure. You can get it from the housing office or energy sales office. Without permission you can get a large fine.
Laying new wiring
Let's look at the installation of a new power supply system using this diagram as an example.
 Circuit example
 For this we need:
- The wire.
- Corrugated or heat-resistant tube.
- Automatic machines, sockets, switches.
- Spare grooves and curved chisels.
After removing the old wiring, we begin laying the new one. For private and small apartments, a single-line house power supply diagram is suitable. To do this, you need to apply a preliminary drawing on the walls, then we proceed to gating.
Note! After installing new electrical wiring, cosmetic repairs to the room will be required.
It is necessary to carry out gating, adhering to certain rules.
- The grooves must run strictly in a horizontal or vertical direction in relation to the floor; crossing or moving obliquely is prohibited.
- It is necessary to maintain a distance of 15–20 cm from the ceiling and floor.
- The groove depth should not exceed 25 cm.
- Horizontal breakdown of load-bearing walls is prohibited. Only vertical processing is allowed.
After the grooves are ready, first of all it is necessary to run the wire from the junction boxes to the meter. For additional safety, the cable can be placed in a special heat-resistant fabric, corrugation. Fixation should be carried out using alabaster every 1 or 1.5 m. Next, a wire is laid from pre-installed distribution boxes to switches and sockets.
 The simplest electrical metering device
 The final step is to connect the entire system to . If your device is old, then it is worth replacing. The ideal option would be to invite a qualified electrician to help you run the wires from the entrance to the apartment. It is better to install the meter in a plastic or metal box.
When choosing a meter, pay attention: you can install a multi-tariff device in order to subsequently save on electricity in the evening and at night.
Checking the quality of work performed
 Multimeter device
 The final step will be to check the completed work. To do this, you need to acquire a multimeter and an indicator screwdriver, which will allow you to carry out a control check of the drawn line.
A multimeter is a voltage detection device about the size of a large mobile phone. The kit also includes two probes.
After checking the sockets and switches using a special transparent screwdriver, you next need to measure the voltage in the network using a multimeter, this will avoid an unexpected short circuit. If at the time of testing the device does not find any faults, the walls can be safely sealed and proceed to the main decorative work.
Remember, in the bathroom, due to high humidity, it is prohibited to install sockets and switches without a special isolation transformer or RCD, and the distance between the wires and heating radiators should not be less than 50 cm. A heated towel rail is also included in the heating radiator.
One of the most common reasons for changing the electrical wiring in a private home is increased electricity consumption. It creates a strong load on the wires, which, as a rule, are not ready for this due to physical wear.
In addition, replacing the wiring allows you to achieve a higher level of electrical safety. In an old house, over years of use, the wire insulation may deteriorate. The result is a dangerous situation, which on top of that entails additional energy costs.
Replacing electrical wiring in a house with your own hands is a rather difficult task, especially if we are talking about hidden electrical wiring. However, this task is doable if a person is able to understand the diagrams. Otherwise, it is better not to tempt fate and contact either a good private electrician or a company that provides electrical wiring replacement services.
Drawing up a diagram
The future wiring diagram can be based on standard single-line power supply diagrams, which are freely available on the Internet. The basic rule here is the following. At least two branches must go from the meter to any room in the house - one for the lighting circuit, the second for sockets.

Since a private house, as a rule, has one bathroom, an additional potential equalization system is not required. That is, on the wiring replacement diagram, only branches to connection points (sockets) and stationary electrical installations should be indicated.
Another important rule that is worth remembering when replacing electrical wiring: do not draw branches on the veranda, balcony or loggia on the diagram. This is a gross violation of the rules for installing electrical installations in residential premises. Balconies, verandas and loggias must be powered from sockets located in other rooms.
 It is advisable if the drawn up diagram is approved by electricians and organizations involved in fire safety. Practice shows that it is better not to overload the wiring diagram in a private house with small details such as ceiling lighting, an extension cord for the veranda, etc.
Inspectors are confused by such details, and an overall good plan may not be accepted because of this.
Having a permit certificate for replacing old wiring, as well as a certificate of work performed, will help the owner of a private house value it more expensively in the future during a possible sale.
Cable selection
Selecting the cable cross-section is the most important part of preparing for the installation of electrical wiring. To make a competent selection, a preliminary calculation is necessary: you need to add up the power of the available devices and add to the sum 100 watts for each device used.
Then you should divide the result by 220. If the final figure does not exceed 15, you can use wires with a real cross-section of 1.5 mm square. And for sockets, the optimal cross-section is larger - 2.5 mm square.
As for materials, today the priority for home craftsmen who decide to replace the electrical wiring in their home is copper cables of the VVGng-LS and NYM brands. The former are characterized by an affordable cost, and the latter by an additional insulating shell, as well as ease of cutting.
 Aluminum cables are also not prohibited from being used to replace electrical wiring, but their cross-section must be larger than copper cables.
And the cable cores made of aluminum tend to break at bends, that is, they are not very reliable. Paying attention to this, aluminum is not recommended for use inside the house.
It is also worth determining in advance the length of wires and cables needed for replacement. To do this, you need to measure the distance from the panel to the connection point, taking into account all the corners, alcoves and protrusions present in a private house.
Traditionally, all electrical wiring turns are made strictly at an angle of 90 degrees, and this also needs to be kept in mind when taking measurements. The resulting values are added to each other and added to the total by at least another 15%.
There is also a simplified method for calculating the footage of wires and cables - you simply need to multiply the area of a private house by two.
Tools and equipment
In addition to wires and cables, you will have to purchase replacement protective equipment for electrical wiring - residual current devices and circuit breakers. These devices are selected for each group of wires separately.
A sixteen-amp circuit breaker is connected to lighting, a 25-amp circuit breaker is connected to sockets, and a 32-amp circuit breaker is used for high-power household appliances. A separate residual current device (with a current of 63 amperes) should also be installed at the input.
The actual procedure for replacing electrical wiring in a private home can only begin when all sockets, automatic devices and lighting fixtures have been purchased.
When purchasing them, you should be wary of defects and fakes. It would not be superfluous to require a quality certificate for goods.
It is also worth making sure that all the necessary tools are at hand. For example, to replace electrical wiring in a private home you may need:

Here you need to add a set of screwdrivers, which any owner probably has, a level, and a pencil. Other tools may be required.
Removing old lines
First, any master who decides to replace the electrical wiring himself must remove the old lines. To do this, turn off the electricity at the input in the distribution panel.
Then all rooms are cleared of furniture so that nothing interferes with the replacement. Old cables must be completely removed, starting with the junction boxes.
Usually they can be pulled out of the grooves without any problems, but if this does not work, then it is better to leave them in place, well insulated on both sides.

By the way, old grooves can be used for new electrical wiring in a private house if you are generally satisfied with the position of sockets and switches.
If not, you will have to make new grooves according to the approved scheme.
Installation of new wiring
It’s worth noting right away that replacing electrical wiring in a private home should be done with tools with insulated handles. And the master himself must wear rubber gloves.

Usually, replacing old electrical wiring in a house begins with replacing the panel and installing it in a new place (unless, of course, the old one is not satisfactory). In private houses, as a rule, there is no special niche for the shield, so the easiest way is to make it hinged and attach it to dowels.
A place is selected for the shield that will always have easy access. In addition, the owner of a private house must run a VVGng 5*6 cable from the old location of the panel to the new one and connect it.
At the next stage of replacing the electrical wiring, you must perform the following actions:

Replacing outdated or dilapidated electrical wiring in a wooden house follows approximately the same algorithm. But here special attention needs to be paid to fire safety. Therefore, experts advise making open cable routing in a private house made of wood.
However, it can be internal if serious finishing and wall covering is planned in the future. Internal electrical wiring in private wooden premises must be placed inside pipes or metal sleeves.
This allows you not only to protect yourself from the risk of fire, but also from damage when drilling holes.
Checking new lines
When you change the wiring in your house, you will need to check the finished lines. Here you should use a multimeter and an indicator screwdriver. This screwdriver can be used to check the voltage at outlets and other specific electrical points.
A test with a multimeter will allow you to more clearly verify that there is no short circuit in any section of the electrical wiring. If the check did not reveal any problems, it means that the replacement of the wiring in a private house was successful, and you can begin plastering, putty and other finishing operations.
If you are planning to carry out a major renovation of your apartment, you need to change the wiring. In houses that were built a long time ago, the wiring is not designed to modern use. During the construction of old structures, specialists could not even think that in addition to the basic electrical appliances that were used at that time, people would use many other equipment. It turns out that the throughput of the old wiring is less than the power of all electrical appliances that is consumed. In addition, the service life of the wiring is about 30 years. But if you want to ensure uninterrupted voltage and extend the life of electrical appliances, you should not wait until the wiring is 30 years old. You can replace the electrical wiring yourself.
Choosing the right cable
Most people, when starting to draw up a diagram and work plan, are faced with the problem of what type of wires to choose. Wires are divided into several types. Basic:
- aluminum
- copper
Of course, it is best to buy copper ones. They are durable and reliable, and also have a longer service life. All specialists in the construction of both panel and other houses use only copper wires. When sockets or switches are connected, the core of aluminum cables is easy to break; with a multi-core copper cable, such an unpleasant situation is impossible. In addition, copper cable has good throughput.
Installation diagram of sockets and switches
Before laying electrical wiring, you need to carefully work on the location of sockets and switches in the house. It is with the help of the diagram that the wiring in the apartment will be carried out. For example, if you know in advance where you will put the computer, you can run a separate cable there, which will allow you to power all computer devices that have increased power consumption. The same applies to other powerful equipment.
How to distribute the number of sockets:
- living room. In the living room, it is recommended to install 5 sockets with a common frame (or whatever is convenient for you) for connecting video and audio equipment, two sockets near the sofa and one socket each where you need additional power sources
- bedroom. The sockets here should be near the sleeping place, the desktop, if there is one. The rest are optional
- corridor. A double socket will suffice here
- bathroom. The number of sockets depends on what electrical appliances you will use here. On average, one or two sockets are enough
- kitchen. It is worth installing three to five sockets near the cutting table. Place the rest as needed.
According to standard regulations, sockets in the house should be located at a distance 30 cm from the floor, and the switches are on 85 cm.
Removing old wiring
So, after you have drawn up a diagram of the placement of all sockets and switches in the apartment, you can begin to dismantle the old wiring. This process can be done with your own hands. It depends on how the old wiring was installed. Before doing all the work yourself, you need to disconnect the wiring from the meter in the apartment. If the electrical wiring was placed in channels, then dismantling the old wiring and installing new wiring is carried out in parallel. You need to wind a new one to one side of the old cable, then you need to get the other end of the old wiring. That is, you won’t need to hammer into walls and create unnecessary problems. But if the new wiring diagram of the house does not correspond to the old wiring, then grooves will need to be made in the walls.
When, When electrical wiring is embedded in the wall, the first thing you need to do is find out in which part of the house it is laid. You can find it by noticing grooves embedded in the walls, or by using a special device. You can also study the house diagram. Once you have determined its location according to the diagram, you can change the electrical wiring.
Correctly changing the electrical wiring at home with your own hands
To avoid unexpected trips to the store when laying a new cable, you need to stock up on all the tools and materials in advance. So, to replace the electrical wiring you need:
- hammer drill
- Bulgarian
- soldering iron
- building level
- led screwdriver
- spatula, putty, electrical tape
- cord, screwdrivers, side cutters, flashlight
- new wires
When we have everything necessary to replace the electrical wiring in the apartment, we begin the process itself. We make markings on the wall in the place where the new electrical wiring will be laid. Then, using a hammer drill and a grinder, you need to make grooves - ideal for the walls of a panel house. It is best to lay the wiring in corrugation; this will not only increase the level of safety, but will also facilitate the process of replacing electrical wiring in the future. After the grooves have been made, you need to lay a cable from the meter to the distribution boxes. We place the cable in the corrugation and place them in the grooves. From the distribution boxes we lay the cable to the socket, switches and lighting fixtures. In this case, it is worth looking carefully at the diagram. Then we connect the cable branches with the main one in distribution boxes. This must be done with a special terminal block, which will ensure high quality and safety. When all the work in the distribution boxes is completed, you need to start connecting the power supply to the apartment.
Completion of wiring replacement work
The final stage of replacing the wiring is connecting the apartment's wiring to the meter. In this case, if you do not have basic knowledge in this area, you should not do the work yourself; it is better to call an electrician. The old meter and machines need to be replaced. When all the work is completed, we connect the apartment wiring to the machine and turn on the machines. If the machine is not knocked out, it means that you were able to change the wiring in the apartment with your own hands without incident. All that remains is to check the sockets and switches to see if they work.
As you can see, changing the wiring yourself is not as difficult as it seems at first glance. Often people, when they read the entire work procedure, get scared and call specialists. Replacing the wiring yourself will cost several times less than with the help of specialists. But if you are not confident in your abilities, it is better not to take risks.

