Star news


How to delete the history of downloaded applications in the appstore. How to Selectively Hide App Store Purchases on iPhone, iPad, or iTunes
While using the iPad, we install various applications and test them. We leave some for a long time and use them, and some - all garbage - we remove without pity, realizing their further uselessness or simply inconsistency, uselessness, stupidity, etc.
First argument: The Apple system is designed in such a way (through one place) that even if you delete an application from the tablet, information about it remains in the system and, by opening the AppStore in the " Purchases" (formerly called " Purchased") located full list all applications ever installed for this account. And this list only grows over time, and it may not be easy to find a specific application in it.
Second argument: For example, if one account is used on several iPads, or children also use it. In order to prevent these same children from learning ahead of time what they should learn a little later, it is also necessary to hide “adult” programs and games from their eyes.
In each of these cases, you can (and should) hide all unnecessary applications. Hiding purchases in the AppStore on iPad is only possible in operating systems starting from iOS 5. You can hide both deleted and installed and currently used applications. The procedure for hiding a purchase does not affect the application itself in any way - it is not deleted, saves in it are not reset, and version updates are still carried out.
How to hide AppStore purchases on iPad
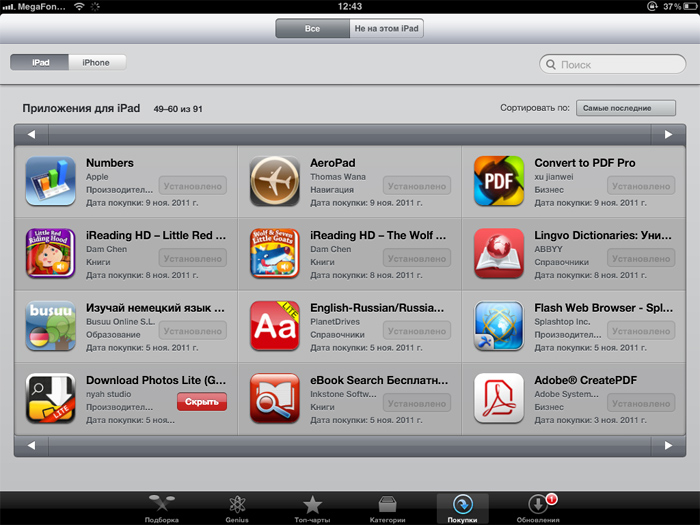
Purchased". Here is a list of all purchased/downloaded/installed free and paid applications:

2. Find the application that needs to be hidden (We will use the application as a guinea pig Download Photos Lite.) and slide your finger across it from right to left or left to right. A red button will appear that says " Hide":
3. Click on it - the application will become pale. If you exit the " section Purchased" and log in again, this application will no longer be in the list.
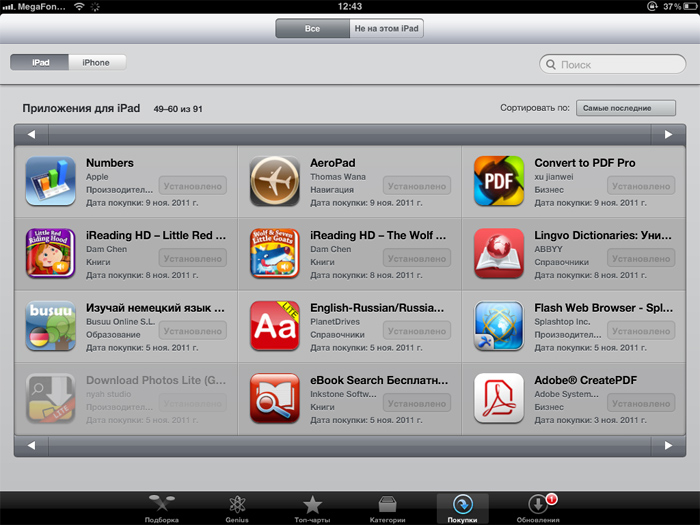
4. Repeat this procedure with all unnecessary/adult applications.
Sometimes it may happen that an application is accidentally made hidden by mistake or enough time has passed that it is not hidden from other iPad users, in which case you need to perform the reverse procedure - return the hidden application to the list of purchased programs.
How to return purchases to "Purchased"?
1. Go to the AppStore in the "tab" Selection" and scroll to the bottom of the page.

2. Find the button with your Apple ID at the bottom left and click on it.
3. In the new window that appears, click on the button " View Apple ID". In a new window, enter your password for your Apple account.
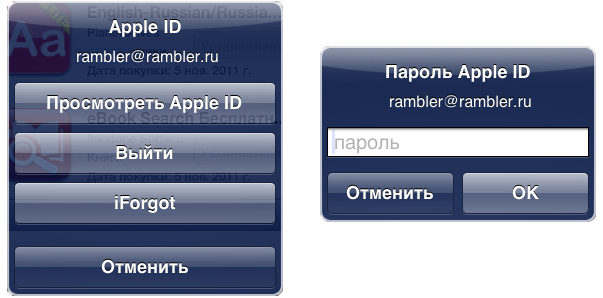
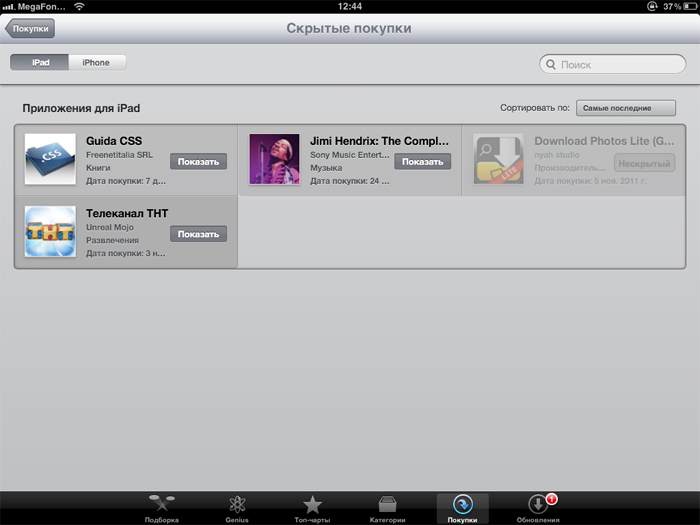
4. A new window will open with your account information. Scroll down a little to the " button Hidden purchases"(in English version - Hidden Purchases):

5. A page with hidden applications will open. And our old friend - Download Photos Lite- also here:
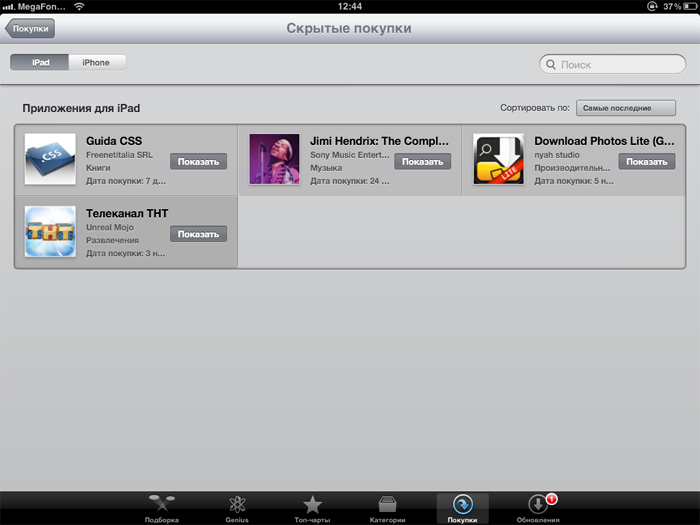
6. Press the button " Show"(in English version - Unhide) next to those applications that need to be returned to the " section Purchased" in the AppStore:
The restored application will become translucent, which means it has returned to the " Purchased".
How to hide iTunes purchases on your computer?
On a computer using a program iTunes You can also perform these operations.
1. Go to iTunes -> iTunes Store -> tab App Store .
2. Scroll down.
3. Find among a bunch of links " Purchased" (Purchased).
4. Click on it. All purchased applications will appear.
5. Point to application areas.
6. Click on the cross that appears.
7. In the window that appears, click the button " Hide" (Hide). The application will disappear from the shopping list.
How to get an app back from being hidden in iTunes?
1. Move the cursor to the upper right corner iTunes Store, where your Apple ID is indicated.
2. Select from the drop-down list Account.
3. Enter your password. Scroll down and find the link " Show hidden purchases" (View Hidden Purchases).
4. Click on it. A list of hidden purchases will appear, where when you click on the " Show" (Unhide) previously hidden applications return to purchased ones.
Attention! After updating the operating system to iOS6, it will not be possible to hide purchases on the AppStore in this way; this mechanism is disabled and is no longer available on the iPad. You can now hide purchases of certain programs only using iTunes.
A couple of days ago, I was asked a tricky question - how remove programs from App Store purchases? Why was this needed? For example, during the entire existence of my account in the App Store (since 2008), I have downloaded and purchased more than several hundred applications, and when I start scrolling through the “Purchases” tab on the iPhone, my fingers get tired of looking for something I need. You can, of course, use the search, but this is not our method! So, if you are tormented by the problem of removing programs from purchases, read on - I will show you how to solve it! 🙂
Update! After the release of the new version of iTunes, this method changed a little, and a very tricky moment appeared, which I will describe below. Don’t be offended that some of the screenshots will be from the old version of the article, and some have already been updated :)
First, we need any computer with iTunes installed - you can’t pull off such a trick with an iPhone 🙁 Next, we need to go to iTunes Store and log in if you have not already done so. After these simple manipulations, click on Purchases by clicking your name in the top right corner of iTunes:

And in a new window we will have the opportunity to choose what exactly we want to view - films, music, programs or books. If you buy or download all of the above, you can systematically go through all the points, but we will focus on the programs.

If you click on Applications in the upper right corner, then, as can be seen from the screenshot, a list of programs will appear that you can either download to your computer or delete (read below how to do this). By default, all programs are sorted by date, although you can change this indicator to Title. In my case, I left everything unchanged and scrolled through the list to the very bottom, where my very first purchases are stored *felt a surge of nostalgia* :)

Remove purchases from the App Store
After I began to control my feelings again, it was time to delete something unnecessary, and here very unpleasant “ambushes” awaited me - 1) programs can only be deleted one at a time (it is not possible to select several objects), but this is not the most terrible thing - 2) after deleting, the list flies to the very top, and you need to scroll it to the very bottom again in order to remove unnecessary software and after a moment, start scrolling down again :)
Update! In addition to the first 2 setups, I came across one more - the delete button (cross) disappeared!!! That is, when you move the cursor to the upper left corner of the program icon, the cross does not appear :) I thought for a long time how to remove the annoying program, when suddenly, by chance, I discovered that The mouse cursor changes when you hover over a corner of the program, and if you click on the mouse, then the program will be deleted! Compare:

There is a cross in music!

There is no cross, although I hovered over the WiFi Map
Hurray, we figured out how to remove programs even without a removal indicator. Now let's try to simplify our life so as not to delete programs one by one: there is a search bar on the left in which you can enter the name of the program or developer and clean everything out in this way. This does not fundamentally solve the problem, but it can simplify it a little... At least in my case, all the Free programs have gone into the furnace (I buy the most interesting programs after using the free versions).
I hope that my review will help you if you want to put things in order with your purchases! I hope that I won’t have to redo the article after the next iTunes update :)
Based on the experience of using our Shared Account 3 service, many users have questions about hidden applications in the AppStore virtual store. In order to make adjustments and close this “ill-fated” topic once and for all, I decided to write a detailed manual (read as instructions) for all users of our wonderful service.
In the next paragraph, I will tell you why you need to hide and open applications. Those eager to begin the practice directly can safely skip this explanatory part. Due to the huge number of applications that accumulate and cannot be deleted on each user’s account, there is some confusion and difficulty in finding what you need. To do this, Apple developers came up with a new feature to hide unnecessary content. With this, they killed two birds with one stone: they freed each user’s shelves from a mountain of unnecessary junk and allowed parents to hide strawberries or cruel applications from their children.
How to show hidden applications?
Via iTunes from PC/Mac:
- 1. Launch iTunes itself (the manual is written according to version 10.7)
- 2. Click the (Sign In) button and enter your Apple ID and password
- 3. In the “Quick Links” menu, select “Account”
- 4. In the “iTunes in the Cloud” block, select “View Hidden Purchases”
- 5. A list of all hidden applications opened in front of us, among which we are looking for what we are looking for, in my case this is the “Ukrainian Cams 2” application and click on the “Unhide” button to the right of it.
- 6. The opened application will look like this, with the faint inscription “Unhidden”.
- 7. To easily find the application, use the search.
Via iPhone/iPod Touch and iPad:
- 1. Open settings
- 2. Click the “Store” tab and click “Login”
- 3. “With an existing Apple ID”
- 4. Enter ID and password
- 5. You can see from the account inscription below that everything has been entered correctly
- 6. Open the AppStore and select the “Featured” tab on the bottom panel, scroll the list to the very bottom and click on our account ID
- 7. In the tab that appears, click “View Apple ID”
- 8. In the “iTunes in the Cloud” block, select “View Hidden Purchases”
- 9. A list of all hidden applications opened in front of us, among which we are looking for what we are looking for, in my case this is the “Ex Libris” application and click on the “Unhide” button to the right of it.
- 10. To easily find the application, use the search.
ArviZami was with you.
Articles
21-09-2015
All applications purchased by the user remain in a section called “Purchases,” which is not always convenient if this list gradually grows to impressive sizes. ? In fact, you can't permanently delete information about downloaded apps, but you can hide them for convenience.
How to remove apps from purchases and clean the App Store
Open the iTunes application from your home computer. Next, we check whether our PC is authorized. To do this, go to the “Store” menu and select the “Authorize computer” option. Note that the Alt key is used to call the top menu in the Windows operating system. Now go to the iTunes Store at the top right, and from there to the section with quick links. We are interested in the “Shopping” menu. We open the “Applications” tab, where we can view all the content we downloaded from the store at one time or another. As soon as we move the mouse cursor over any of the programs, we will see a cross at the top left. Clicking on it will hide the application. Now it will no longer be displayed among other purchases, but this does not mean that it will be deleted.
If for some reason we need to see the program again, open iTunes, go to the store menu, and from there to the section with quick links. Select the “Account” option. A window will open in front of us where we will see a section called “iTunes in the cloud”. To the right of "Hidden Purchases" is the "Manage" option. Click on it and see a list of programs we have hidden. Below the application icon and name there is a “Show” button. If you wish, you can also select "Show All" in the bottom right.
Note that figuring out how to clear purchases in the App Store was easier for owners of devices up to version 7 of iOS. The fact is that previously it was possible to hide applications directly on the device.
How to remove App Store purchases from your device and clean it up
There are three main ways to delete purchases on the gadget itself. The first and simplest method assumes that the user goes to the device’s desktop and presses the shortcut of the application he needs for a few seconds - until he starts to move. After this, an image of a cross should appear at the top left. Clicking on it will delete the program and all its data. You should also keep in mind that standard system applications cannot be removed.
You can also delete a game or program through the device settings. Go to the “Statistics” item through the main settings and select “Storage location” (the last item may have a different name, depending on the iOS version). Now we wait for the system to load the list of programs. Select the application we need and click “Uninstall a program”. Note that those programs that take up the most space on the device will be located at the top. To see all applications, click the corresponding button at the end of the list.
The third method involves using iTunes on your computer. The device is connected and selected in the media library. Now go to “Programs” and delete what you need. At the very end, do not forget about synchronization.
Articles
21-09-2015
Various reasons may prompt a user to get rid of all or some applications from his shopping list in the online store. Having found out how to clear App Store history, as well as how, if necessary, to restore the necessary information, a person will be able to make his work with an Apple device much more convenient. For example, the user will be able to hide information from prying eyes, or clear the history in order to increase comfort - especially if the list of downloads has already become simply huge.
How to clear the purchases section in the App Store history
If we only have the device itself at hand, we go to the store by clicking on the corresponding icon on the desktop. Before us is the “Categories” section. Find the “Updates” button at the bottom right and click on it. Go to “Purchases”, and from there to “My Purchases”. Select any program and run your finger over its name from right to left. The Hide button appears. Click on it. This is how, one by one, you can hide certain applications in order to free up space and not get confused in the list of programs that tends to infinity. According to the company's official policy, content purchased in the store cannot be completely deleted, but it can be hidden, which is even more convenient since you won't have to pay for the program twice.
To return what was hidden, go to the iTunes application on your computer and go to the account settings menu. From the drop-down list, select “Information” and enter your ID details (email address and password). To the right of the “Hidden Purchases” menu, click “Manage”.
Knowing how to clear App Store history, you can easily free up space on your device. To remove an application, press and hold the icon of the program you want to remove until it begins to wiggle slightly. Next, click on the cross icon. It's even easier to clear history on your computer through the iTunes application. Select a program and press the Delete button.
How to get a hidden App Store app back after clearing history
To see a hidden program, you need to go to the “Hidden purchases” menu and click on the “Show” button.
To view your purchase history, go to the iTunes application from your computer and go to the menu with account information. Log in to your account by entering your email address and password. Go to “Account Information” and, if necessary, enter the password again. Scroll down the window until “Purchase History” appears. If desired, you can expand the full list (the “See all” button).

