Star news


Connecting the electrical panel in the apartment. Electrical panel installation
Distribution panel, also called an electrical cabinet, is a box in which electricity meters, network protection devices and distribution devices are installed.
For country houses and small cottages with an area of 150–200 m2, one electrical cabinet installed at the electricity input is enough. Inside the box there is a meter, a powerful input circuit breaker that controls the entire power supply circuit of a country house or cottage, and several smaller circuit breakers.
Usually, one of them controls the electrical outlet network, another controls the lighting network, and the rest have a narrow specialization and protect specific appliances: a washing machine, an electric stove, an electric heater in a sauna, etc.
Installation of distribution shield is the most important and most responsible part of electrical installation work in the house. It will be right if you take this process seriously. Reliability depends entirely on the quality of installation electrical network and the operation of its protective devices.
The assembly of electrical panels should ensure ease of operation of electrical wiring, the possibility of separate control of power supply to individual groups of consumers in the country and selectivity of protection operation. This is only possible with a competent approach to each stage of work on installing a switchboard.
Work begins with drawing up a project for power supply to consumers. Consumers must be grouped by power consumption, by purpose, by the need to install protection, and so on. Consumers include: kitchen, living room, bedroom, children's room, plumbing unit, hallway, corridor.
We group consumers to unite them into separate electrical lines. For certain groups it is necessary to use RCDs as current protection.
Let’s take the project “to the maximum.” For it you need:
- Input machine - 32A;
- Electric stove - 20A;
- Dishwasher - 16A+RCD 30mA/25A;
- Kitchen sockets - 16A + RCD 30mA/25A;
- Kitchen and bathroom lighting - 10A;
- Corridor and hallway lighting - 10A;
- Room lighting - 10A;
- Air conditioning - 16A;
- Sockets - 16A;
- Sockets in the nursery - 16A+RCD 10mA/20A;
- Washing machine - 16A+RCD 10mA/20A;
- Water heater - 16A+RCD 10mA/20A.
It is clear that there are not such a number of automatic devices and RCDs even in new multi-storey buildings, let alone in the country. Here you can combine - for example, hang all the lighting on one machine, sockets in residential premises (preferably in the kitchen separately and with an RCD) on another, etc. An RCD can be hung everywhere, but for a water heater, washing and dishwasher highly recommended.
As a result we get:
At my dacha, the wiring is done differently due to the presence street lighting and the territorial distance of the kitchen, residential building and shower block with utility block. But more on that separately.
Electrical panel installation
Before you begin installation electrical panel, you need to decide what type of similar equipment is best for you. The internal electrical panel is hidden in the thickness of the wall, and the overhead panel is mounted directly on its surface. Internal installation equipment takes up much less space and looks much more aesthetically pleasing, so it is advisable to choose just such an electrical panel for your dacha.
Installation of the shield is carried out in several stages. First you need to select a place suitable for its installation, and then apply markings to the wall. To do this, you need to measure the dimensions of the purchased shield. At the required height from the floor, draw a horizontal line, and then vertical lines at a distance equal to the width of the electrical equipment plus a margin of 30 mm on each side. After this, draw a second line horizontally at a distance equal to the height of the equipment. But you also need to leave a margin so that the shield can easily fit into the hole prepared for it in the wall.
At the second stage, you should make a hole according to the applied markings. To do this, you will need a hammer drill and an angle grinder - a wall chaser. Above or under the electrical panel, you need to make grooves for the outgoing wires and input cable, then install the base of the panel in the hole prepared for it. To mount the base correctly, you will need a hydraulic level. Using alabaster, you need to make a preliminary fastening. After this, attach the base of the electrical panel using dowel nails. Typically, similar fasteners are included with the electrical panel. It is recommended to fix the electrical panel at a height of 1.6–1.7 m from the floor, and seal the remaining cracks around the perimeter with polyurethane foam.
To insert wires into the electrical panel, you need to remove the plugs from the technological holes for their entry. You can also insert the wires into the panel through the back wall of its base.
After the base is secured, you need to proceed to the next stage - assembling the electrical panel.
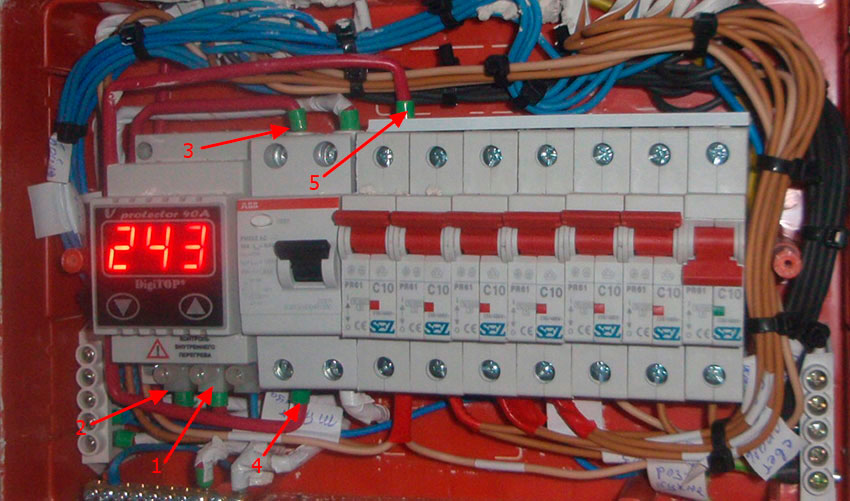
Place the DIN rails (metal profile) in the places specially provided for this purpose and secure them with self-tapping screws. After this, install the grounding and neutral busbars. They come in a variety of modifications. If there is enough space, it is better to install the tires by mounting them on a DIN rail. The zero bus is installed on insulators. As for the grounding bus, it can be strengthened without insulators directly to the body of the electrical panel. If the protective and neutral conductors at the input are combined (a two-wire connection diagram is used - phase and PEN conductor), it is necessary to separate the neutral and protective conductors on the grounding bus. A common input PEN conductor is connected to the grounding bus, after which a jumper is installed from it to the zero bus.
When choosing a location for installing an electrical panel, two points need to be taken into account. Firstly, after arranging the furniture, it should remain freely accessible, and secondly, it should be located as close as possible to the power supply entry into the house.
Then protection devices are installed. The choice of machine rating will depend on the cross-section of the outgoing wires. The electrical circuit breaker is designed to protect the outgoing line from short circuits. If its rating is overestimated, the outgoing wire may become very hot under high load. As a result, it will either fail or cause a fire. Consequently, overstating the machine is a serious risk of fire.
In accordance with the project, it is necessary to install the machines in the electrical panel. First, an introductory machine is installed. Wires from it will go to group automatic machines of outgoing lines. The wires should be placed so that they cross each other as little as possible. When stripping wires, you must make sure that their bare parts do not protrude from the terminals of the machines. Groups of machines are connected to each other by special jumpers, which are made from wire with the same cross-section as the input wire. But in order to make the assembled circuit more reliable, a phase bus must be installed instead of jumpers.
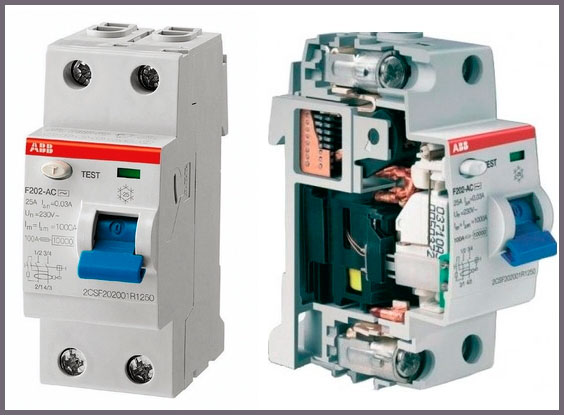
To prevent the possibility of electric shock, it is necessary to install an RCD, since the machine is not able to protect against such a nuisance. Its function is to protect against short circuit of the outgoing line. The function of an RCD is precisely to protect against electric shock. It must be installed on those lines that go to the sockets. Residual current devices are especially necessary for lines going to the electric stove and washing machine. To connect the RCD, the neutral wire must be taken from the neutral bus, and the phase wire from the machine (Fig. 12).
When the load is connected, you should check whether there is voltage on the outgoing lines. To do this, you need to turn off the circuit breakers on these lines and apply voltage to the electrical panel through the input circuit breaker. Using a multimeter or probe, make sure there is voltage on the machines. If everything is functioning normally, the input circuit breaker is turned off and the final assembly of the electrical panel begins. To do this, install the cabinet cover, apply markings to all machines, guided by the single-line diagram specified in the project. If the cabinet door is made of opaque material, it is advisable to stick on it with inside a copy of the diagram. It will be useful during further operation, especially if you need to troubleshoot any problems. This stage completes the installation and assembly of the electrical panel.
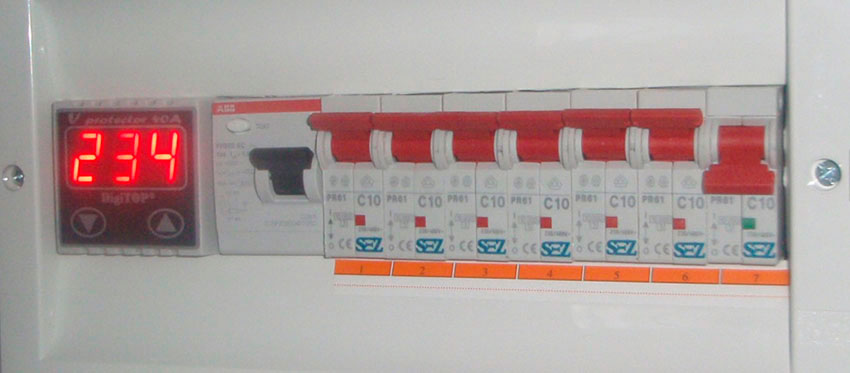
Figure 12. Electrical panel diagram: 1 – input circuit breaker; 2 – electric meter; 3 – residual current device (RCD); 4 – grounding bus; 5 – zero bus; 6, 7, 8, 9 – machines for outgoing lines of lighting and sockets
From the book Living Room author Zhalpanova Liniza ZhuvanovnaInstallation of glass Glass is installed in the frame of the window and secured with glazing beads or studs. To secure the glass, only small nails and pins are used. They should be driven into the sides of the folds every 25 cm so that they go slightly upward from
From the book Living Room author Zhalpanova Liniza ZhuvanovnaInstalling skirting boards The last stage of work is attaching the skirting boards. Skirting boards give a wall a finished look, improve the appearance of the floor and close gaps between the floor and the wall. They can be made of wood and plastic. If the floors are made of linoleum or polyvinyl chloride
From the book Living Room author Zhalpanova Liniza ZhuvanovnaInstallation of stairs The installation of stairs begins with the installation of stringers. They are fixed to the floor surface of the first floor with screws, and at the top they are attached to the floor beams. The fastening points can be reinforced using metal corners screwed to the floor.
From the book Bedroom authorInstalling glass Install glass into the window frame and secure it with glazing beads or studs. Use only small nails and pins to secure glass. They should be driven into the sides of the folds every 25 cm so that they go slightly upward from
From the book Bedroom author Lyakhova Kristina AlexandrovnaInstallation of skirting boards Skirting boards can be smooth or grooved. For a tighter connection to the floor and walls, a groove or bevel is made in them. Join the skirting boards along their length at right angles, while in the corners of the room it is necessary to make a cut at an angle of 45° and join “at
authorInstalling skirting boards After gluing the linoleum joints, install the skirting boards. Wooden skirting boards are attached to the plugs in the walls with nails with a diameter of 2.5 mm and a length of 35–40 mm or screws with a diameter of 3 mm and a length of 25 mm. Polyvinyl chloride skirting boards are glued to the walls with KN-2 glue and
From the book The Newest Encyclopedia of Proper Repair author Nesterova Daria VladimirovnaInstallation of plumbing You can install plumbing equipment without the help of a plumber, you just need to have the necessary tools on hand and follow some rules. Correct installation of plumbing equipment and devices is the key to their normal operation
From the book The Newest Encyclopedia of Proper Repair author Nesterova Daria VladimirovnaInstallation of toilets As a rule, ceramic toilets are installed on concrete or tiled floors and secured with dowels, screws, or by gluing to the floor. A sheet of rubber with a hole for the direct release of the toilet is laid between the floor and the toilet.
From the book The Newest Encyclopedia of Proper Repair author Nesterova Daria VladimirovnaInstallation of washbasins Ceramic washbasins, single and group, are installed on cast iron brackets attached to the wall with screws. First, holes for attaching the brackets are marked according to the template, then the holes are drilled (when installing the brackets
From the book Electricity in the Countryside author Pechkareva Anna VladimirovnaInstalling sockets Before you begin installing the socket, you need to run the cable to the place where it will be installed. In addition, you need to prepare the necessary tools and materials: screwdriver, pliers, impact drill or hammer drill, drill bit
From the book Do-it-yourself stoves for baths and saunas author Kalyuzhny Sergey Ivanovich author Simonov Evgeniy Vitalievich From the book Building a house quickly and cheaply author Simonov Evgeniy Vitalievich author Nikitko IvanInstallation of beacons Before starting the production of screeds, it is necessary to install the so-called beacons. Without their use, it will be impossible to ensure that the floor surface is perfectly flat and has the required height. This is especially true for large
From the book All about tiles [Do-it-yourself installation] author Nikitko IvanInstallation of drip flashing Installation of drip flashing is necessary in cases where there is a significant gap between the wall and floor cladding (this often happens, for example, when finishing bathrooms). It is made as follows: at the initial stage, the tiles are cut
From the book Home Locksmith author Zvonarev Nikolai MikhailovichInstallation of pipes Steel pipes are used almost exclusively for gas and water supply indoor installations, and cast iron pipes are used for sewerage. Water and gas pipes are connected using couplings, tees, transitions and other threaded fittings. Pipes
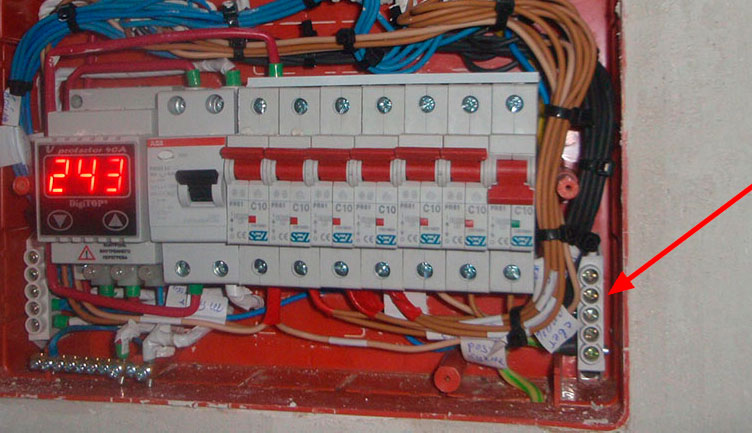
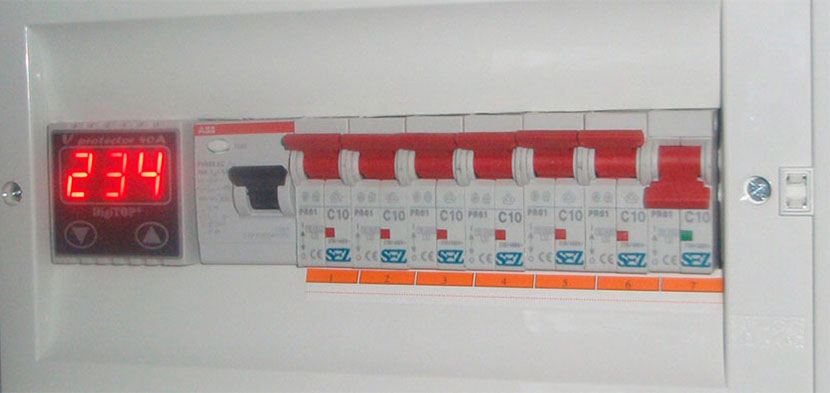
I talked about how to completely replace the electrical wiring. We brought all the new wiring into one place in the hallway. There was already a metal built-in electrical panel with a meter and an input machine. Below this shield we placed an electrical panel with automatic machines.
We laid the wires to the panel in a groove on the side of the meter. They hollowed out space for a shield for twelve modules. They brought the cable shield into the housing and froze it with alabaster. After the alabaster hardened, the electrical panel body was sealed with gypsum plaster.
How to choose an electrical panel
Now we will look at several general rules for choosing an electrical panel. Let me make a reservation right away - I am not a supporter of buying electrical panels at markets and shops like “Everything for construction”. I buy them either in trusted stores or online from manufacturers.
- It is better to buy an electrical panel with a small supply of modules. You should always have the opportunity to maneuver in a larger direction. For example, when we were calculating the replacement of wiring, we planned a panel with eight modules. They set it to twelve. During the process of assembling the shield, we regretted that we did not buy sixteen modules.
- Try not to skimp on the shield. Cheap shield - cheap plastic. Over time it may turn yellow and become brittle. Also, manufacturers of cheap shields do not take into account such qualities of the shield as: self-extinguishing and low smoke.
- Shields from renowned manufacturers are already designed for competent, convenient and safe cabling inside them. An inexpensive shield purchased on the market will probably have to be tuned and completed.
Electrical panel design
Initially, it was planned to install one RCD and six automatic devices in our panel. And then, the customer was perplexed why there were six machines for two rooms and a kitchen. Previously, everything worked from two plugs.
I explain to him: before there was no air conditioning, a boiler was bought instead of an old gas water heater, the washing machine was connected through an extension cord in the room along with the TV. Plus, in the bathroom there was a brand new, not yet connected shower box with lights, radio and other gadgets. And somewhere you need to connect a couple of dozen sockets and a dozen light bulbs.
In the end, we decided this: we give three machines for sockets and lighting, and four machines for a boiler, shower, air conditioner and washing machine.
The RCD rules over the machine guns. Residual current device or differential relay (difrele). It turns off everything at the slightest attempt of electric current to escape to the side or to your hands. An extremely necessary thing in your shield.
Above all this is a voltage relay. Controls incoming voltage. The voltage in your network jumped, say, to 260V. Click! The relay turned off all equipment. The voltage has dropped below 250V. Click! Turned it on. The same thing happens at the lower limit.

A very necessary gadget for your home. Primitive, not very accurate, Chinese. But, in conjunction with a contactor, it is practically indestructible.
How to connect a phase in an electrical panel
- Input to the phase voltage relay from the meter.
- Phase output from the voltage relay to the RCD.
- Input to phase RCD with voltage relay.
- Phase output from RCD to automatic machines.
- Entrance to phase machines with RCD.
Electric current from the meter is supplied to the voltage relay. If the voltage of the electric current corresponds to the specified parameters of the relay, the current is supplied to the RCD. From the RCD, electric current is supplied to the circuit breakers.
How to connect zero in an electrical panel
When purchased, the shield was equipped with one zero tire. I had to additionally buy a pair of zero insulated tires.
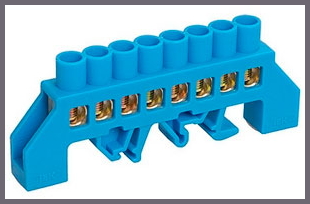
We used one of these buses for wiring the zero after the RCD. The second is for grounding.

- Zero from the meter comes to the non-insulated zero bus from the panel kit.
- From the same bus, zero goes to the RCD.
- Zero input to the RCD.
- Zero output from the RCD.
- Connecting a zero with an RCD to a zero bus for wiring consumers.
- Zero connection to power the voltage relay.
Our zero is divided into two groups. The first group is used to connect the input, RCD and voltage relay. The second is for connecting the neutral conductors of all lines. The wires are collected in threes and crimped with cable lugs. How to crimp the wires is shown below.
Attention! Do not use too much force to tighten the tire screws. Otherwise, you can cut the wires with screws.
How to connect the ground in an electrical panel
We placed the bus for connecting PE conductors in the lower right corner. We screw the zero tire directly to the shield with self-tapping screws.
Just like at zero, we crimp three wires into one lug and connect them to the bus.
Additionally, I would like to draw your attention to the ground. In my case, there was correct grounding initially. If you do not have a grounding loop or you are not sure about something, it is better to play it safe and consult with specialists.
Attention! Disdainful attitude to grounding and zeroing is a direct threat to the life of you and your loved ones.
How to connect machines in an electrical panel
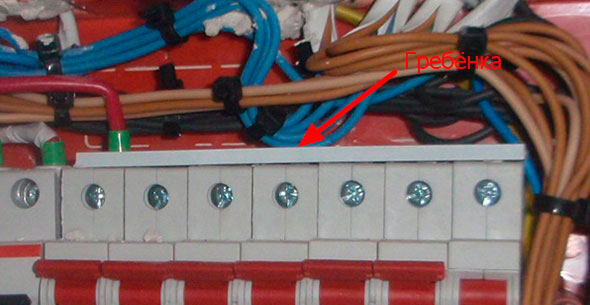
We connect the machines from above with a connecting comb.
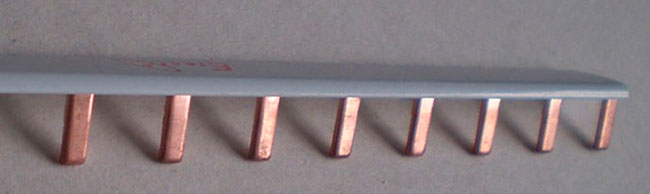
Many people prefer to make jumpers between machines from wire. I believe that a comb is more reliable. And aesthetics are not in last place.
When purchasing a comb, pay special attention to its weight and thickness. Many manufacturers maintain low prices for combs by reducing the cross-section. The cross-section of the core in the comb must be at least 10 mm/sq.
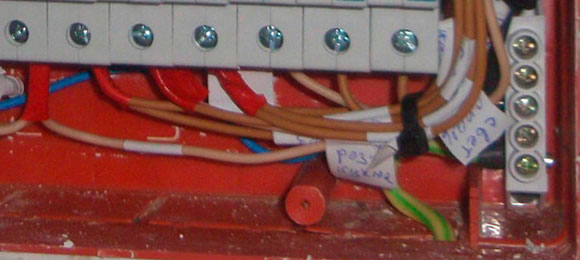
We insert wires from consumers into the machines from below. Some machines have two wires. It is allowed to clamp up to three wires under one clamp. We crimp stranded wires with cable lugs.
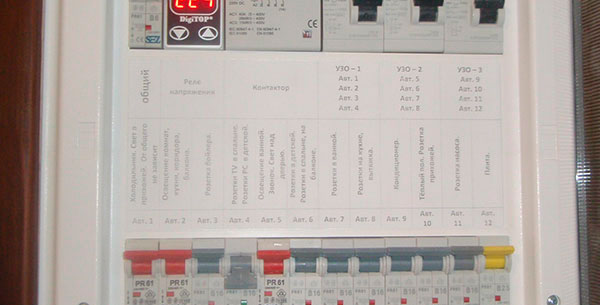
How to sign machines in an electrical panel
The next step is no less important. You need to sign the machines, which one, what turns it off.
Each shield comes with a self-adhesive label. There are either empty cells or serial numbers of machines. Not very comfortable things. There is very little space for a normal description of the machine. Many years pass and no one remembers what “ros.com.2” means. Therefore, in this case, we simply had to number the machines.
Then, on a piece of paper we made detailed description. This paper was glued to the counter with the counter, on the inside of the door.
If the design of the shield allows, you can paste the description directly onto the shield.
This is easy to do.
- Let's make a table. I do it in Word, right away in the right size.
- Let's print it out.
- We laminate the front side with transparent tape.
- We glue double-sided tape on the back side.
- Using a sharp knife or blade, cut out a table under the ruler.
- We tear off the protective film on the double-sided tape and glue the table to the shield.
How to maintain an electrical panel
The electrical panel must be maintained regularly. Its performance and the safety of your home depend on this.
- Six months after assembling and connecting the shield, it is necessary to carry out a control traction of the contacts of the machines and buses.
- In the future, this procedure should be carried out annually.
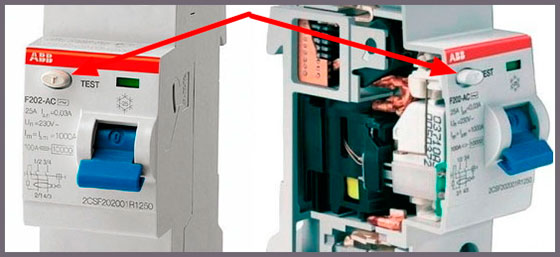
- Every two weeks it is necessary to test the RCD. To do this, press the “TEST” button on the device. Testing is best done in the morning, when most electrical appliances are turned off.
Attention! Do not use too much force to tighten the tire screws
P.S. What to do if you need advice or consultation?
- Ask a question on the Electrical Plumbing forum.
- Call me at
- Ask your question on social networks -

