Star news


LED lamp driver repair. DIY LED lamp repair
Manufacturing technologies for lighting products have recently opened up for consumers a new type of devices based on diode elements. In the market they are known as LED lamps. The active distribution of these devices has pushed aside both fluorescent and halogen analogues, not to mention traditional ones. And there is an explanation for this, since LED lamps were initially positioned as devices with a high working life and unsurpassed lighting quality. This is true, but LED devices are not immune to breakdowns, which are sometimes not so easy to fix.
Installation of LED lamps
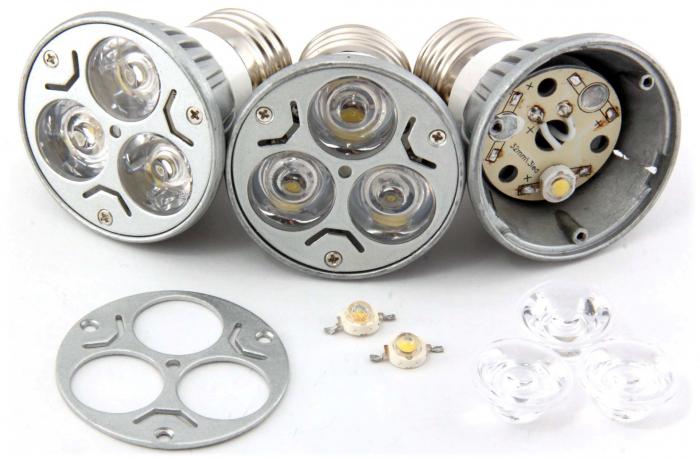
To understand what elements you will have to deal with during the repair process, you need to familiarize yourself with the internal filling of the lamps. It is obvious that high performance indicators were made possible thanks to the manufacturability of the product. So the device LED lamps like this:
- body (usually with a unique design and design);
- driver (performs the function of a power converter);
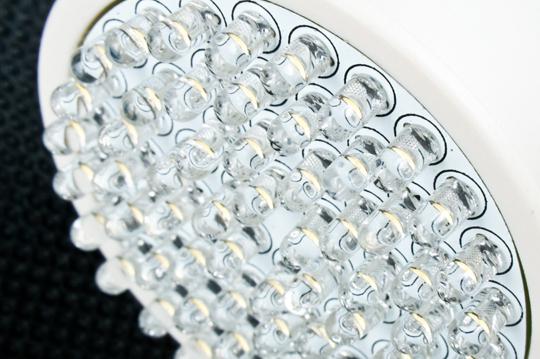
- light source (directly LEDs);
- radiators;
- optical elements.
Now it’s worth taking a closer look at each of the described components. Everything is clear about the body - it is not of particular interest from the point of view of the functional system of the lamp. The driver acts as a power supply for the diodes, but does not output voltage, but the LEDs produce light by converting the electricity supplied from the driver. The device also includes a radiator and optics. The former are used to cool heating LEDs, and lenses with reflectors (secondary optics) convert LED radiation into light acceptable for use.
Disassembling the lamp

Not a single repair can be done without this operation, although for household lighting lamps the procedure may seem exotic. There are two approaches to analyzing LED lamps. In the first case, a screwdriver is used. If the model has fins for heat removal, then the operation is more likely to be successful - just find a suitable loophole between the ribs and the tool blade and try to separate the body. Since repairs do not always involve replacing faulty elements, even at the disassembly stage you should be sensitive to internal components, including
The second method of disassembling the lamp is applicable to models with thick glass, which, in principle, are not suitable for physical manipulation. There is one trick here: you need to take a hairdryer and heat the body with it - then the glued glass circle will come out of the cylindrical base without additional effort. The secret is that the thermal effect expands the size of objects, and the adhesive composition becomes elastic - therefore, under a hot hairdryer, LED lamps literally crumble.
Replacing the power supply

Among the common faults in some models of LED lamps is the power supply in which the capacitor or resistor burns out. Attempts to evaluate the performance of a given element using measuring instruments, as a rule, do not give the expected result, since the problem is detected only when connected to the network.
One way or another, the only way to eliminate the defect is to replace the unit, since repairing LED lamps may require a complete analysis of the board for faults, which is difficult without special equipment.
It is important to note that electrical goods stores usually do not have them, so you should immediately go to the points of sale of radio electronics and ask for a power supply for 5W LED lamps. What follows are several simple manipulations with dismantling the old and installing a new component.
If the LED burns out
If the power supply is working normally, then it makes sense to look for the problem among the LEDs. Before repairing LEDs by replacing non-working elements, you should check which diode requires updating. To do this, you need to use a 9 V battery and use a resistor (resistance 1 kOhm) to check all the diodes one by one.
When a defect is detected, you need to close its outputs. As a rule, the connection of sources is carried out according to the chain principle, so short-circuiting one of them will not lead to loss of function by other elements - perhaps their light will be even brighter. At this stage, repairing LED lamps with your own hands is impossible without a soldering iron. All old diodes are soldered off, after which the board is turned over - then new elements are soldered to the contact tracks.
Features of corn lamp repair
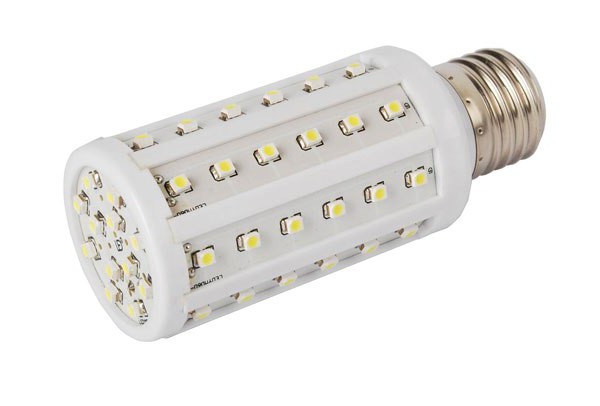
In terms of ease of repair, the LL-CORN series models, that is, corn-type LED lamps, are the most profitable. The diode sources are located directly on the outer surface, which allows the technician to repair LED corn lamps without interfering with the internal structure. If necessary, the LEDs can be ringed and replaced - the technology is similar to the methods for repairing lamps with other designs. A faulty diode should also either be updated or short-circuited with a special jumper. This will not affect the stability of operation and reliability of the LED device, but in aesthetic perception the absence of one of the light sources will be noticeable.
Driver problems
This element itself is the most reliable part of the lamp, so there are common cases when the driver was preserved, and the rest of the filling, along with the LEDs, was updated. Malfunctions in boards often arise due to overload with protective equipment and discrepancies in nominal performance indicators, which over time forces users to repair the LED lamp driver or replace it. The specific reasons why the lamp driver stops working are difficult to identify. If we talk about the signs, this is the blinking of the LEDs, that is, they are, in principle, working, and everything is in order with the contacts, but the interaction scheme with the converter itself is incorrect. In such cases, all that remains is to replace the driver by purchasing a new element on the radio market - the markings on the board will help you choose the appropriate model.
Upgrading the lamp during repairs
There is little good in the fact of repair, but forced intervention in the device provides some advantages. In addition to the fact that a beginner can learn how to repair an LED lamp without the help of specialists, it makes sense to use this opportunity to improve the quality of the lamp. For example, during repairs it is worth experimenting with LED diodes. Often, the boards and the housing itself with a heat-dissipating function are not suitable for “native” LEDs - as a result, with a more or less high-quality base of the device, the light sources do not reach the possible maximum in radiation characteristics. Therefore, in some cases it is worth completely updating all diodes.
The opposite situation is also common, when the base itself lacks a capacitor and a rectifier. As a rule, this defect is caused by Chinese lamps, which implement a series connection of pairs of “counter” diodes with a ballast capacitor, which leads to frequent blinking. Of course, repairing LED lamps will eliminate this flaw, but such revisions of circuits at home will not ensure the durability of the device, although the quality of lighting will undoubtedly increase.
Conclusion
Despite the obvious advantages of LED lamps, manufacturers have not yet worked out many technological nuances in the final implementation of the devices. The increasing complexity of the design and internal structure of the lamp has led to the expansion of the list of components susceptible to failure. The situation is aggravated by the fact that repairing LED lamps with your own hands is significantly different from operations for restoring traditional and more familiar lighting sources. The user is required to know some basics of radio engineering and skills in handling a soldering iron, and all this is often supported by the need to purchase expensive drivers and LEDs. One way or another, LED devices in the best designs from branded manufacturers have many advantages, for which even difficult repairs can be forgiven.
LED lamps today are considered the most economical and durable compared to others. And although their cost is still relatively high, they are increasingly replacing incandescent and fluorescent lamps.
Why is this happening?
Mainly for two reasons:
1. incandescent lamps burn out quickly and have low efficiency,
2. Luminescent ones require special disposal as they contain mercury vapor in the flask. In addition, if you break such a lamp at home, you can expose your family to poison.
There are no such problems with LEDs. Throw them anywhere and break them to your health, they do not pose any danger - except for glass fragments.
At the same time, there are a lot of companies producing these products, and choosing a quality product among them is sometimes not an easy task.
Yes, and a famous brand does not guarantee complete confidence in the long-term uninterrupted operation of the device.
What should you do if the lamp stops shining and you can’t replace it under warranty? You can try to repair it yourself. Its structure is not complicated and does not require special tools for disassembly.
This article will describe the disassembly and repair of a standard, budget-class LED lamp. In addition, one of the possible breakdowns and its elimination is given.
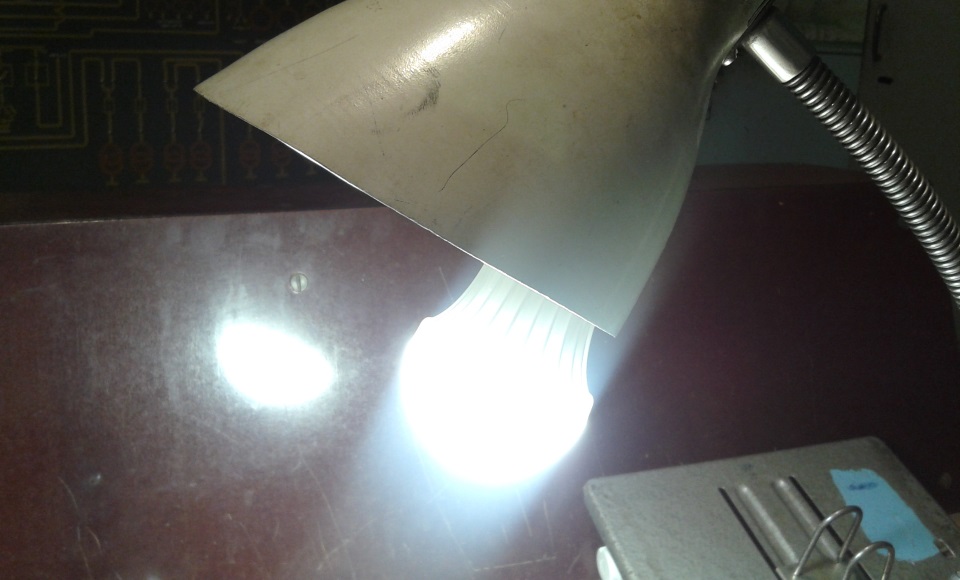
The only tools you need are a screwdriver, a knife and possibly a two-handed indicator.
![]()
If there is no indicator, any “dialing” will do.
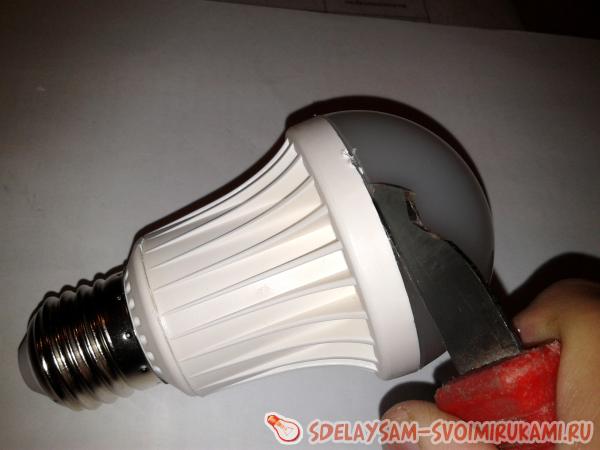
So, let's start by removing the diffuser. To do this, insert the knife blade into the gap between the glass and the plastic case and carefully move it in different directions.

The diffuser should come out of the latches and be removed without any problems.
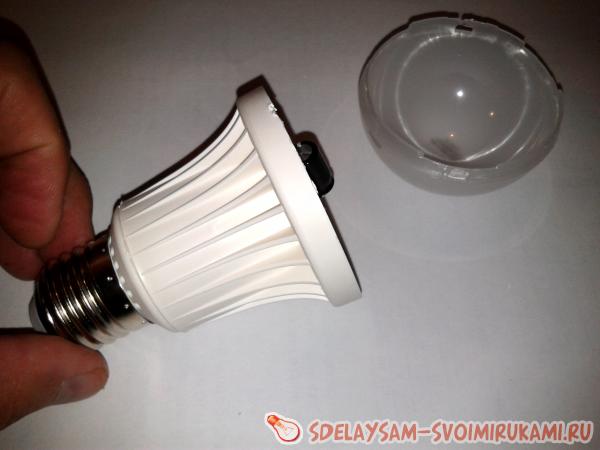
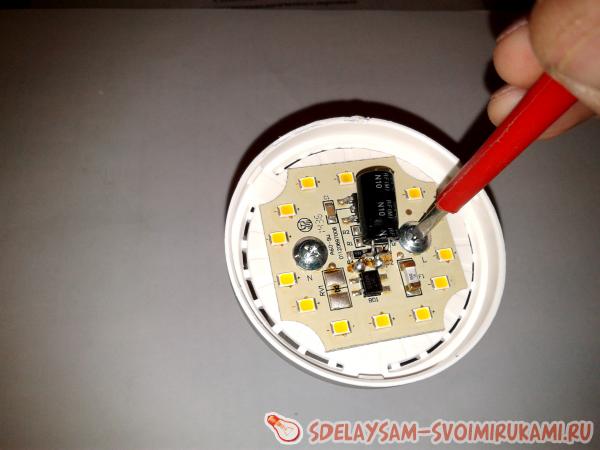
A board with LEDs and a rectifier reveals itself.

There is also a fuse installed on the board. To make sure that it is not burnt out, we connect the ends of the continuity wire to its terminals. Light or sound indication of the device will show its serviceability. If it doesn't show up, you'll have to replace it.

When the fuse is intact, we disassemble further.
First, unscrew the two screws securing the board, after which it can be easily removed.

Under the board there is a radiator in the form of a metal flask.

Thermal paste applied to both surfaces improves the heat transfer of the board to the radiator.
If necessary, it can be changed if it has dried out. Regular thermal paste for a computer processor will do.
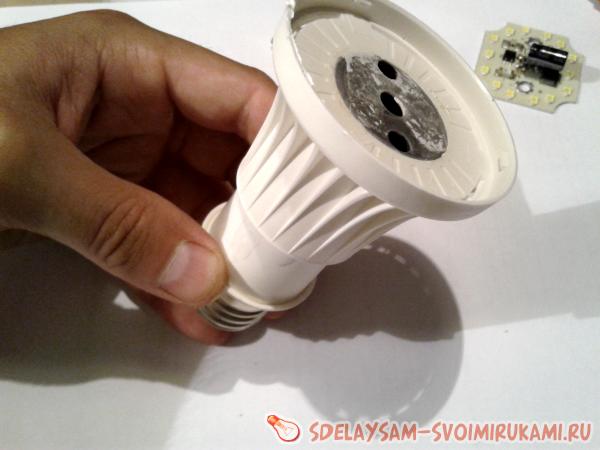
To continue disassembly, pull on the top of the lamp housing and it can be easily removed.
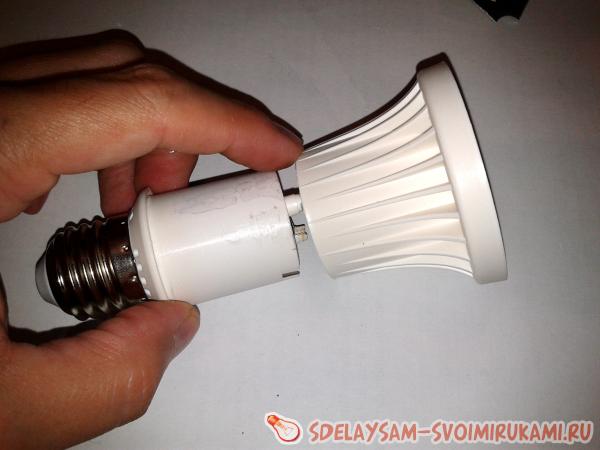
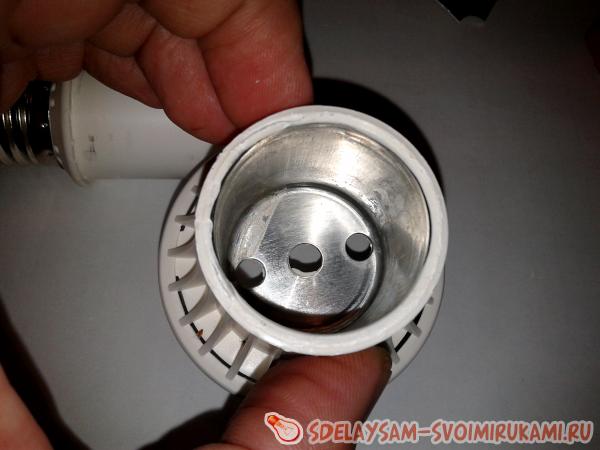
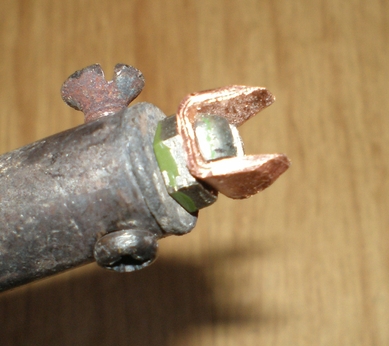
At the bottom of the case with the cartridge, you can see two metal strips, one end connected to the base, and the other with holes where the screws go.

Thus, voltage is transmitted through the screw from the base to the board.
The problem turned out to be that over time the contact became bent and did not come into contact with the board screw. Hence the lack of light from the lamp.
To eliminate this malfunction, simply bend the end of the contact strip with a screwdriver or tweezers.
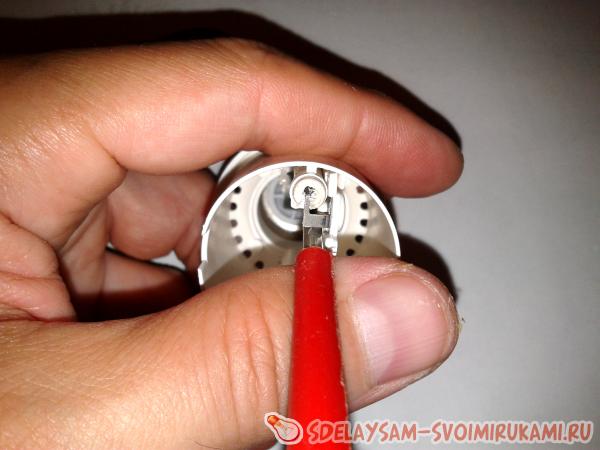
Of course, you can do it better, for example, by soldering wires to the board and base. Then there will definitely be no problems with contact. But more often than not, the first simple option is sufficient.
Now you can assemble the lamp in reverse order. We put on the upper part with the radiator so that the two contacts fit into the holes.


Next, install the board and tighten it.
More and more LED lamps are replacing incandescent and mercury lamps. And it’s clear why. Moreover, recently the price for them has dropped significantly. But these lamps also do not last forever and the time comes when they break. And this does not necessarily happen because of a cheap manufacturer; this also happens with products from a famous brand. In this case, it’s doubly offensive for the money spent. But repairing LED lamps with your own hands is very simple and does not require special knowledge of electronics.
But don't get upset prematurely. All is not lost; it is possible to repair the lamp with your own hands and it will last for a long time. This article describes one of the common causes of failure and discusses the repair of 220-volt LED lamps.
As with any repair, some tools are needed. Here's what you'll need:
- Soldering iron
- Solder and rosin
How to fix an LED lamp
First you need to remove the diffuser. To do this, as shown in the photo, we insert a knife blade instead of connecting the glass to the plastic body and make horizontal movements with it in different directions.
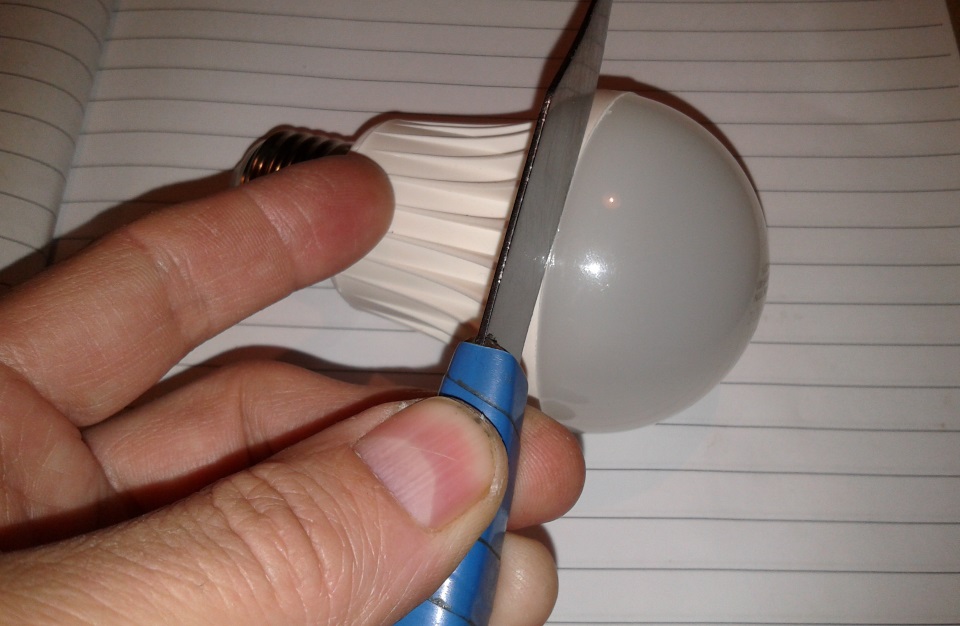
At some point, the latches will come out of their socket and the glass shade will be removed.
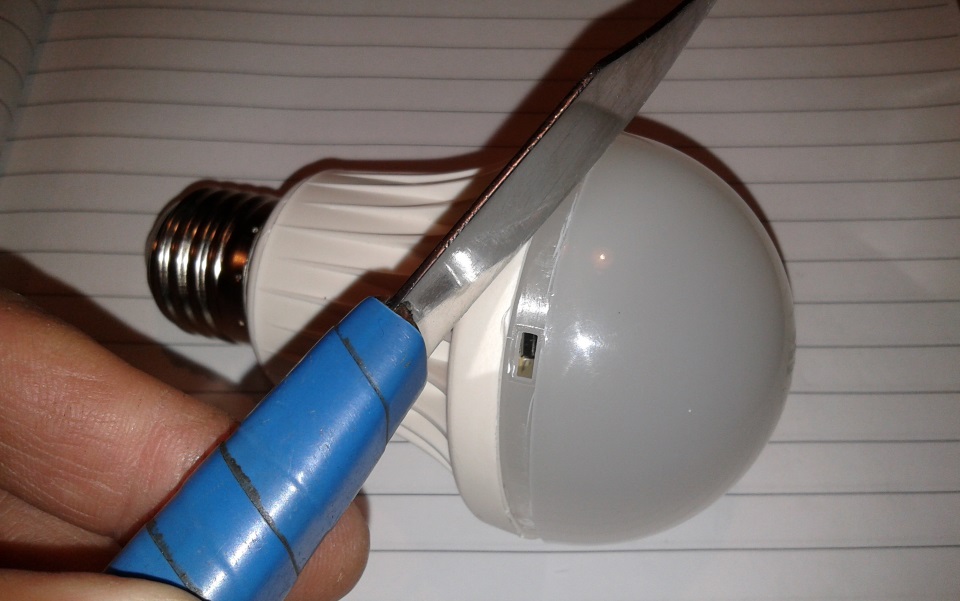
There is no need to saw the cap with a knife, otherwise you may damage both the lamp and your fingers. In some lamp models, the shade can be removed easily, in others it may take more time and effort. In any case, they will not be in vain.
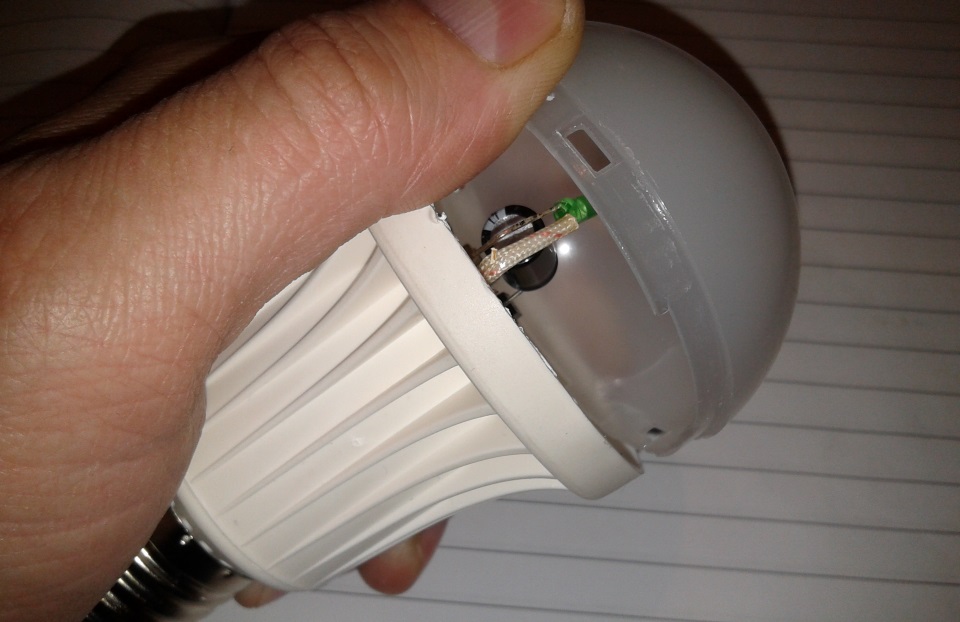
Now you see a board with LEDs. If there is visually no damage or burns on the electronic elements, carefully - you will need a magnifying glass - inspect each LED. As you can see, you don’t even need an LED lamp circuit for repairs, everything is very simple.
Usually, if they are the problem, a darkening will be visible on one of the crystals. Not necessarily - it should be a black burnt hole, sometimes a barely visible dark spot can be a problem. Just compare “suspicious” with all the others and you will see the difference.
You can, of course, apply a voltage of about 3 volts to each LED from the power supply and thus determine which one is unusable. But usually the first option is enough. Yes, because of one LED, all of them do not light up, since they are connected in series in a chain.
When the problematic element is found, we simply pick it out with a knife. The LED carefully “braids”, leaving smooth soldering areas.
Next, you will need any other working LED of any color with legs. It can be taken from an old charger, a flashlight, a glowing lighter, and so on. This repair used a green charging LED. On the second board, which you will see below, the Soviet AL307 with a voltage of 3 volts was used.

In general, whatever you have on hand will do, as long as it’s in working order. Therefore, you can first check it by connecting it to a 3-volt battery or power supply, observing the polarity.
If you are not sure where the anode and cathode are on the LED, simply reverse the polarity and it will light up in the desired position.
Now we heat up the soldering iron and solder the LED in place of the removed one.
Polarity is also important here, and the easiest way to find it is to solder the element in reverse if the lamp does not work during the first soldering.
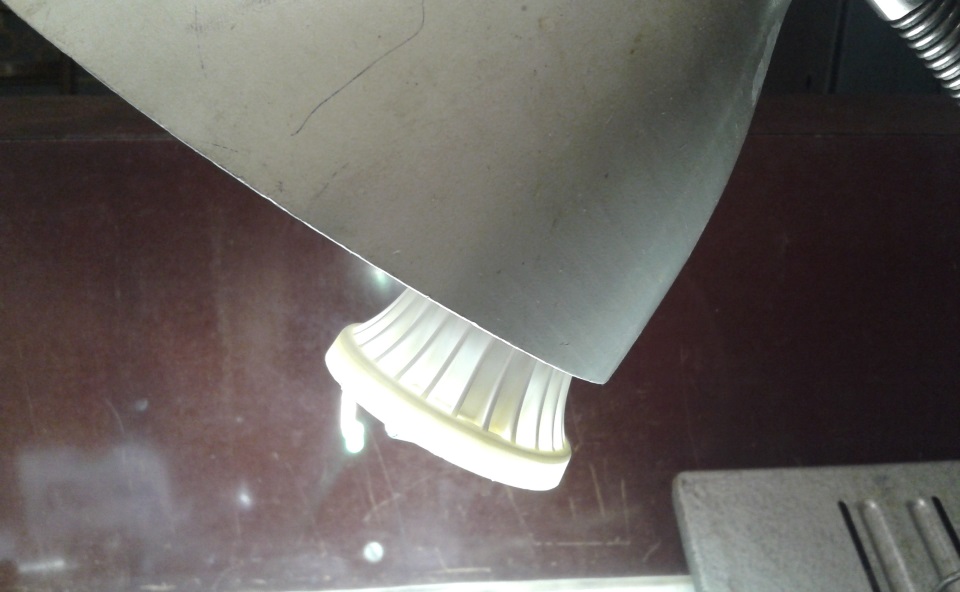
If you did everything correctly, the lamp will light up immediately, and it doesn’t matter that one of them is green, the glow will be as white as when you bought it.
To put the glass cover on, you may have to bend the legs of your LED in the desired direction.

The repair of the LED lamp was successful; you can screw it into the lamp.
Here is a photo of another lamp with a similar repair and its result. Both lamps had the same problem - one LED was faulty, but we’ll look at repairing the LED lamp driver next time. So go for it and you will be happy.
LED lamps, whatever one may say, have more benefits than other types of lighting devices. Environmentally friendly, economical consumption, long service life. By the way, the latter is often overshadowed by early failure. And since the cost of such a lamp is quite impressive, if possible I really want to return it to its former ability for further use.
Is it possible to repair LED lamps yourself? Yes. Undoubtedly, if you know a few tricks before engaging in such a competent activity.
In our previous articles, you probably learned about the elementary procedure for measuring online. Therefore, before you start repairing an LED lamp, make sure that there is voltage in it. After all, the problem may not be in the light source itself, but somewhere in the wiring section. If voltage is present, then unscrew the lamp from the base and prepare for repair.
Carefully disassemble the lamp. Remember exactly where each part is attached and what the fastening system is. You can photograph each stage or write it down, but in fact the design is simply simple.
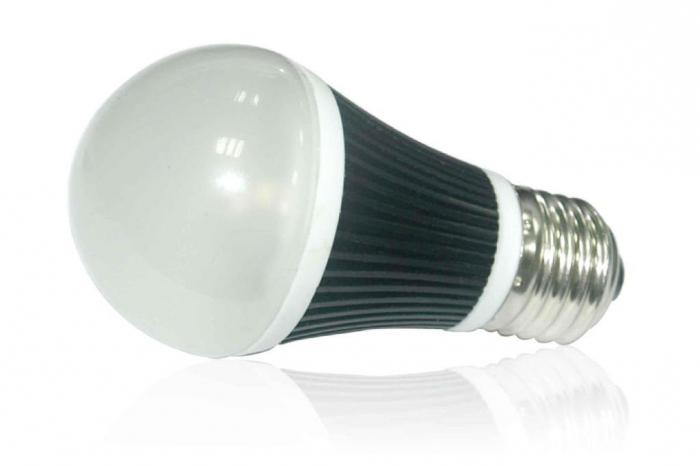
The LED lamp consists of the following parts:
- base;
- lamp body;
- dome-shaped light diffuser in a matte milky shade;
- under the dome there is a round board with LEDs;
- Below are the power supply drivers (more often in case of breakdowns - a transformerless rectifier, which makes the lamp cheap and not durable in operation).
Your task, as a potential master, is to check the functionality of each part and find faults with the LED lamp.
To work you will need:
- a multimeter that will allow you to determine the location of the breakdown. This is the case if it cannot be localized with the naked eye, then use a similar device (for example,);
- It also wouldn't hurt to reconnect the LEDs and power supply;
- a screwdriver for unscrewing bolts and separating spare parts from the base;
- scalpel or knife with a thin blade.
Repairing an LED light bulb yourself - procedure
Finding a breakdown is similar to visiting a doctor - you need to check all the patient’s organs one by one and make a diagnosis. Therefore, the repair of LED lamps also has its own algorithm of sequential actions:
Attention! All the parts of the lamp fit quite tightly, so apply force so that the part moves away from its strong bed, but nothing is damaged.
That's all the tricks for self-repairing LED RGB and monochrome lamps. A teenager, an owner, and a strong woman can cope with this. Bright light for your home!
Example of LED light bulb repair via video
Can purchased LED lamps be repaired? This question, taking into account the high cost of lamps, is quite relevant; a lot has already been written about this on Internet forums. The most frequently discussed issues are the repair of lamps purchased on Aliexpress.
The article, among other things, talked about the purchase of LED lamps, which have become so popular recently. Actually, the article began with these lamps: the quality of these lamps left much to be desired, mainly attracted by the low price. But in some places where too much illumination is not required, these lamps came in handy.
Upon further use, it turned out that these lamps are not as durable as promised in the advertisement. If the author of the article’s “Navigator” brand lamps have been working flawlessly for almost two years, then the lamps purchased on Aliexpress fail in a month or two, or even earlier. An indicative case is when a lamp replaced in the evening simply did not turn on the next day. As a result, two faulty identical lamps.
Someone else would simply throw away the unusable lamp, but not a radio amateur. Therefore, radio amateurs first try to find out the scale of the disaster, and, if possible, eliminate the defect. So it was this time. It’s not that Chinese lamps are too expensive, but if you can restore it, you won’t have to buy another lamp. As they say, the savings are obvious.
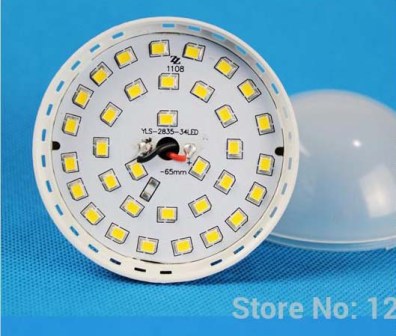
The appearance of these lamps is shown in the figure.
This picture is taken from the Aliexpress website. Apparently, the sellers assumed that someone would disassemble and repair such lamps, and, as they say, repairs are not far off. A larger board is shown in the figure below. From the inscription on the board it is easy to understand that the lamp is assembled from 34 LEDs of standard size SMD2835 (2.8 * 3.5 mm).
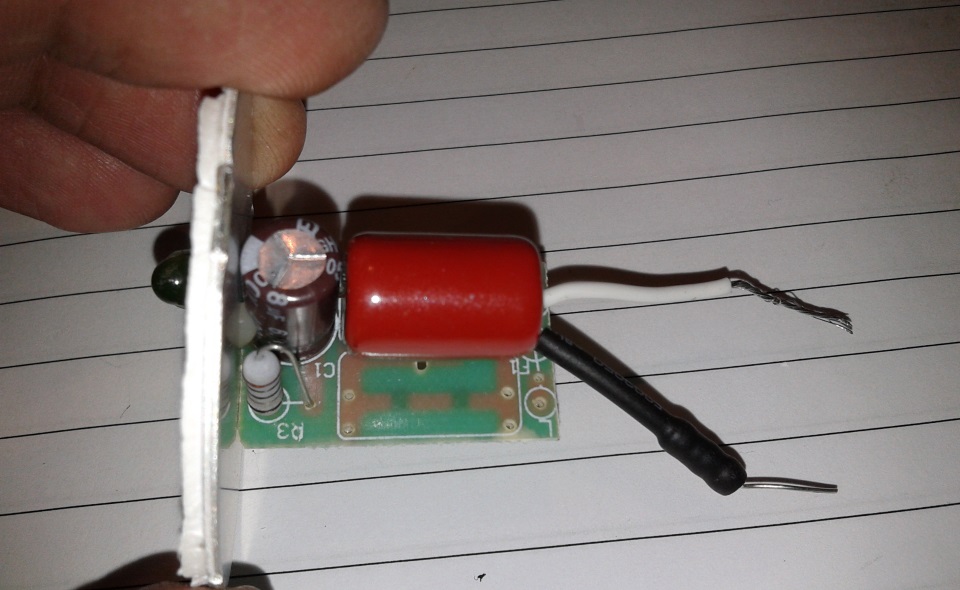
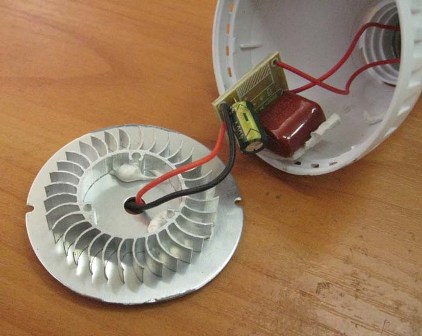
Disassembling the lamp revealed that there is a small power supply board inside. Only visible in the photo; all other parts are made by SMD mounting and are located on the back side of the board.

The circuit assembled on the board is shown in the figure below. It’s impossible to think of anything simpler: a regular transformerless power supply with a quenching capacitor.
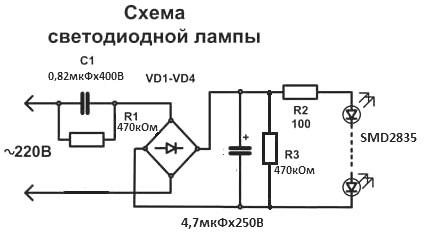
The purpose of the parts is clear: resistors R1, R3 discharge the capacitors after disconnecting from the network. This is done so that there is no electric shock when you touch these capacitors with your hands. Regarding capacitor C1, everything is clear. If you unscrew the lamp from the socket, touching the base may not be very pleasant. It all depends on how much charge remains on capacitor C1.
The charge on the electrolytic capacitor can only remain if at least one LED breaks. This charge can only be “touched” by disassembling the lamp. Although resistor R3 has another purpose.
If the LED chain (at least one LED) burns out, the voltage on the electrolytic capacitor remains at a level not exceeding the operating voltage of the electrolytic capacitor.
In the diagram, the operating voltage of the electrolyte is 250V. If we assume that the voltage drop across one LED is 3V, then across 34 LEDs the drop will be 34*3=102V. It turns out something like a parametric voltage stabilizer. Therefore, 250V is theoretically more than enough.
Chinese developers apparently reasoned in a similar way: there are lamps in which the operating voltage of the electrolytic capacitor is only 100V. These are mainly small-sized lamps with a power of 3...5W, where it is difficult to hide a high-voltage capacitor. In the lamp shown in the photo, the operating voltage of the electrolytic capacitor is 400V. But resistor R3, most likely, will not be superfluous.
Resistor R2 is designed to limit the current through the LEDs. But this is only on the diagram. In fact, it is simply not on the printed circuit board inside the lamp. The function of limiting the current through the LED chain is successfully performed by capacitor C1. This is like a variant of the scheme. Maybe other manufacturers still supply this resistor.
So, as was written just above, there were two faulty lamps at once, each with only one LED burned out. Moreover, there were no visible defects in the form of soot on the board, destruction or blackening of the LED itself. Therefore, the faulty one had to be found. This is quite simple to do: the LEDs light up faintly. Naturally, if the multimeter probes are connected in the forward direction.
It was decided to use one lamp for spare parts, remove the LED from it and solder it to another. Attempts to unsolder the LED using a hot air gun were unsuccessful: the LED did not want to be unsoldered.
The fact is that on the back side of the printed circuit board there is an aluminum heatsink, because LEDs, like all semiconductor devices, are very disliked high temperature. But even without a radiator, the process of soldering parts from a printed circuit board is much more complicated and dramatic than soldering new parts onto the board.
Repairs should begin by searching for a faulty LED if the lamp goes out completely and immediately. If the lamp starts to blink, or just shines dimly, then the fault lies in the power supply. Most often this occurs due to a faulty capacitor C1.
The easiest repair option is to replace capacitor C1 with a known good one. A faulty electrolytic capacitor can almost always be identified by eye by its swollen bottom. This is exactly how modern explosion-proof electrolytes behave.
After detecting a faulty LED, the easiest way to unsolder it is as follows. The first thing to do is remove the yellow elastic filter using a thin screwdriver or needle. Underneath there will be a metal surface with a crystal. Place a piece of solder and a small amount of gel-like flux on this surface. Using a well-heated soldering iron with a power of at least 60...80 W, heat this “sandwich” until the LED is unsoldered from the board.
Some better results can be achieved by using a low-melting alloy, such as Wood's alloy, instead of solder. This alloy in the form of small cakes is sold on radio markets. By mixing with base solder, usually lead-free, Wood's alloy lowers the melting point of lead-free solder. Therefore, the desoldering process becomes easier and faster, and the likelihood of overheating the printed circuit board is significantly reduced.
Another way to unsolder a faulty LED is with thermal tweezers. But not everyone has this tool, and it’s hardly worth buying it for a one-time use. Therefore, it is better to make a U-shaped tip, or use a homemade tip shown in the figure below.
After the faulty LED is sealed off, all that remains is to replace it with a new one. LEDs of standard sizes 2835 or 5730 can be ordered in the same place where the lamps were purchased, on Aliexpress. They are quite inexpensive there, about 50 rubles per hundred pieces.

Judging by the price, these are not the best LEDs, but the lamps were still repaired, and the glow of these LEDs is no worse than those that were originally.
Soldering a new LED onto the board will not be difficult. This can be done with a regular soldering iron. Remains of old lead-free solder should be removed from the board. This is best done using braided wire from shielded wire.
The braid must be impregnated with flux, in the simplest case rosin. Then use a well-heated soldering iron to pass through the braid along the contact pads, the solder will be absorbed into the braid. Then irradiate the board contacts with POS 61 solder or similar.
Now all that remains is to solder the LED installed on the contact pads. The LED contacts must be covered with a layer of flux, preferably gel-like. After this, just touch the ends of the LED with a soldering iron to melt the solder remaining on the board contacts. Soldering occurs so quickly that the finger holding the LED on the board does not feel any increase in temperature.

