Star News


Is it possible to check the current in the socket with a tester. Device for measuring voltage. How to measure voltage with a multimeter
Voltage, or voltage, is one of the parameters of electric current, showing the potential difference in a circuit section. It is equivalent to the electromotive force, and in fact is one of the most important factors for the operation of any electrical appliance.
Checking the voltage is perhaps the most frequent operation that has to be performed when working with electrical engineering, regardless of whether it is maintenance of an industrial or household (home) electrical network. From its value, as well as from the very fact of its presence, it depends whether the appliance will work, and also whether it can fail. Currently, a device called a multimeter is used to measure voltage.
general purpose
This is a multifunctional device designed to measure a wide range of electric current parameters. A modern multimeter, even a semi-professional one designed for domestic use, is capable of measuring:
- AC and DC voltage;
- alternating and direct current (current strength);
- resistance.
This is the minimum list of functions that even the simplest device has. More complex ones have the functions of continuity of diodes and transistors, checking the integrity of cables, etc. There are models that allow you to measure even the temperature.
An ordinary household appliance is used in networks whose voltage is not higher than 1000 volts direct or 750 volts alternating current. To measure high voltage, use only a professional high-voltage multimeter.
Device
We will consider digital multimeters (they are also testers), because. analog ones (equipped with an arrow and a field with a scale of values) are now almost out of use.

There is a wide variety of multimeters on the market, but all of them have the following elements:
- digital display;
- switch for setting parameters;
- 2-4 sockets for connecting contact probes;
- two contact probes.
The device operates on batteries. We will consider the simplest multimeter for home use, which measures three main parameters - voltage, current and resistance of an electrical conductor. The vast majority of other functions in everyday life are not needed, with the exception of the dialing function. But before moving on to measuring voltage, let's figure out what it is.
Difference between AC and DC voltage
It would be more correct to speak of the difference between constant and alternating current. Various electrical appliances operate either from direct current, or from a variable.

Variable means that the direction of movement of electrons in the conductor changes from plus to minus with a given frequency, that is, the polarity of the current changes. In a household outlet, according to the standard, the operating voltage is 220 V, (amplitude 311 V) and the frequency of current change is 50 Hz. From this voltage, all devices that are plugged into the outlet work.
But accumulators and batteries are sources of direct current. They always have fixed plus and minus (polarity). The frequency of direct current, of course, is absent.
Plug connection
Before measuring voltage, the multimeter must be set to the appropriate mode. To mark the voltage, either the abbreviations ACV - variable, and DCV - constant, or pictograms that complement the designation V - voltage, are used. So V~ is AC voltage. V with a horizontal long line, under which three short ones - this is a constant.

Note! If your device has only the designation V, then it is able to automatically determine whether it is variable or constant.
In addition to the pictograms indicating the type of voltage, ranges of values are marked on the multimeter case. Most household appliances have measurement limits up to 750 V AC and up to 1000 V constant voltage.
Before you measure the voltage at an outlet, on a battery or other device, connect the probes to the multimeter. There are two of them - black and red. But there can be two nests, and three, and four - depending on the class of the device.
The black probe is either minus or zero. It is always installed in the multimeter socket marked COM. The red probe is either positive or "phase". To connect it, a socket is selected, provided with the appropriate marking. If there are only 2 nests - the question is removed, if there are more - choose the one near which there is a V symbol.
Other sockets can be marked either 10-20A or mA - respectively for measuring current strength (extra large or extra small), or have other designations and, accordingly, purposes. The voltage socket is always the same.
Setting the measurement mode
After installing the probes, move the multimeter switch to the appropriate range. If you are measuring the voltage at the outlet, choose a threshold value of 750 ACV, if, for example, a car battery - 20 or 200 DCV.
Note! It is always necessary to set the measurement limit above the expected voltage at the power supply. Otherwise, you risk burning the device.
There is a rule: voltage is measured by parallel connection multimeter, (whereas the current is in series with the load). In practice, this means that in order to measure the voltage in the outlet, you just need to insert both multimeter probes into it, each into its own socket. Where is zero, where is the phase - it does not matter.
The device shows the voltage within the limits to which it is adjusted. Thus, if you set the upper threshold to 750 V, you will see a value on the screen in the range of 210-230 V. Or less, or more, if the voltage surge is very large, but it cannot rise above 750 V. But if you set the threshold to 200 V, then with the actual voltage value above this limit, the number 1 will appear on the screen.
Please note that exactly 220 V in a household outlet is not always the case. Deviations plus or minus 10-15 V are permissible.
Checking a three-phase line is carried out by contacting two multimeter probes with two tires. There should be 380 V between them, between one bus and ground there will be 220 V (plus or minus 15).
Battery check
How to measure battery voltage? It is necessary to finish the black probe with its minus, the red probe with its plus, and set the border to 20 DCV. For any household batteries and accumulators, this is enough. For comparison, a car battery delivers 13-14 V. Only high-power truck batteries are designed for voltages of 24 V and higher.

The multimeter will show the remaining battery power. If you reversed the polarity - it's okay, just a "-" sign will appear on the screen.
When checking the battery, keep in mind that a "fresh" battery should give a voltage value slightly higher than indicated on its case.
When pressing the probes to the contacts of a battery or accumulator, you should not be afraid of an electric shock: the sensitivity threshold of human skin is 36 V. You will not feel even 20 V. But when checking the current in an opened electrical appliance or outlet, you need to be careful. Do not use probes with damaged insulation.
Possible malfunctions
If the multimeter stops measuring voltage or shows it incorrectly, check the battery inside the case with another tester, or simply replace it. Also check if the set measurement threshold corresponds to the voltage that the object you are testing should have. Check if the nature of the voltage is set correctly - the battery is not checked in AC mode, and the socket is not tested in DC voltage.

If the parameter is not detected in one outlet, check it in another. If the problem arose when checking a small battery, it may be due to poor contact between the probe and the terminal.
Test the device on various objects that are a priori operable. If the multimeter basically stopped measuring voltage, then either its built-in current source has dried up, or the control board is damaged, or - the most common case - the cable of one of the probes is damaged. You should inspect the cables for breaks, make sure that they make good contact with the socket. If a break is found, replace or repair the wire, restoring its integrity.
If no visible reasons for the loss of performance are found, then most likely the multimeter burned out. This could be due to an attempt to measure overvoltage, or a powerful mains surge, or other reasons.
To measure the magnitude of the alternating voltage 220V, acting in any electrical circuit, as well as to determine the current strength in the load connected to it, special measuring instruments are used. They are called avometers, multimeters or testers. These products are fairly easy-to-use devices, the procedure for working with which can be mastered by almost anyone.
According to the method of measuring and recording basic electrical quantities, such as, for example, current in a socket, voltage or resistance, all these devices are divided into analog (pointer) and digital. The article will be devoted to the second of these two samples of measuring equipment, most often called simply a multimeter.
Application features
A digital electrical meter (or multimeter) is a electronic device, which provides digital indication of the recorded values with the output of readings on the LCD display. Such devices are somewhat more expensive than switch models. However, they provide a more accurate measurement of electrical parameters and are much more convenient in everyday use. In addition, digital multimeters have a large set of additional functions, some of which are not available in analog models. With their help, it is easy to check the outlet in the apartment, to make sure that the required voltage is supplied.
 Additional functionality includes: digital multimeters as a test for the suitability of semiconductor elements, "ringing" of electrical circuits with simultaneous duplication of an audible signal. They can also determine the nominal values \u200b\u200bof capacitors (the latter function is found only in some models).
Please note that it is precisely because of the indicated multifunctionality that this device received its user name. "Multi" means "many" and "meter" means "to measure".
The set of a purchased digital product includes the measuring device itself and two wires with special probes or "ends", the lower part of which is protected by non-conductive plastic heads (holders). Before you check the voltage in the outlet with a multimeter, first of all, you need to properly assemble the measuring circuit. To do this, use the input sockets available on the case and marked with the corresponding letters.
It is supposed to insert the end of the black wire into the hole marked "COM", meaning "Common" in Russian. The connector tip of the red cord is connected to the second (signal) socket.
Additional Information. If there is another input connector on the body of the device, marked with the inscription "10 Amperes", you will be able to measure currents with an amplitude within the specified value. In some models, this limit is increased to 20 Amps. When measuring currents within the limits of the indicated values, the connector of the cord with a red color marking is inserted exactly into this socket.
Step-by-step instruction
After connecting the wires, you can proceed to the measurements themselves, the sequence of which is as follows.
First, the required operating mode of the multimeter is set by means of the central circular switch. The mode corresponding to the measurement of alternating voltage is in the sector under the designation "ACV" or "V~".

Then, within this sector, you should select the position "750", corresponding to the maximum value of the controlled parameter in the outlet, that is, voltage up to 750 volts inclusive. At the limit marked "200", voltages are measured that do not exceed 200 Volts.
After selecting the mode and measurement limit of the multimeter, both probes are taken by insulated handles, and then their tips are inserted into the socket sockets.
In case of formation of good contact with the terminals of the socket, the indicator will immediately show the result of the measurements. It is displayed as a series of numbers with an accuracy of tenths.
The order (polarity) of the position of the ends when measuring the AC voltage in the network does not matter.
It should be noted that the outlet rarely has a voltage of exactly 220V. Usually it is slightly higher or lower. According to the norms, the deviation should not exceed 22V, if we are talking about a household network.
electrical safety
When working with a multimeter, it is imperative to follow the following rules for handling the device, which ensure security in terms of electrical safety:

In conclusion, we note that one more feature of the use of a multimeter should be attributed to the same problem (namely, to the issue of security). The fact is that when working with this device, you can not only measure the operating voltage, but also establish the nature of the malfunction, which manifests itself in the form of its absence. To do this, you will additionally need a conventional indicator screwdriver, through which you can establish the presence (or absence) of a “phase” on one of the socket terminal blocks.
It happens that the indicator screwdriver shows the presence of a “phase”, and when both measuring probes are inserted into the socket, the multimeter reading does not change. This means that there is a break in the “zero” conductor of the wiring, or the contact is broken in its connection with the socket terminal block.
When working with an indicator screwdriver, be sure to check that this accessory is working. It must be checked on a known "working" outlet. To check the latter, it is enough to connect a working table lamp or iron to it.
Using a multimeter greatly simplifies the work of an electrician. And at the household level, the device can come in handy if you need to check whether the outlet is working and what the voltage is in the network.
The most-most necessary device for an electronics engineer. And I would immediately recommend that electronic teapots run to the store and buy this device, since the variety of these miracle devices at least eat booty :-)
And here is my instrument
Let's take a look at its notation. In the figure, I marked with numbers those designations that are found on any multimeter. If you do not know them, then you do not need a multimeter.

So let's go:
1) Resistance icon. This icon tells us that we are going to measure resistance. The photo shows the range of resistance that we can measure with a multimeter - from 0 ohms to 200 Megaohms.
2)Constant voltage icon. This means that by putting the switch on it, we can measure direct current. In this instrument, the DC voltage measurement range is from 0 millivolts to 1000 volts.
3) AC voltage icon. The measurement range in this case is from 0 millivolts to 750 volts.
4) Icon for measuring the gain of transistors. But I don't use it because I don't need it.
5) Capacitor capacitance icon. Capacitance is measured in farads. Range from 0 to 200 microfarads.
6) DC current measurement icon. Range from 0 to 20 Amps.
7) AC voltage current measurement icon. Range from 0 to 20 Amps.
8) Diode continuity. Shows exactly voltage drop across the measured element in millivolts. Yes, yes, you can not rub your eyes to read the previous sentence again ;-). The beauty of this function is that if a voltage drop of less than 100 millivolts is displayed (it varies for different models), a beeping signal comes from the multimeter. Very convenient for checking diodes, as well as the integrity of wires, fuses (at the end of the article there are links on how to do this). When buying a multimeter, take one so that this function is unambiguous, otherwise the multimeter will sharply lose its functionality.
We measure the current.
Remember one rule when measuring: when measuring current, the probes are connected in series with the load, and when measuring other quantities, in parallel.
The figure below shows how to properly connect the probes and the load in order to measure the current:

We don’t touch the black probe that is plugged into the COM socket, but we transfer the red probe to the socket where mA or xA is written, where instead of x is the maximum current value that the device can measure. In my case, this is 20 Amperes, since 20 A is written next to the socket. Depending on what value of current strength you are going to measure, we stick a red probe there. If you don’t know how much current will flow in the circuit, then put it in the xA socket:

Let's see how it all works in action.
In our case the cooler is the load from a computer. Our power supply has a built-in indication for showing the current strength, and as you know from the physics course, current strength is measured in amperes. We set 12 volts, on the multimeter handle turn on the measurement of direct current. We set the measurement limit on the cartoon to 20 Amps. We collect as according to the scheme above and look at the readings on the cartoon. It exactly matched the built-in ammeter on the power supply.

To measure current AC voltage we put the multimeter twist on AC current measurement icon - "A~" and in the same way we make measurements according to the same scheme.
We measure DC voltage.
Let's take this battery

As we can see, it is written current 550 mAh, which she can issue in load per hour, that is milliamp per hour, as well as voltage, which our battery has - 1.2 Volts. Stress is understandable, but what is it current per hour? Let's say our light bulb load eats current 550 mA. So the light bulb will shine for one hour. Or let's take a light bulb that shines weaker, and let it be with us eats 55 mA so she can work 10 hours. We stupidly divide the value of 550 mA, which we have written on the battery, divide by the value that is written on the load and get the time during which all this will work until the battery runs out. In short, who is friendly with mathematics, it will not be difficult for him to understand this miracle :-)
Let's measure battery voltage, one multimeter probe for plus, the other for minus, that is, we connect in parallel, and voila! In this case, the battery voltage is 1.28 volts. The value on a new battery must always be greater than what is written on the label.

Let's measure the voltage on the power supply. We set 10 volts and measure.
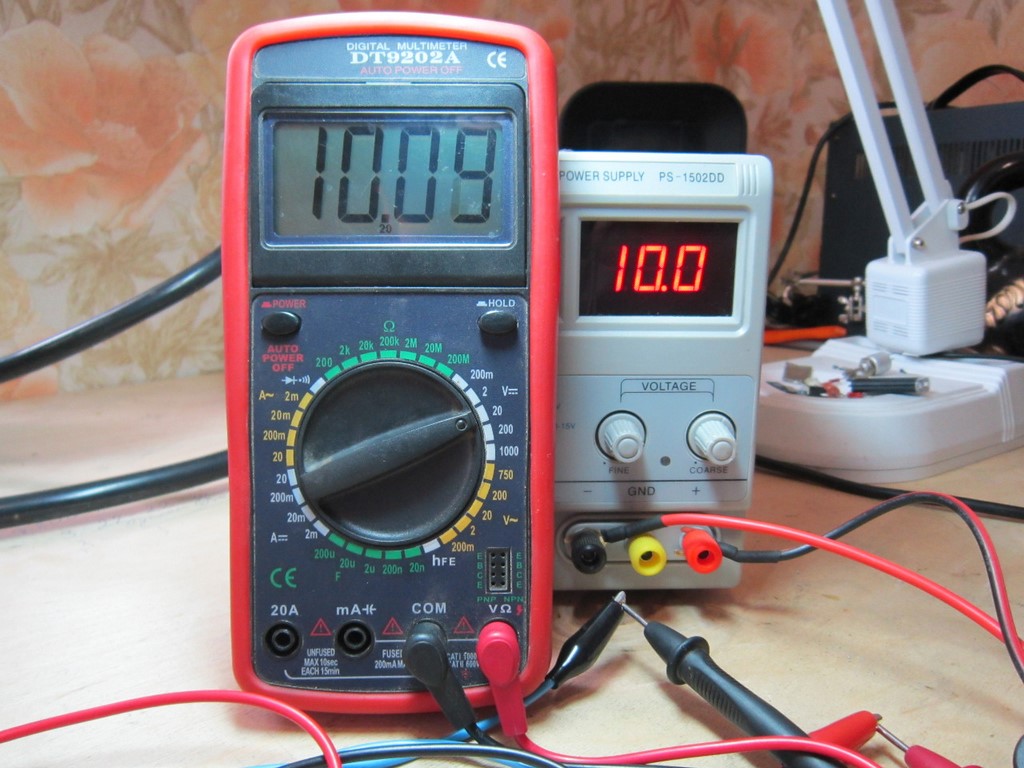
Red is plus, black is minus. Everything converges, the voltage is 10.09 volts. 0.09 volts do not play any role, they can be neglected.
If we confuse the probes of the multimeter or the probes of the block, then it's okay, the multimeter will show us the same value, but with a minus sign.

Keep in mind, it doesn’t work on such cartoons

We measure alternating voltage
We put on a cartoon on AC voltage measurement limit and measure the voltage at the outlet. It doesn't matter how the probes are inserted, AC voltage has no plus or minus..There is a phase and zero. Roughly speaking, one wire in the socket is not dangerous - it is zero, and the other can spoil your well-being or even health - it's a phase.

Good day, readers of the site site. In the first part of the article "How to use a multimeter" we considered their varieties, designations and main functions. Today we will talk about practice - measurements with a multimeter.
Resistance measurement
As a rule, the resistance measurement range of the multimeter is divided into five ranges:
- - 200 Ohm;
- - 2000 Ohm;
- - 20 kOhm;
- - 200 kOhm;
- - 2 MΩ.
Most multimeters have another range, indicated by a diode or buzzer icon - this is for testing contact. When the contact is closed, the LED lights up and a buzzer sounds. In some types of multimeters, this function is performed by the 200 ohm range.
In everyday life, resistance measurement is usually used to check breaks in the electrical circuit, as well as the health of some household appliances, such as light bulbs, irons, motor windings, etc.
By measuring the resistance, you can check the health of the fuse, the operability of the switch and other switching devices.
If a unit appears on the left side of the display, it means that the resistance of the measured circuit is higher than the included range, you must switch to the next one. The unit in all resistance measurement ranges indicates the presence of an open circuit.
AC voltage measurement
For AC voltage measurements the switch of the multimeter must be set to the sector designated as ACV or V~. Usually the sector has two positions 200V and 750V.
Voltage measurement with a multimeter must be started, setting the switch to the position with the highest value. If the readings of the device are less than the upper limit of the previous range, then you can switch to a lower range (for example, if the device shows 50 V in the 750V position, then you can set the range to 200V) so that the readings are more accurate.

Do not touch the bare part of the probe with your hand, and also work very carefully so as not to cause a short circuit. Before work, it is important to make sure that the device, wires and probes are in good condition.
When measuring AC voltage, polarity is not necessary.
DC voltage measurement
For DC voltage measurement the switch of the tester must be set to the sector designated as DCV or the letter V, underlined by a dotted line. As in the case of alternating voltage, measurements must be started by setting the switch to the maximum position and gradually decreasing it.

Otherwise, the multimeter may fail.
DC multimeter measurement
The current strength is measured during the adjustment of various electronic components, circuits and devices. In everyday life, a current tester can be used, for example, to control the charging current of a battery when charger there is no corresponding device or it is out of order.
The DC scale usually has four limits:
- - 200 µA (microamps);
- - 2000 µA;
- - 20 mA (milliamps);
- - 200 mA.
If measurements are made within the listed limits, then the probes are connected to the same sockets as when measuring other quantities: black wire - to the socket marked with a ground icon or the inscription COM, red - to the VΩmA socket.
If the range of measured currents is higher than 200 mA, then it is necessary to switch the probe from the VΩmA socket to the 10A socket, otherwise the device will fail. The black wire remains in the socket with the ground symbol.
As well as when measuring voltage with a multimeter, it is necessary to start measuring current from the maximum limit in order to prevent damage to the multimeter.
It is necessary to switch the device to a lower limit only after making sure that the readings of the device are below the set limit. If there is no need for more accurate measurements, then you can not switch to the lower limit.
It is impossible to measure the current strength in the socket - the device will instantly fail! Therefore, before connecting the probes to the measuring points, it is imperative to make sure that the multimeter switch is set in the desired sector and at the required measurement limit.
Replacing the power supply element of the device
As soon as you notice the battery icon on the display, it means that the battery from which the device is powered is "hooked" and it's time to replace it. To do this, unscrew the two bolts with a screwdriver, remove the back cover and install a new battery - a 9 V battery.
I hope in this article all your questions " how to use a multimeter correctly”A full answer was given, if not, ask questions in the comments.
Related content on the site:
If you want to know if electric current flows in the outlet and what voltage it has, then in this article you can study this information. Usually, in order to know if there is voltage in the outlet, you may need to use a tester - a multimeter or use.
To obtain voltage data, of course, it is best to use a multimeter. In this article, you will also find information on how to check the voltage at the outlet with a multimeter and an indicator screwdriver.
Using a multimeter
If you want to know what voltage is currently flowing in the network, then it is better to use a professional device. We already have an article about . The instrument type in this case will not affect the measurement. To start the measurement, you will need to put the device to measure AC voltage. For a household network, the switch must be set to 750 volts. After that, you just have to insert two multimeter probes into the outlet, as shown in the photo below.

If on the display you do not see an indicator of 220 volts, then you should not worry. The GOST indicator regulates the deviation by 10%. When making such a measurement, you also need to consider one of the most important points. This includes an insulation test. If the insulation of the probes is damaged, then such a device cannot be used. Also pay special attention to the choice of mode. If you set the multimeter to the "resistance measurement" mode, then the device may fail.
Below we have brought to your attention a video that will tell you how to measure the AC voltage in a 220 Volt network.
Indicator screwdriver
If your home does not have a multimeter, then you can also use an indicator screwdriver if necessary. In this case, you can only find out if there is voltage in the outlet without a tester. In this case, you will not be able to find out the value.

To measure voltage, you need to touch the penny on the probe with your finger. In the photo below you can see how to cope with a similar task. If the light in the screwdriver lights up, then this means that there is voltage in the network.
A modern way to determine the voltage in the outlet
Now we decided to bring to your attention the most modern version. To determine the voltage in the outlet, you will need to use a control relay. This type of automation today allows you to protect your network from overvoltage. After installing it, you can not only measure the voltage in the outlet, but also protect your household appliances from overvoltage.

The only drawback of this method is that each outlet requires a separate device. That is why it is best to install this device only for valuable equipment.
Now you know exactly how to check the voltage in the outlet with a multimeter and an indicator screwdriver. We hope this information was useful and interesting.