Star news


Digital multimeter dt 830b operating instructions. Multimeter M832 - instructions and use
Digital multimeters are more popular among specialists than analog ones, as they are more visual and easy to use. The results of the measurements that were made are displayed on the liquid crystal display and displayed in the form of numbers. The risk of taking incorrect readings due to human error with such devices is minimal. For example, consider a digital multimeter DT-830B.
The price of such a device can be different and fluctuates depending on the functions it performs and the accuracy of the measurements taken. However, the function of measuring current in the electrical network, voltage in the network and the resistance of resistors or other devices is provided by absolutely all models, regardless of price.
All models are very similar to each other in the arrangement of controls.
There is a switch in the center of the device that allows you to select the measurement mode and limit. The parameters are divided into sectors and outlined with lines for convenience.
At the top there is usually a display. At the bottom of the socket for connecting probes. We'll look at how to use the DT-830B multimeter below.
The scale shows abbreviated designations of measurement modes, which are better to remember, since they are not explained in the instructions for the DT-830B multimeter.
OFF - switched off device, DCV - measure direct voltage, ACA measure alternating current, DCA measure direct current, Ω - measure resistance, ACV measure alternating voltage, hFE measure transistor parameters, ACA measure alternating current (this function is not provided in the Digital DT-830B multimeter , therefore this sector is not on the scale).
The probe is a metal rod whose handle is insulated. From the measuring point, the signal is supplied to the device through the drive to which the probe is connected. The probes can be modified or made yourself, depending on the desired length of the wires and your other preferences. The connector labeled COM is negative, or acts as ground.
The black wire is connected to this connector. To measure resistance, small amounts of current or voltage, a connector labeled VΩmA is provided. The inscription containing 10A or 10 ADC indicates that this connector provides for measurements in the range of values from 200 mA to 10 A.
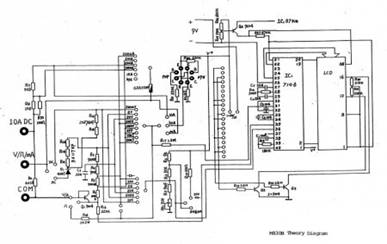
The circuit diagram of the DT-830B multimeter is shown in the figure below.
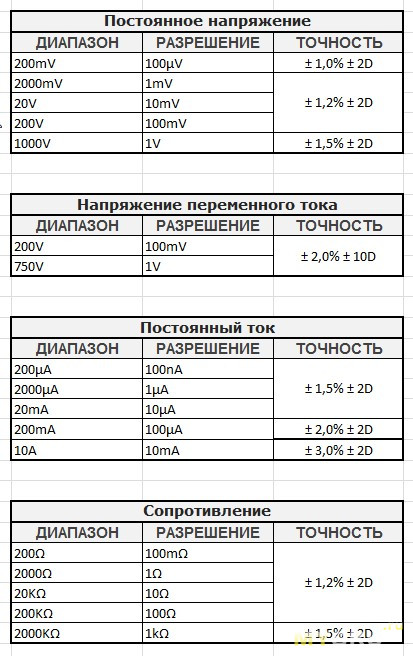
Specifications digital multimeter DT-830B:
- AC voltage range: 200 V and 700 V.
- Range DC voltage: 200 mV; 2000 mV; 20 V; 200 V; 1000 V.
- Range of measured resistance 200 ohms; 2000 ohm; 20 Kom; 200 Kom; 2000 Com.
- Range direct current 200 µA; 2000 µA; 20 mA; 200 mA; 10 A.
The device can perform a diode test. It also has a function for measuring the gain of the transistor.
Using a digital device is much more convenient than an analog one. It is light and small in size, and is not afraid of shocks and falls. Licensed models are equipped with protection against incorrect selection of measurement mode.
For example, if the device is configured to measure resistance, and the probes are mistakenly placed in a 220 V socket, it will emit a warning signal. Thanks to this, the device can be turned off before it is damaged.
Specialists whose profession is related to electrical measurements have already switched to using digital instruments. The principle of their operation is quite simple, similar to analog models and consists of alternately switching modes and measurement limits using the central knob, so there was no need to additionally train people to work with this device.
I drove the multimeter for quite a long time - 1.5 months.
A few guts, a burning smell and requests for help below.
ATTENTION!!! I didn’t compress the photos at 80+ meters... but the photos are from my phone
Background:
In distant warm July a kind person under the name he shared with the people the joy of where you can spend some coins. For which I am very grateful to him! Those who don't mind can come in and say thank you too.
Differences between 830 series multimeters:
The multimeter arrived in a standard yellow package:


In a beautiful box: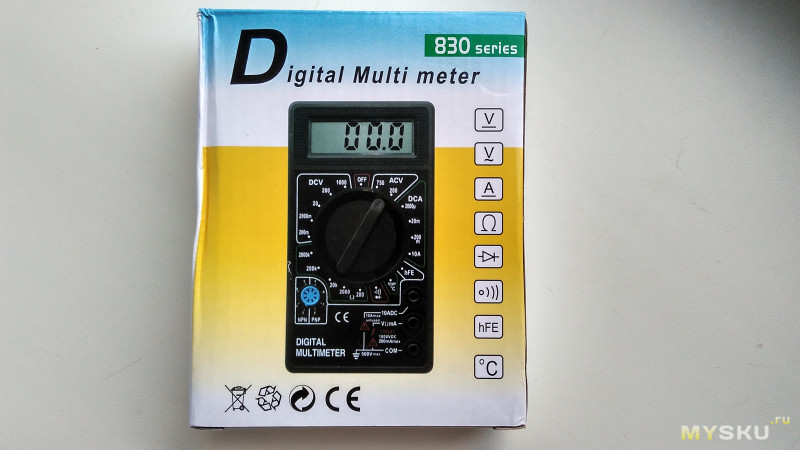

Package contents:
multimeter, test leads, instructions letter from the seller. ![]()
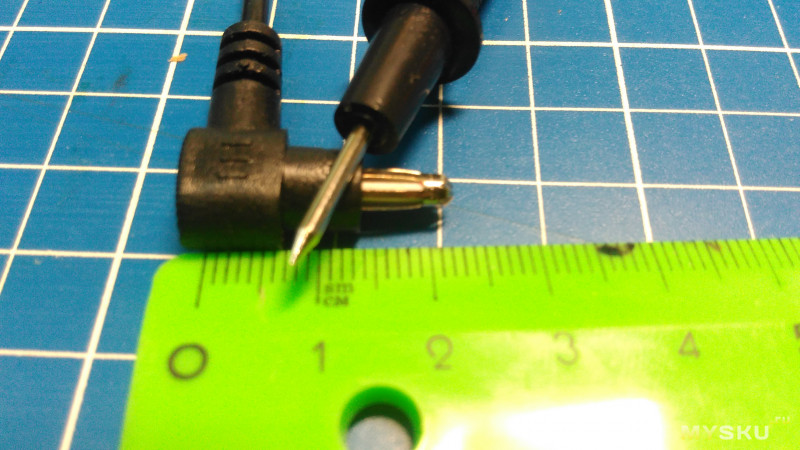
The probes say 1000V, but I would be careful...
And even with a letter from the seller:
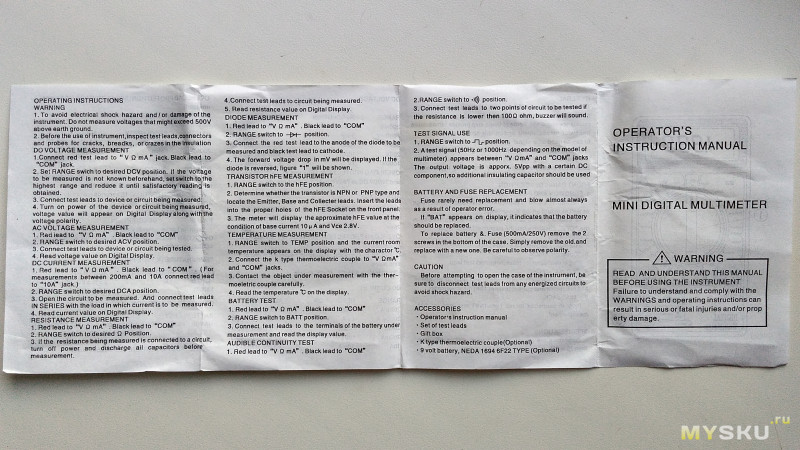
And instructions:
I glanced at the instructions, I wanted to find the characteristics of the probes, but as it turned out, the instructions are the same for all types.
I liked the section on replacing the battery and fuse:
open the cover and replace the battery and fuse.
In my old DT-830, purchased back in 2003, the fuse can actually be removed and replaced, but here it’s not so easy.

In general, there are no questions about the parcel, only a wish that the packaging be thicker, otherwise nothing stops our mail...
Characteristics:
- screen maximum value - 1999
- works from the crown (9V)
- Diode testing
- Transistor hFE test
- The instructions contain references to overload protection
- The dialing function - nope, there is no such thing...
The switch positions are divided into sectors:
OFF/on - device power switch
DCV - DC voltage measurement (voltmeter)
ACV - voltage measurement alternating current(voltmeter)
hFe - transistor measurement switching sector.
DCA - direct current measurement (ammeter).
10A - ammeter sector for measuring large values of direct current (according to the instructions, measurements are carried out within a few seconds).
Diode - sector for checking diodes.
Ohm - resistance measurement sector
Instead of diode testing, I would like to have a sound test, and also temperature measurement, but this model does not have it. DT-838 has it.
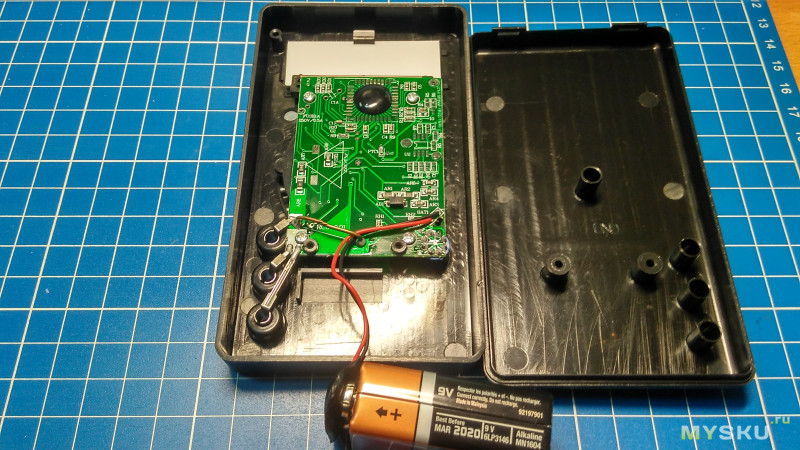
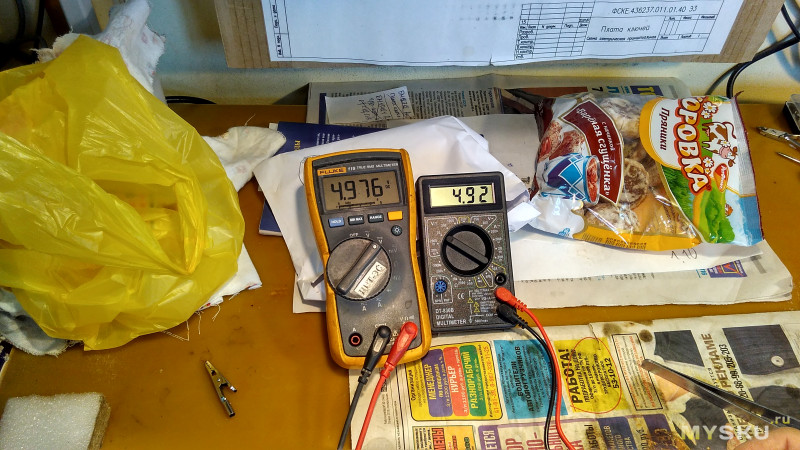
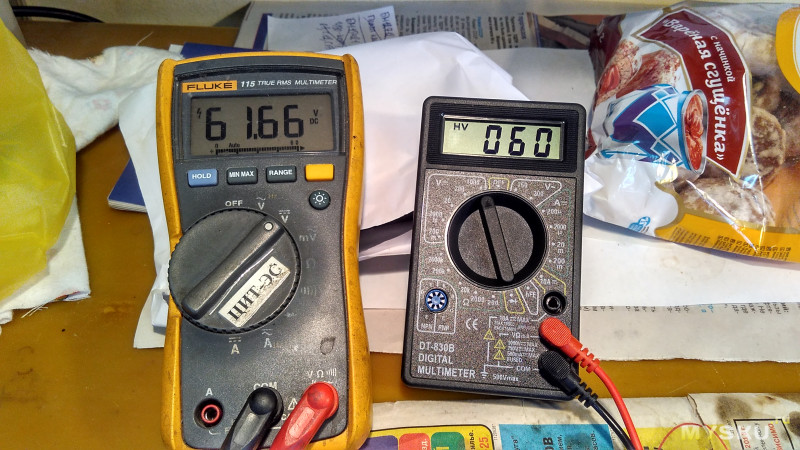
The multimeter was taken to work for comparison with a more accurate brother (Fluke 115). Since I myself am not involved in electronics, I asked knowledgeable people at work to check the accuracy. Before that, I took it apart and took a photo:
Entrails

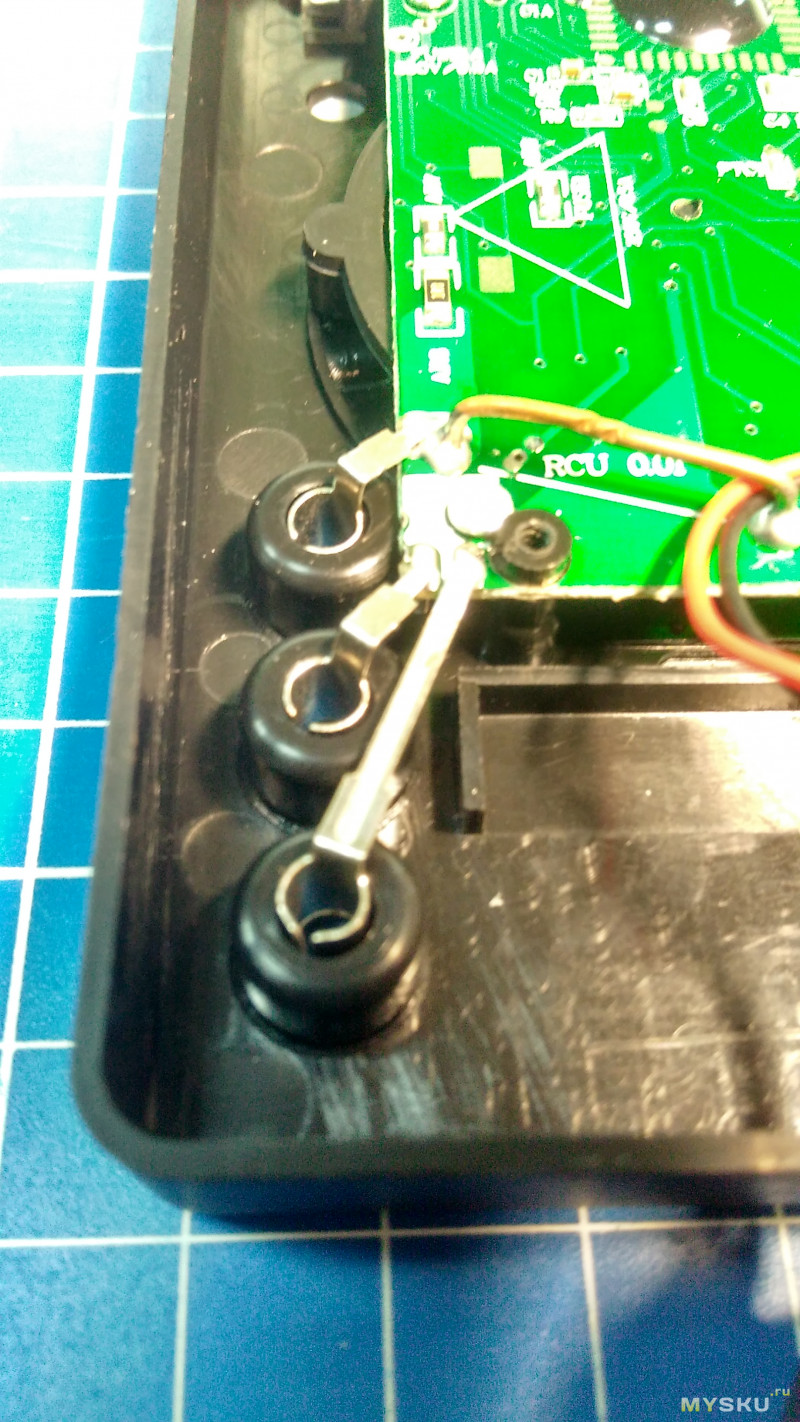
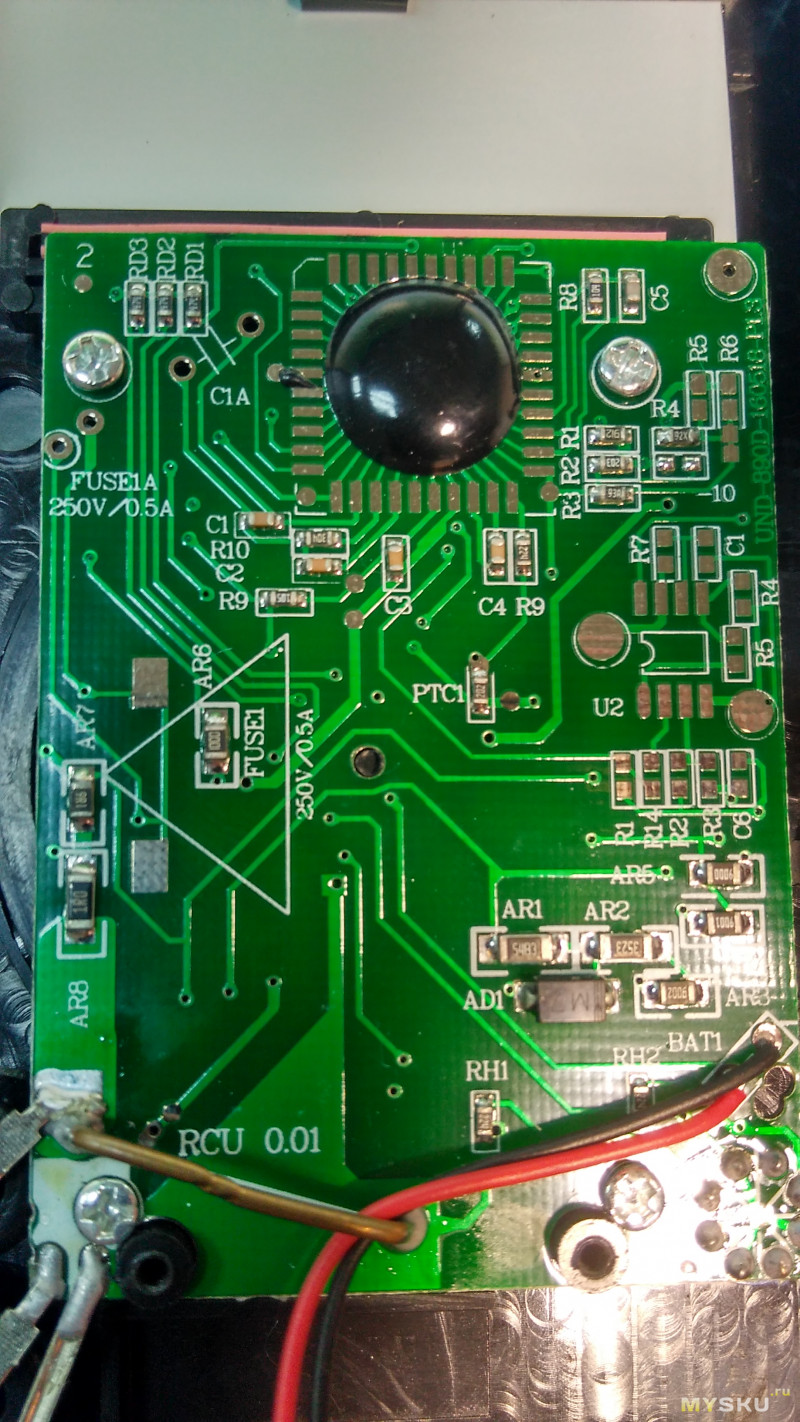


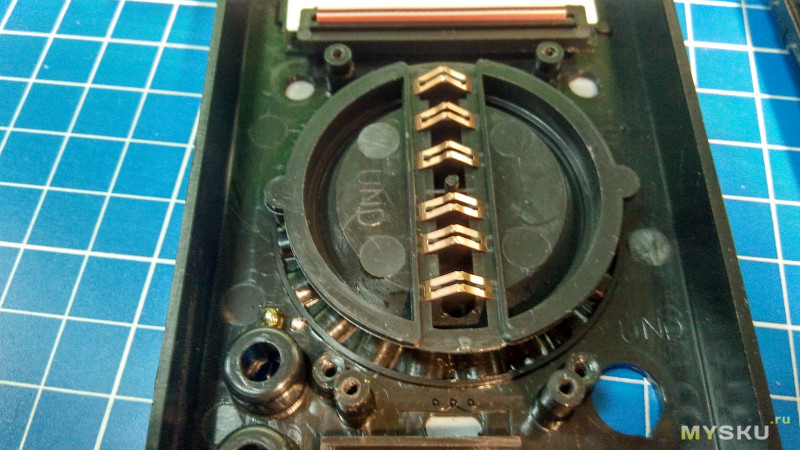
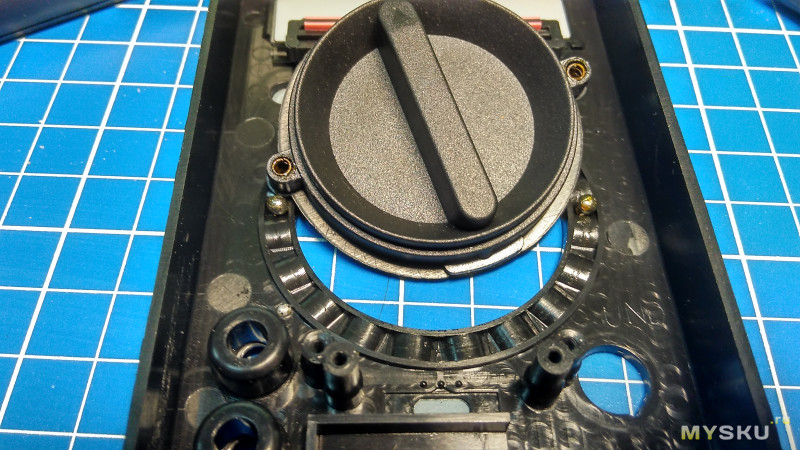
These balls in the last photo are very insidious! The multimeter is disassembled in 2 minutes, and the balls are looked for on the floor for 40-50 minutes and then it is simply considered that owning two balls in the locking mechanism is chic!
Additional Information
Today is exactly one week since I am writing this report. I found him!
The first thing we decided to do was check the voltage in the outlet. 2 probes in the lower positions in the multimeter and the other ends in the socket holes, and the switch up. BIG BAGA BOOM!))
We disassemble it again and see that a tiny strip of track near the screw has burned out, it looks like the screw turned out to be a conductor)) 
The master (hereinafter with all due respect to the person) looked and said that now we’ll fix everything!
I threw the jumper directly and started testing further. 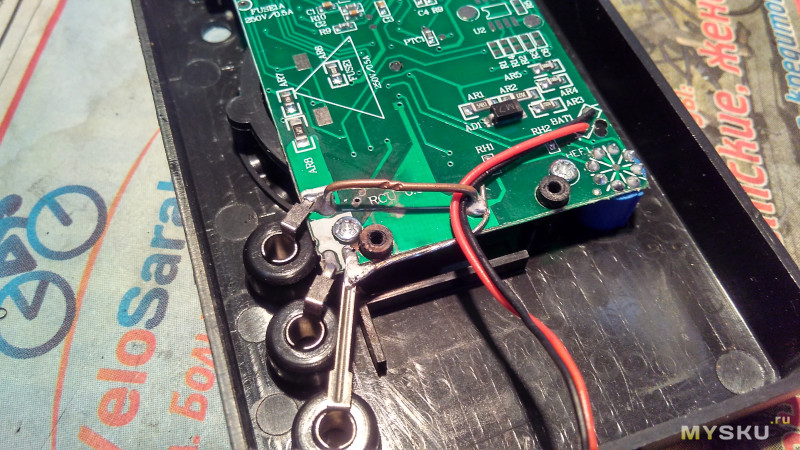
So the Master began to set on the left tester through laboratory block tension and compare with the readings of the right (patient), all the time after the changes he muttered - “not bad, not bad.”
The Master's desk is not in disarray, I just came close to it at 7:30, and we start working at 8:30. You understand that before work starts, everyone rests) And I’m boring with my homemade products, you know...

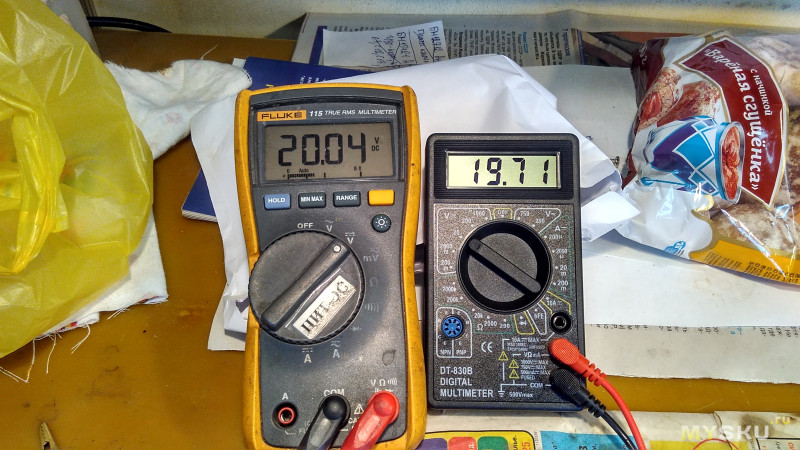
The power supply on which everything was set - I twisted it) 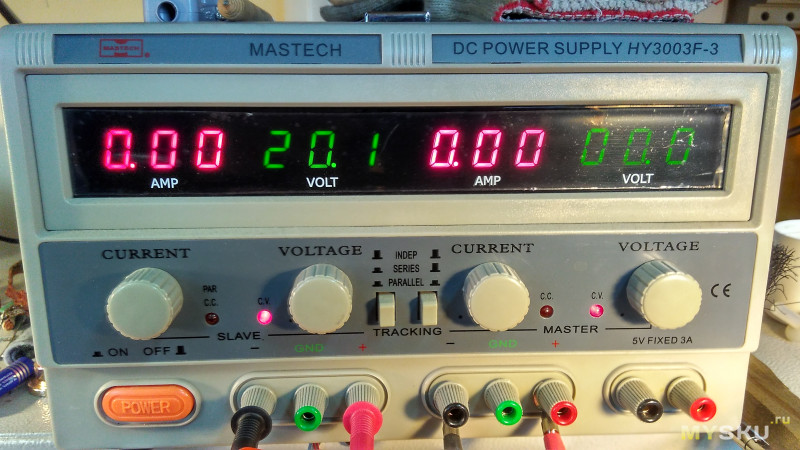
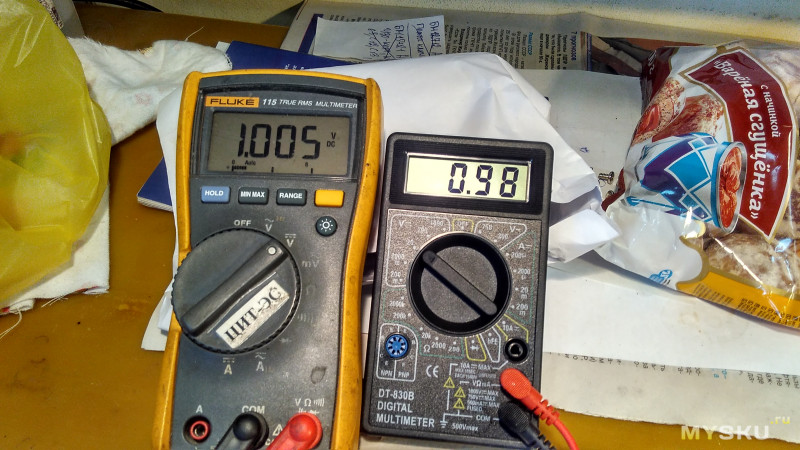
Everything was “not bad, not bad” according to him, and then we moved on to resistance testing:
and then there was an ambush... none of the resistance test positions work - the screen is dead. And the continuity of the diodes is also deader than dead...
We started to take it apart again and see what could have happened. I got in the way as best I could and, at my request, they changed two resistors: 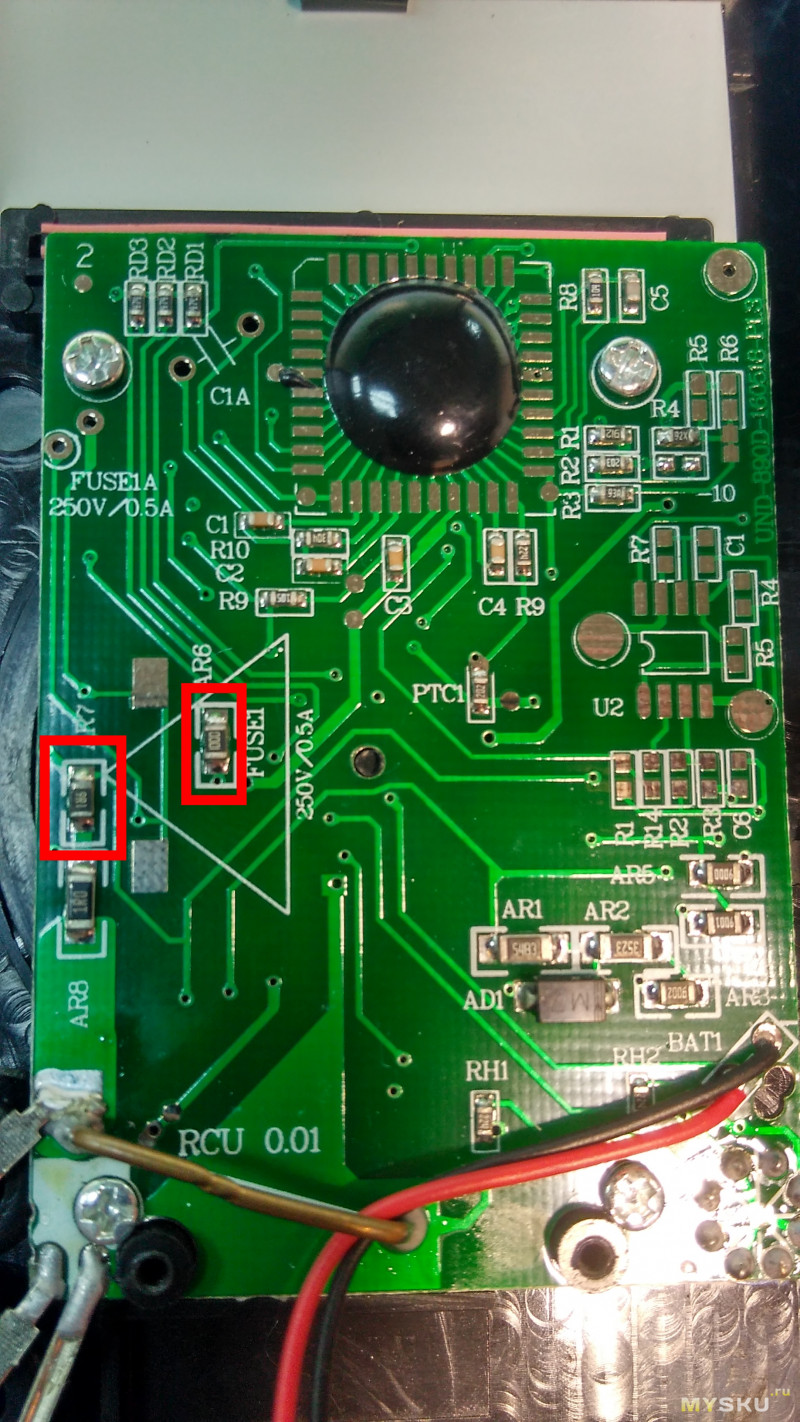
at 10 and 9.1 Ohm - it didn’t help. We fussed about for half a day, then I said that for now it’s enough to suffer and we need to think...
I just felt terribly uncomfortable in front of the person that I was distracting him for 120 rubles...
Dear experts! And now - attention, question!
Maybe someone knows how to treat my patient? It's not a matter of money spent on it, it's a matter of interest and excitement. I saw that I wasn’t the only one who ordered it... maybe someone is now sitting and quietly giggling (or a villainous laugh can be heard)))
The probe resistance is approximately 0.3 Ohm. It was not possible to measure the readings of the multimeter itself...
Results:
According to the Master, the multimeter is quite accurate for its price category.
For home use it will cost 120 rubles...
Even after using it to make fire, more than half of the functions work :)
Minuses:
It works great! (I also advised the Master to put it on the table when they climbed into 220, and not to hold it in his hands)
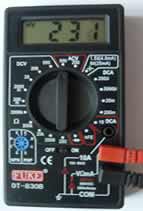
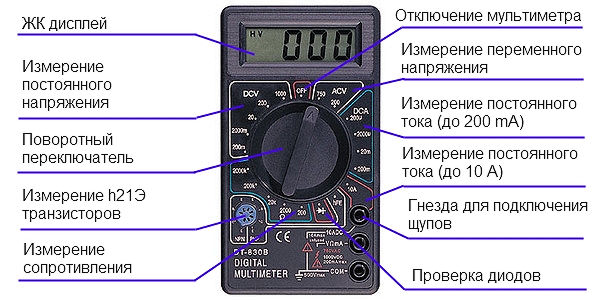
MULTIMETER DT-830B
The front panel of the multimeter has a multi-position switch, an LCD indicator, sockets for connecting probes and a transistor test connector. The device is powered by a 9 volt Krona battery.
By the way, if something happened to the wiring in your house or you are planning to replace all the wiring in the near future, contact our sponsor, Sergei Biryukov, who provides electrician services in Moscow. This electrician will do everything in at its best and for centuries. Depending on the work performed, the warranty ranges from 1 to 15 years. By the way, the cost of the work can be found on the website http://sergeyelektrik.ru
The switch positions are divided into the following sectors:
OFF/on- device power switch.
DСV- DC voltage measurement.
ACV- AC voltage measurement.
1.5v-9v- checking batteries.
DCA- direct current measurement (ammeter).
10A- for measuring of great importance DC (according to the instructions, measurements are carried out within a few seconds).
hFE- transistor measurement switching sector.
Diode- sector for checking diodes.
Ohm- resistance measurement sector.
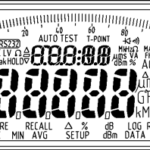
DCV sector
On this device, the sector is divided into 5 ranges. Measurements are taken from 0 to 500 volts. We will encounter high DC voltage only when repairing a TV. This device must be operated with extreme caution at high voltages.
When switched to position "500"
volts warning appears on the screen in the upper left corner H.V., that the highest level of measurement is turned on and when large values appear, you need to be extremely careful.
Usually, if you do not know the value of the voltage being measured, the measurement is carried out by switching large positions of the range to smaller ones. For example, before measuring the voltage on the battery of a cell phone or car, on which the maximum voltage is written 3.7 or 12 volts, then boldly set the sector to the position "20"
volt. If we bet on a lower one, for example, on "2000"
The millivolt device may fail. If we set it to high, the device readings will be less accurate.
When you do not know the value of the measured voltage (of course, within the framework of household electrical equipment, where it does not exceed the values of the device), then set it to the upper position "500"
volts and take a measurement. In general, you can roughly measure, with an accuracy of one volt, at the position "500"
volt.
If greater accuracy is required, switch to the lower position, only so that the value of the measured voltage does not exceed the value at the position of the device switch. This device is convenient in measuring direct current voltage in that it does not require observance of polarity. If the polarity of the probes ( "+"
red "-"
black) will not coincide with the polarity of the measured voltage, then the sign will appear on the left side of the screen "-"
, and the value will correspond to the measured one.
ACV sector
The sector has 2 positions on this type of device - "500"
And "200"
volt. Handle 220-380 volt measurements with great care. The procedure for measuring and setting positions is similar to the DCV sector.
DCA sector
It is a direct current milliammeter and is used to measure small currents, mainly in electronic circuits. To avoid damage to the device, do not place the switch on this sector; if you forget and start measuring voltage, the device will fail.
There is also a 10A position for measuring direct current (amperemeter). Measurements are made by moving the wire from the second socket to the 10A socket. If you need to measure the current of any electrical appliance, you can use an ammeter, but again with great care. The instructions for the device say that current measurements should be taken for several seconds, but I would not recommend using this opportunity again.
hFE sector
To measure transistors, there is a socket indicating which socket and which leg of the transistor to place. The transistors of both are checked n-p-n And p-n-p conductivity for breakdown, break. Shows the static current transfer coefficient (only silicon - CT).
Sector Diode
Shows the voltage drop across the junction, from 400 to 700mv in the forward direction on a working diode and infinity, i.e. one on the left in the opposite direction.
On a faulty one, in both directions:
1. Close to zero - breakdown value.
2. Close to infinity - break.
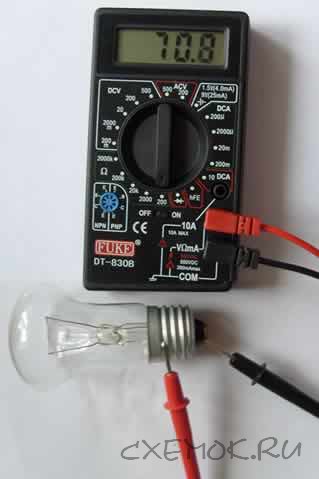
Resistance measurement sector (ohmmeter)
Divided into positions from 200 ohms to 2 megohms (2,000,000 ohms). You can measure resistance from 1 Ohm to 2 MOhm with the following nuances:
Firstly: The Chinese multimeter is not an accurate instrument and the error in its readings is quite large.
Secondly: unpredictable high sensitivity for precise measurements. In this regard, when the probes are connected to each other, the device indicates the resistance of the circuit, which should not be neglected, but considered as the resistance of the wire on the probes, i.e. when measuring small resistances, you need to subtract from the result the value obtained by shorting the probes.
For example:
We measure the resistance of the lamp, since the lamp has a small resistance, set the device to the 200 Ohm position. First, we connect the probes to each other. My device showed 0.7 Ohm - we will subtract this after measuring the resistance we need. We measure on a lamp, we get 70.8 - 0.7 = 70.1 Ohm. Please note that the readings are approximate, but in cases with household electrical appliances this is sufficient. Working up the sector's range is not difficult. If you see a unit on the screen on the left, then the resistance is greater than the set position of the switch, and if there is a unit on the screen at the switch position of 2000 KOhm, then the circuit can be considered open. When numbers appear, there is some resistance in the circuit.
Battery Replacement:
As soon as you notice a failure on the display, numbers disappear or the readings do not correspond to the approximate values, then it’s time to replace the battery. We take a small Phillips screwdriver, remove the back cover and replace the battery. Let me remind you that the device is powered by a 9V Krona battery.
You can buy a multimeter cheaply.
Recently, inexpensive compact digital multimeters have replaced the warning light to help motorists.So, what is a multimeter?
A multimeter is a multifunctional (from the word "multi"), universal device that combines the functions of a voltmeter, ammeter and ohmmeter. That is, it allows you to measure the voltage and strength of alternating and direct current in networks, as well as the resistance of conductors.
Along with these basic functions, the multimeter also has many additional ones, depending on the model and price of the device. For example, functions such as a temperature probe, a circuit testing mode, a mode for checking diodes and transistors, capacitors, a memory function and others.
For a car enthusiast, usually the functions used are limited to the ringing mode and voltmeter.Let's consider the most common and affordable multimeter, and the one I use, DT-832 under the TEK brand.
| Fig.1 |
The number 832 tells us that the device has an audible indication of circuit integrity - a very useful function. Also included in this series are DT-830 - has no sound indication, DT-838 - has an additional temperature probefor measuring surface or liquid temperature.
The device allows measurements at temperatures from 0°C up to +40 °C , although I had to take measurements at -20°C . Measurement accuracy +-1%.
It is also worth mentioning that this device is produced under various brands, although, in fact, the filling is the same everywhere (China).
So, the delivery set includes the multimeter itself, two test leads for it and instructions. The power source - a 9V Krona battery - is already inside the device; by the way, to replace it you will have to remove the back cover.
This device allows us to measure only direct current strength up to 10 Amperes, direct voltage up to 1000 Volts, alternating voltage up to 750 Volts, resistance up to 2000 kiloOhms, as well as the health of diodes and transistors, availablesignal generator function 5V 50Hz (radio electronics engineers will understand, but we don’t really need this).
The multimeter is equipped with overload protection in the form of a 200mA 250V fuse, also located in the housing.
There are no instructions as such, just a list of device parameters.
So, what do we see on the instrument panel?
Firstly, there is an LCD display displaying the measurement results; under it there is a multi-position switch for modes and limits, three sockets for probes, as well as a socket for testing transistors.
A black “negative” probe is inserted into the lowest connector under the designation “COM”, the top two are intended for the red “positive” one.
“VΩmA” - middle socket, used to measure voltage, resistance and current up to 500mA, that is, up to the 200mA limit on the switch scale. This line is protected by a fuse.
“10A” is the lower socket, used only for measuring current in the range from 200mA to 10A. Not protected by a fuse, which means if the threshold of 10A is exceeded, the device may fail - simply burn out.
Now let's move on to measurements. But first one thing important rule: if you do not know the approximate value of the current parameter being measured, then start from the highest limit
(does not apply to resistance measurements).
1. AC voltage measurement
In this mode, we can, for example, measure the mains voltage in a regular household outlet. Since we know that the voltage in the network should be about 220V, we set the switch to the limit of 750V, otherwise the fuse will blow. It should be connected in parallel to the terminals, as shown in the diagram (Fig. 7), with or without a consumer. In our case, we simply insert the probes into the holes of the socket.
Do not touch the metal parts of the probe under any circumstances, and also make sure that their insulation is not damaged!
As we can see, at the moment the voltage in the network is about 245 V, which is at the upper limit of the norm for household networks. You can, for example, connect a kettle or iron to a nearby outlet to measure how the voltage drops under load.
2. DC voltage measurement
As we know, constant voltage is present in batteries, ordinary batteries, chargers and power supplies. We can measure all this in the same way as when measuring alternating current. However, polarity must be observed here, otherwise the display will show “negative” values. This function of the multimeter also allows us to find wires with "+" or "-".
In the case of a car, we can safely set the switch to the 20V limit and measure the voltage in the car’s on-board network, at the battery terminals, generator outputs, or its drop under load.
3. DC current measurement
The current strength is measured only when the consumer is connected, i.e. under load. Multimeter probes are connected in series into an open circuit BEFORE consumer.
Under no circumstances should you connect directly to an outlet or battery - the multimeter will immediately break down!
For example, let's determine the current strength in a circuit consisting of a 1.5V battery and an indicator screwdriver with a light bulb. To do this, set the highest limit to 10A, move the red probe to the upper power socket. We break the circuit and connect one probe to the positive “+” output of the battery, and the second to the input of the lamp - it shows a value of 0.04 A, now we lower the limit and get a more accurate value of 0.4 mA.
I would like to note that we will not be able to measure the current in a 220V network; the device does not have this function.
Measuring the current consumption allows us, for example, to calculate the required wire cross-section for additional equipment in a car.
4. Ringing of circuits and diodes.
In this mode, we can check sections of the circuit for open circuits, as well as the serviceability of diodes and LEDs.
Measurements, as in the case of resistance testing, are carried out with the power source turned off. To search for a break, we connect one probe to one end or point of the circuit, and the second to the other, and if the circuit is working properly, we will hear a characteristic sound signal and the display will show near-zero voltage drop values. If there is a break somewhere, then the sound signal will not sound, and the display will show the number “1” in the left corner - this means “the resistance tends to infinity,” i.e. the circuit is open.

In conclusion, I would like to give some tips on choosing a car multimeter:
1. Choose a model with built-in sound indication, it helps a lot.
2. With a fuse that can be replaced, otherwise the device can be considered disposable, errors will still occur.
3. With a rubberized body.
4. Preferably with a retractable stand.
But for the first acquaintance, the simplest one will do, so you don’t mind.
Subscribe to the blog! Good luck on the roads!
The multimeter is designed to check parameters electrical networks and electronic components. To an inexperienced person, operating this device will seem difficult. But in fact, it is enough to understand the principle of taking readings and setting settings. After this, it will seem that without it you can’t even change the socket, and this is true.
Multimeter capabilities
What kind of device is this, and what functions can it perform? At the first stage of familiarizing yourself with the operation of a multimeter, you need to understand its settings and capabilities. On almost all models, the designations are written in Latin letters and are abbreviations or abbreviations from English terms.
Now, knowing the “language” of the device, you can begin to study its capabilities. The name multimeter (or multitester) means a wide range of measurements of various electrical quantities:
- Constant and alternating voltage and current.
- Resistance value.
- Capacity. This feature is found mainly only in professional devices.
For household needs, you can purchase a standard digital multimeter with an optimal set of functions. Since domestic manufacturers practically do not produce devices of this class, the choice is made on foreign digital multimeters.
The operating panel of the device is divided into two conventional sectors - the LCD display and the settings block. The latter most often represents a circular switch with markings applied around it. It, in turn, is divided according to the measured quantities with the maximum value of the measurement boundaries.
Measurements are performed using probes, which are installed in special sockets on the device.
Before testing begins, the batteries and functionality of the device are checked. By turning the switch to any position other than “Off,” the indicator should display zeros. Now you can begin measuring the quantities of interest.
First, the upper limit level is set. For example, for a constant voltage it can be from 200 mV to 1000 V. If at least the order of the value is known, the upper limit closest to it is set. Otherwise, it is recommended to set the maximum value and reduce it until numbers other than zero appear on the indicator during the measurement process. If you do not follow this technique, there is a possibility of device failure.
Voltage
Almost all household appliances and batteries operate on constant voltage. This is the most frequently measured quantity. The first experience of taking testimony will begin with her.
We install the probes in accordance with the color markings. If this is not observed, find the designation “+” or “-” on the probe body. After this, the maximum value of the constant voltage force is set. In our case, this is 1000 V. Next, the probe contacts touch the corresponding poles of the element under test. In this case, you don’t have to worry about incorrect polarity - the value on the screen will only change its sign.
Lowering the limit limit by switching the handle, we stop when stable readings appear on the display.
AC voltage measured according to the same principle. The exception is the lack of polarity.
Current
 When measuring DC current, you should consider in advance how the multimeter will be connected to the circuit under test. This task is considered individually for each case. If you have no experience in drawing up such diagrams, it is best to study the theory first. Otherwise, there is a high probability of damage to the multimeter.
Another important point is the location of the probes in the sockets. If the desired current parameter is guaranteed to be less than 200 mA, then their location remains standard. But for readings above 200 mA and up to 10A, one of the probes is installed in a special connector.
Below are the most simple examples measuring current strength of various magnitudes.

Resistance
Measuring resistance values can be useful not only for checking electrical network parameters. This function will be useful when installing electric underfloor heating or any other heating systems that run on electricity.
The measurement principle is completely similar to the steps of finding the value of constant voltage. It is necessary to move the toggle switch to the desired sector.
Professional electricians and electronics engineers, in addition to these basic types of readings, know many other parameters that can be found directly or indirectly using a multimeter. But for everyday needs, the information described above will be enough, and soon using a multimeter will be as familiar as

